BFCM Conversion Tactics: Smart Bundles, Flash Sales & Scarcity Marketing
Reading Time: 13 minutesStill approaching BFCM with generic discounts, last-minute price cuts, or scattered promotions?…
Do you wish to learn how to connect your Facebook Page to Instagram? Then you have landed on the right page!
In 2012, Facebook acquired Instagram and since then it has started to streamline several cross-app functionally between the two apps for businesses.
Recently, with the new update of Facebook Business Extension, it allowed brands to improve their business management from one platform. Apart from cross-selling on the two platforms, Instagram Shopping also presented the opportunity to come in contact with audiences that had the same interest, and make the platform more interactive for businesses as well as customers.
While getting onboard to Instagram Shopping, the basic requirement required to be eligible for Instagram Shopping is having a Facebook business Page. Explore further to understand everything that will help you to leverage the potential of new social networks.
In this quick set-up guide we will walk you through all the necessary information you need to learn when trying to connect your Facebook page to Instagram shopping.
The first step to sell on Instagram Shopping is to have a Facebook business page. If you are already selling across Facebook surfaces, you can easily connect your Facebook page with Instagram Shopping through the Facebook Business Partners. Or you can create a new Facebook page.
To create a Facebook business page, you need to adhere to the following requirements:
Note: The admin of the page can manage the page role and permission.
Whether you are an individual seller or own an online business store, when you link Instagram with your Facebook profile, you will experience several benefits that will help you to improve your business management, as well as customer reach. Here are some of the key benefits that you will experience when you link accounts together.
To create a Facebook business page, you must follow the set-up procedure as per the given steps:
You can also view details such as the total number of visitors and page engagements through the ‘Page Insights.’
If you want to sell on Instagram Shopping, you must ensure to have a ‘Shopping Template’ on your Facebook business page. For this:
Shopping on Instagram enables you to tell your brand story and highlight products seamlessly, so people can easily shop in the moment of discovery. Businesses like you can use real-time and pre-made content to create an interactive, visual shopping experience for your customers. Make sure you connect your Facebook Page with Instagram Shopping.
After setting up your Facebook Page Template; you need to convert your Instagram personal account to a business profile. This is because, through an Instagram business account; you can provide more information to your audience about your products and services. However, to set up your Instagram business profile, you need to follow specific steps.
If you opt for checkout on Instagram, you need to either connect your Instagram account or Facebook business page with Commerce Manager. Then, follow the next step to know more about it.
The checkout on Instagram is currently available for US merchants and will be rolling out in more countries.
With a Commerce Manager, you can enable people to checkout on Instagram or Facebook. Suppose you are a business based in the US. In that case, you can leverage this opportunity and make it easier for your customers to discover, browse, and complete their purchases without leaving the app.
To set up your store with checkout, you need to click on ‘Create your Commerce Account’ and follow 3 important steps:
First, provide the ‘Business information’ like business name, contact details, email address, etc. After this, connect your Facebook page with a commerce account and then with a Business.
Next, set up your shop policies which include adding a catalogue to your account, setting up your delivery option, and return policies.
Last, provide your bank account details and required information like your federal tax identification number, state tax id number, the business representative’s name, etc., to receive the payouts.
“To learn more about Commerce Manager and how to set-up a Commerce Manager, read this helpful guide.”
Note: Through the Commerce Manager, you have to upload the products manually.
You can also connect with Facebook Business Partners to have a seamless selling experience across Instagram surfaces. The partner’s integration app like Facebook & Instagram Shopping and Social Commerce helps you with easy onboarding and a hassle-free selling experience. Besides with the latest Facebook Business Extension let you seamlessly connect your Facebook Page with Instagram Shopping.
The Facebook catalogue features the products and holds the information of all the products that you want to sell across Facebook commerce. So let’s uncover how you can create a new Facebook product catalogue.
Through Catalog Manager OR Facebook Business Partners: After setting up your Facebook business page, you can create a catalogue through Catalog Manager or Facebook Business Partners. The partner’s solution like Facebook and Instagram Shopping, and Social Commerce helps you establish your catalogue through the app and lets you sell seamlessly across the platform.
After setting up your Facebook page catalogue, you can connect your Facebook Page with your Instagram Shopping profile. Nevertheless, you can connect your Instagram profile with the Facebook page from two places:
On Instagram
To connect your Facebook Page with Instagram Shopping:
On Facebook
To connect your Facebook page with your Instagram business account:
After adding your product catalogue and connecting your Facebook Page to your Instagram profile, you can send your account for review. Once approved, you can enable the Shopping feature. Also, in case your Instagram Shopping account does not get approved, try to find out the reasons, and re-apply it following the right solution.
Instagram Shopping makes it easier for you to tag your products in posts, stories, and live features. For adding tags in the posts, you simply have to ‘Select the image,’ tap the product in the image and ‘Enter the name of the product you want to tag’ with the image. Not to mention that you can tag up to 5 products per single image & video post.
Instagram Shopping reduces the hassle of purchasing, making it easier for shoppers to browse, discover, and buy products of their choice. Grab this opportunity to enhance your business and reach your targeted audience through Instagram Shopping.
If you are already leveraging the advantages of Facebook surfaces, then it is time to take your product to the next level with Instagram Shopping; which opens up another window for your brand to grow organically nonetheless from a single immersive shop setup.
When you connect your Facebook page with Instagram, it can help you to save a lot of time. It provides you the feasibility to publish and schedule posts from a single space, and cater to a more relevant audience. Additionally, it also provides you with more detailed insights and compares them. Have questions racing in your mind? Drop in the comments section, and it will be taken care of.
Reading Time: 13 minutesStill approaching BFCM with generic discounts, last-minute price cuts, or scattered promotions?…

Reading Time: 3 minutesTikTok Shop reached a major milestone during its largest U.S. “Global Black…

Reading Time: 3 minutesOpenAI has announced a new AI-powered shopping research tool designed to help…

Reading Time: 9 minutesIf your TikTok Shop listings often sit in review or your visibility…

Reading Time: 3 minutesAmazon has rolled out a new “Seller Challenge” feature for eligible Account…

Reading Time: 3 minutesWalmart Marketplace has sharpened its requirements around product classification (category, type group,…

Reading Time: 3 minutesJust ahead of Black Friday, Amazon is enforcing tighter controls on its…

Reading Time: 11 minutesWhere holiday prep of past years focused on legacy channels like Amazon,…
Reading Time: 11 minutesThe eCommerce shift you actually need to act on Multi-channel fulfillment has…
Reading Time: 10 minutesBlack Friday Cyber Monday (BFCM) isn’t a weekend anymore; it’s a two-month…
Reading Time: 2 minuteseBay is quietly testing a new feature that could reshape how buyers…

Reading Time: 2 minutesAmazon is stepping into a new era of value commerce with the…
Reading Time: 11 minutesThe $240 Billion BFCM Opportunity & Why Operations Matter Every seller, business,…
Reading Time: 7 minutesTL;DR — Your 60-Second BFCM Battle Plan Time remaining: 3 weeks until…

Reading Time: 2 minutesChina’s Double 11 shopping festival — the world’s largest annual online retail…

Reading Time: 2 minutesAs the holiday season approaches, TikTok Shop has released its September 2025…

Reading Time: 3 minutesIn a continued effort to enable sellers and stimulate new product launches…

Reading Time: 2 minutesAs global trade enters a new phase of regulation and cost restructuring,…

Reading Time: 2 minutesOpenAI Turns to Amazon Web Services in $38 Billion Cloud Deal: What…
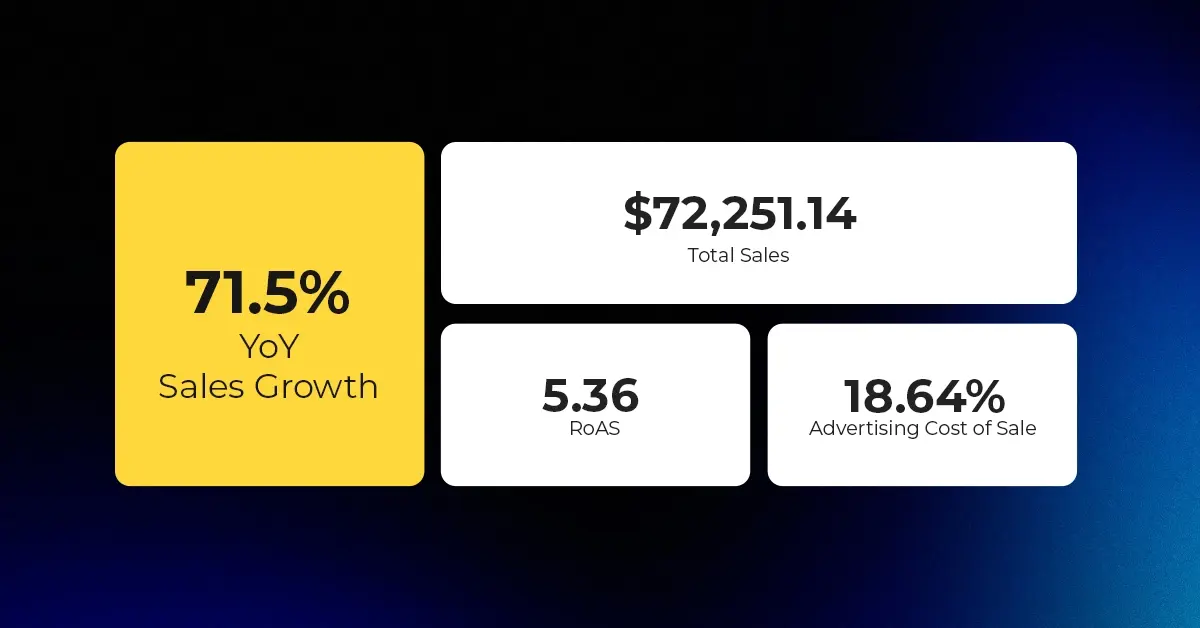
Reading Time: 4 minutesAbout the Client TMRG is a global health and wellness brand with…