
Adobe Sees 520% Jump in AI-Assisted Holiday Shopping
Reading Time: 2 minutes Key Highlights AI-driven traffic to U.S. retail sites will increase by…

Running short of time? Get PDF of the blog in your mail.
Jet Magento Integration extension, a popular extension created by CedCommerce helps in integrating Jet store to Magento store. Jet.com is a popular E-Commerce website which based on the Shopping Club Model. CedCommerce wanted to provide a mechanism to its customers where they can directly upload their products from Jet store to Magento store. Therefore, we at CedCommerce created Jet Magento Integration extension to provide a solution to this problem. We feel privileged when we got this opportunity as something like this hasn’t been developed yet. We are the first one to develop an extension which integrates Jet store with the merchant’s Magento store.
Jet.com is not functional anymore. If you want to continue selling your Jet.com inventories, we can assist you in shifting them to Walmart till July 16, 2020. This is not an automatic process, sellers will have to place a request through the Walmart Seller Center or Contact us. If you are a new seller wishing to sell on Jet.com, don’t be disheartened, we can help you sell on Walmart.com instead.
To achieve this target we indulged ourselves in the continuous communication with Jet Team. They helped us in this process and with their API as well. Our panel of expert developers held rigorous discussions to decide the layout and flow of this extension. We wanted to make sure that we include all the relevant features and functionalities to facilitate our customers to fulfill all their necessary requirements with our Jet Magento Integration extension. We established the integration of Jet.com and Magento with the help of Jet REST API which is open for everyone to use.
Our product is very useful and effective for the merchants as it provides several features. From creating categories in a similar fashion as in Jet.com (with all the nesting included) to viewing the status of the products uploaded on Jet.com from Magento, facility for shipment, return, refund all are provided in our Jet Magento Integration extension. Buy our product and trust me you will have a good experience. Moreover, we provide every kind of support related to the extension and also offer customization as per your needs. It will be a total Value for Moneything for you.
Let us now see how it works!!
Jet-Magento Integration, an extension by CedCommerce, establishes synchronization of inventory, price, other details for product creation and its management between Magento store and Jet.com. The smooth harmonization is established with help of Jet.com REST API.
4. Admin can manage returns & refunds of jet products.
In this extension currently we have provided support for two types of products Simple and Configurable which means only two types of products can be uploaded to Jet.com.
If a merchant wants to upgrade or reinstall module from Magento Connect manager then he needs to remove the folder “jetcsv” from his Magento “var” directory.
In order to obtain Jet API key, Jet Secret key and Fulfillment Node Id the merchant needs to go to https://partner.jet.com/ and login to his account.
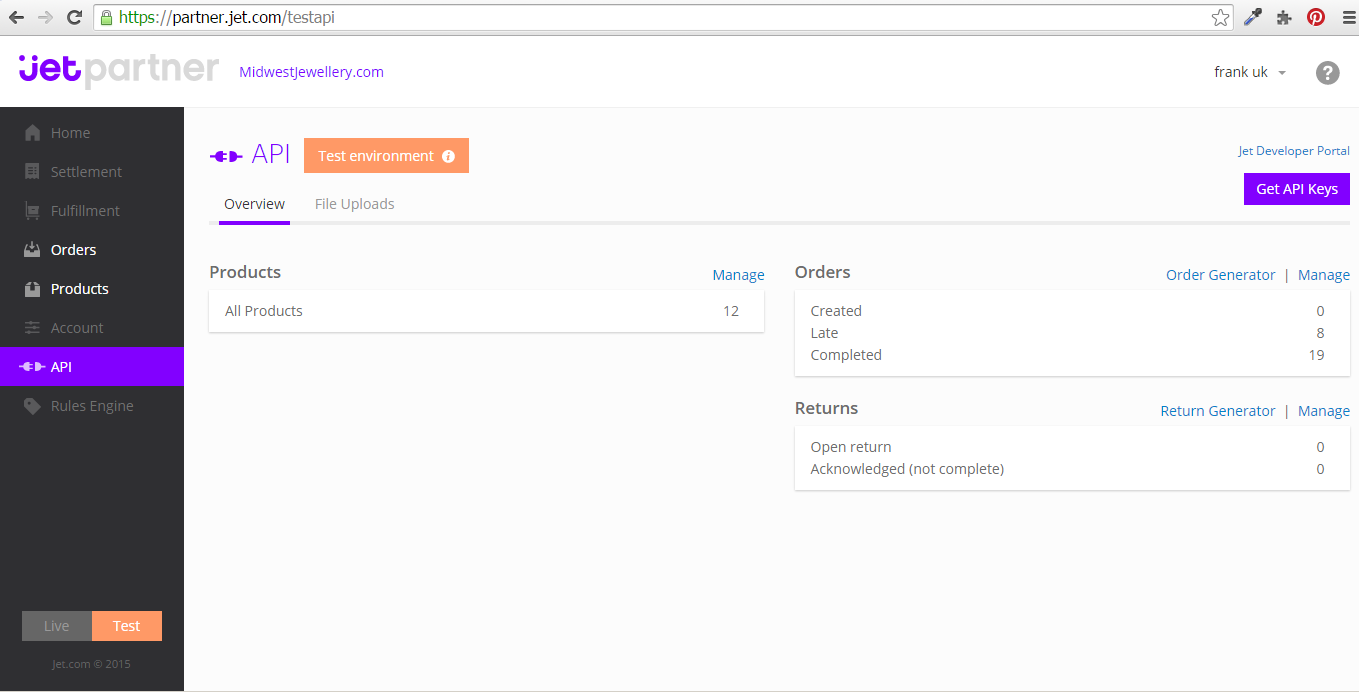
After that obtain the API key and Secret Key and generate a Fulfillment Node as per Jet specifications to have a Jet Fulfillment Node Id. These details will be used in the configuration settings in the merchant’s admin panel.

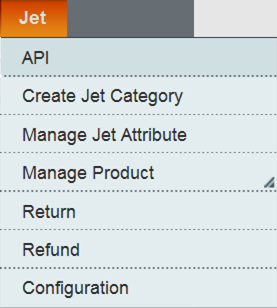
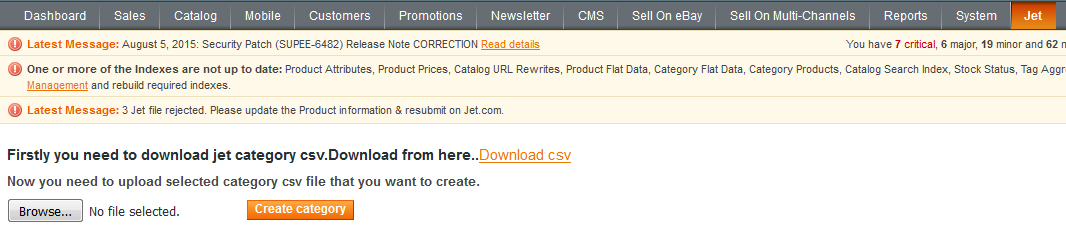
Once the merchant installs this extension, configuration settings will be created in his Magento admin panel’s System Configuration named as ‘jet configuration’ under CedCommerce Extension tab, as well as a menu will be added in the menu section named as jet that will consist of all the panel listing. This extension will also create a tab in the product’s general tab named as jet.com which will list all the created jet.com attribute. That we will explain later.
The Configuration Setting can be done from here with jet com

Here the merchant needs to enter API URL, API username, API password, fulfillment node id and Email Id. In the Email Id field, the merchant can provide his email id if he wants to receive the notification regarding the orders placed; otherwise a default id will be used which is sales@test.com.
In the Return Location, the merchant needs to enter the address where product has to be returned if any return is generated for completed orders. These configurations are mandatory to set before integrating Magento store with jet com.

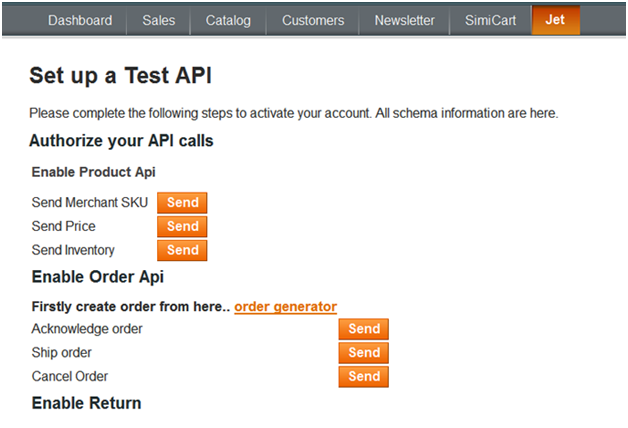
To integrate Magento store with jet.com firstly merchant need to enable his API set up on jet com. Before enabling Jet API panel the merchant need to make sure that Magento cache is disabled. After testing all the API the cache can be enabled. If any merchant has created his account on jet .com and not enabled his API yet then he can enable his API panel from jet->API in the menu section. It will open a page asking ‘Set up your test API’.
1. Enable product API
To enable the product API, the merchant needs to send sku, price as well as inventory. So a setup has been prepared. For this the merchant only needs to click on Send button. Once your product information will be send, button text will be changed to Send Successfully.
2. Enable order API
To enable order API on jet.com the merchant needs to create an order from Order Generator. For this a link has been given named as Order Generator, it will redirect the merchant to jet.com order generator. Once the order has been created the merchant has to send Order Acknowledge.
To enable Cancel Order the merchant needs to click on the Send button besides Cancel Order. Once the order information will be uploaded successfully, the button text will be changed to Send Successfully.
3. Enable return API
Return API used to manage Returns generated for the completed order on jetc.com. To enable return API merchant needs to click on Send button besides Enable Return. Once the return is complete, the button text will be changed to Send Successfully.
To upload a product on jet.com, a jet category must be assigned to it. For this the merchant needs to create a jet category which can be done with the help of a csv file having all the categories that have to be created in Magento.
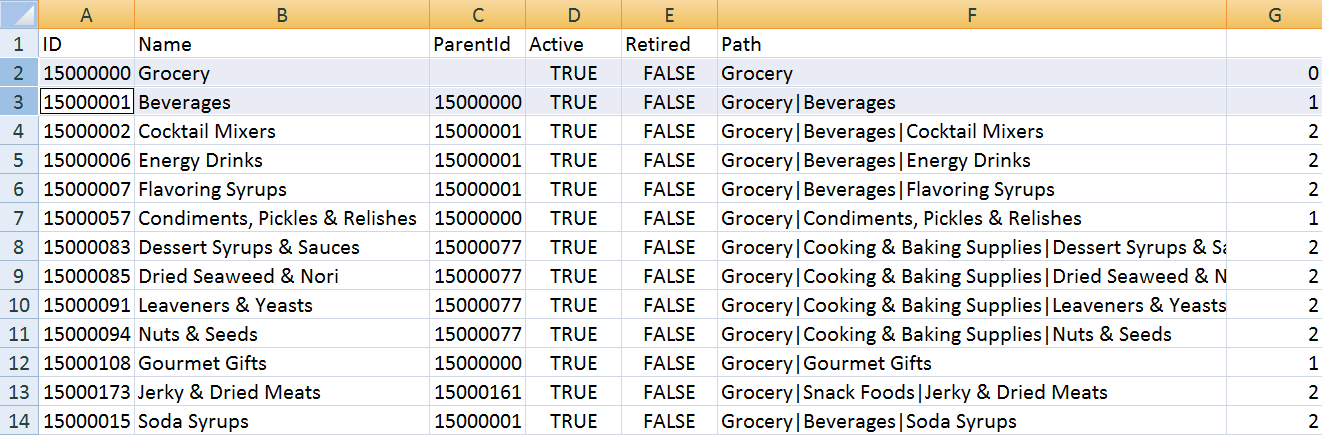
The CSV file to be uploaded should follow the given format
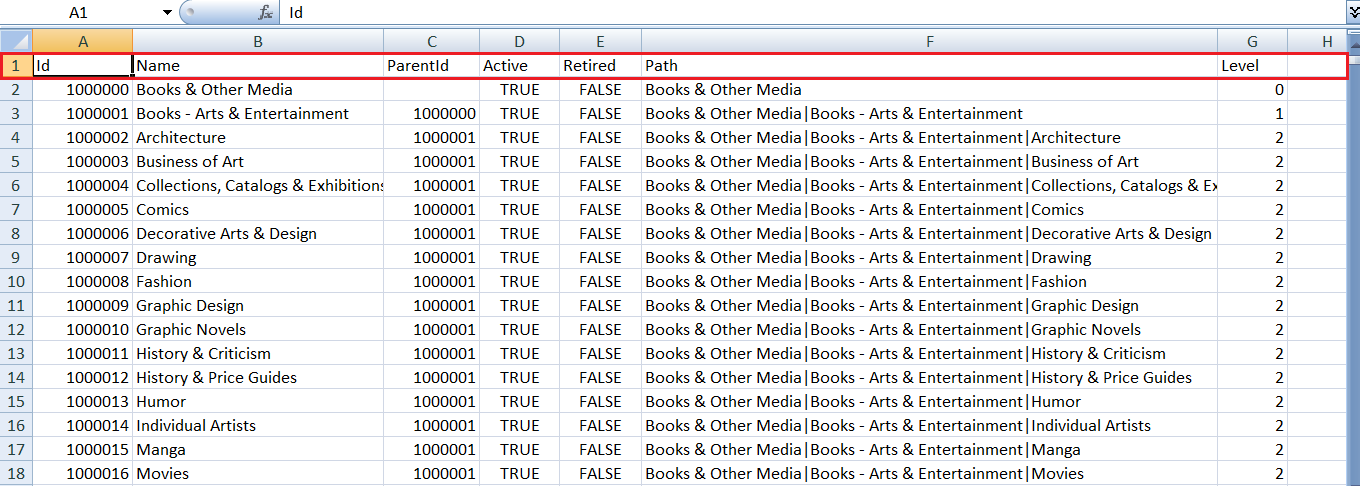
One thing to note here is that the column headings (shown in red in the above image) in the csv file to be uploaded should be exactly the same as given above in the sample csv file so as to ensure proper creation of categories.
While creating your own csv, it is important to keep in mind that, if you are creating a second level category then its parent level categories should also be mentioned along-with their ids in the csv file. If not 0th level category then atleast 1st level category must be mentioned in the csv alog-with its parent id in the csv file.
For example, Grocery (0th level) is the parent of Beverages (1st level) and Beverages is the parent category of Cocktail Mixers (2nd level). Therefore, to add any 2nd level category merely defining it in the csv is not enough. Its parent level categories should also be defined. This is done because for 2nd level category its parent category (1st level) could be obtained by its parent id but for the 1st level parent category its corresponding 0th level parent category cannot be obtained because there is parent id as 1st level category is not even defined. Therefore, defining at least 1st level parent category is necessary.
If this procedure is not followed then following notification error will be generated:-
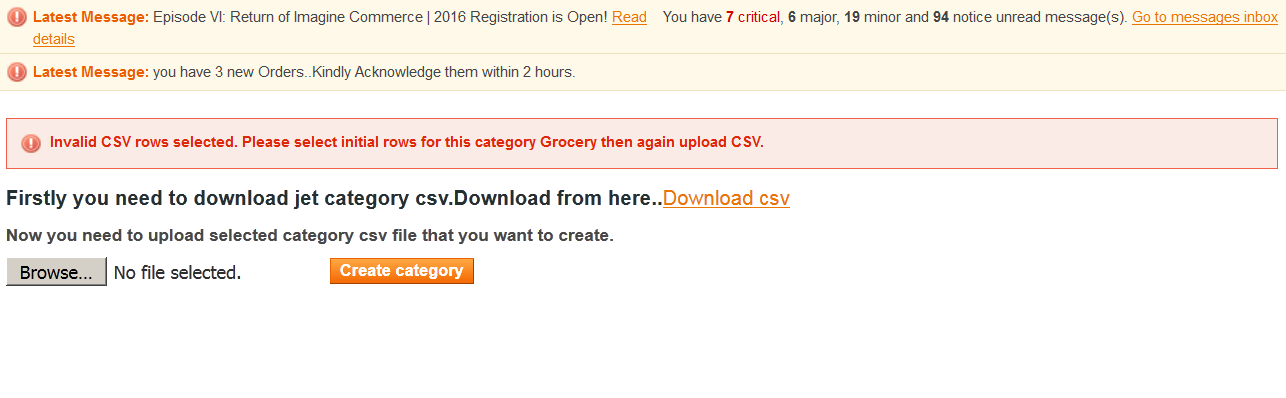
To create a jet category, a category csv has to be downloaded. To download the csv the merchant needs to go to the Magento admin panel and from the menu section select Jet->Create Jet Category. This will open a page which will provide a link for downloading jet category. After downloading the jet category, the merchant needs to create a csv file of the categories that he wants to have. After that he should click on the Browse button and upload the csv of the selected categories and those many categories will be created.
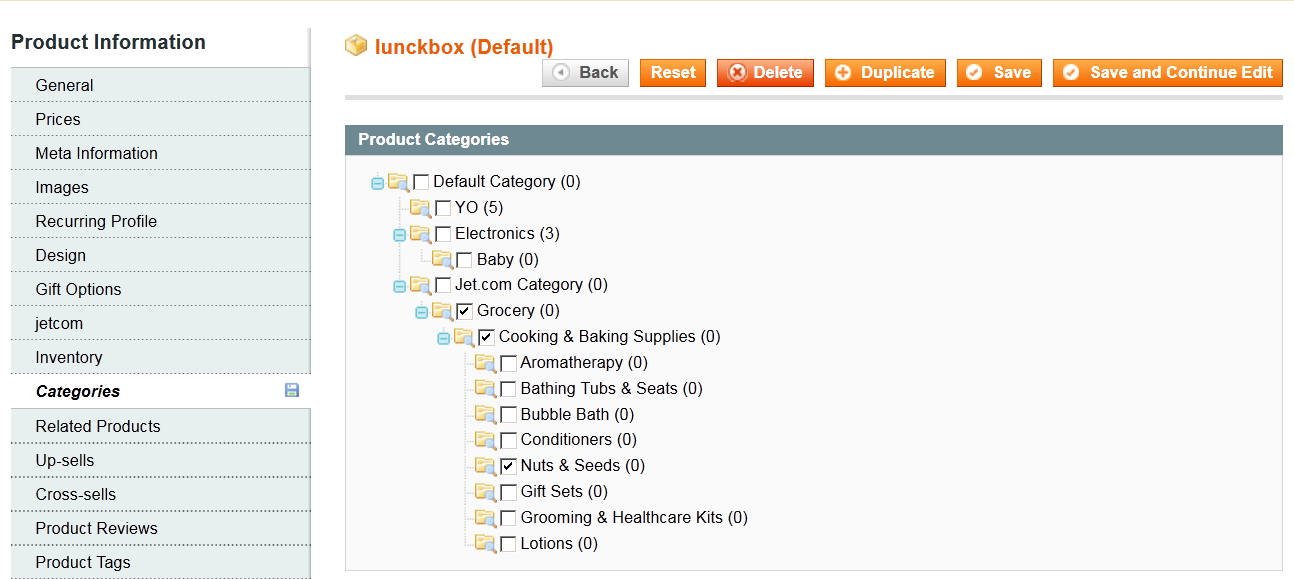
After the categories get created in Magento, they need to be assigned to the products. For this purpose, the merchant should go to Catalog > Manage Products > Select the product to be edited and locate the Categories tab. There he will find all the categories listed in the same manner as they were in Jet.com. Now, he should a category which has to be assigned to the product. But, a product can be assigned to a single category only as this is the specification of Jet.com and we have to follow it.
If there is nesting of categories (say 3 level nesting) then the product should be assigned either to the parent category, or to the child category or to the sub-child category, but NOT to all 3 of them or any 2 of them. Every product should be assigned only to a SINGLE Jet Category. For instance, if there is a product (say “Plum Seeds”) and it falls under 3 categories having parent-child relationship (say Grocery, Cooking & Baking Supplies and Nuts & Seeds) then Plum Seeds should either be assigned to Grocery or it should be assigned to Cooking & Baking Supplies or to Nuts & Seeds but, not to all 3 of them or any 2 of them.
Note: One product should be assigned to only Jet Category and not more than that. A category can have multiple products but a product should be mapped to only one category.
Jet has a different procedure for attribute mapping. In Magento the attributes are assigned to the products whereas in Jet the attributes are assigned to the categories. Every Jet category has a specific set of attributes (not attribute set just a certain number of attributes) associated to it.

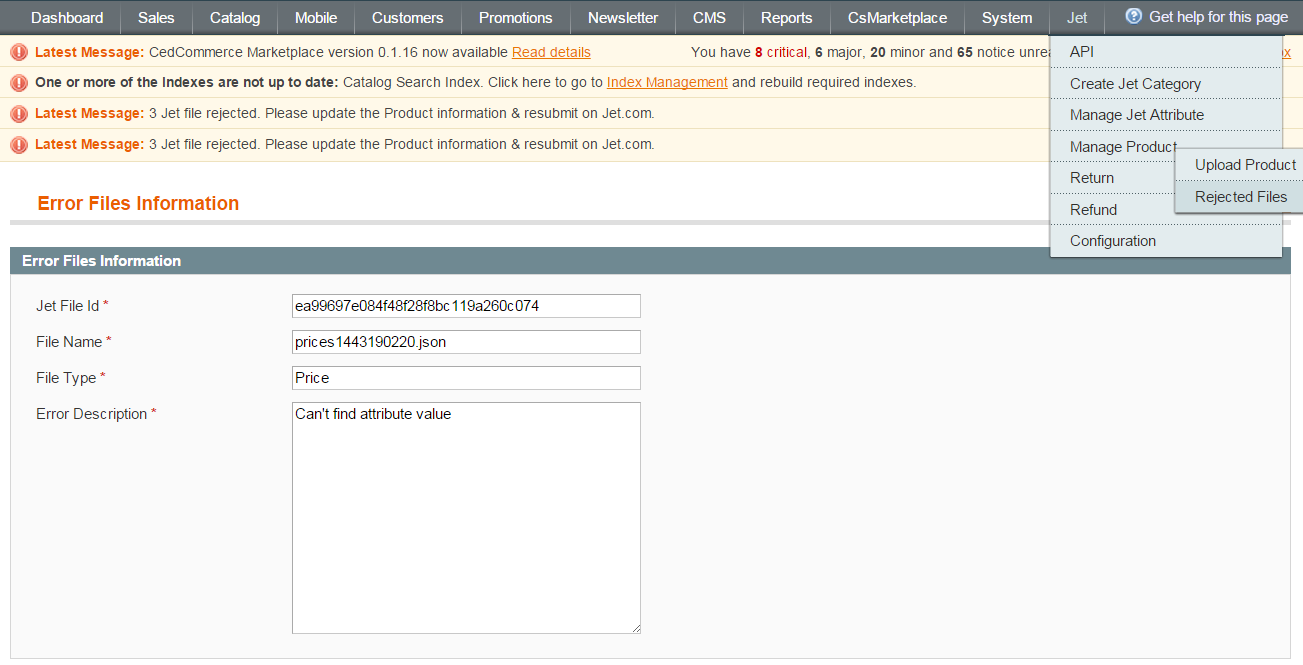
The value of these attributes is necessary to be provided as if any required attribute will be found missing by jet, then Jet will throw related errors (which could be seen in Jet > Manage Products > Rejected Files > Error Description section) and the product won’t be uploaded on Jet.
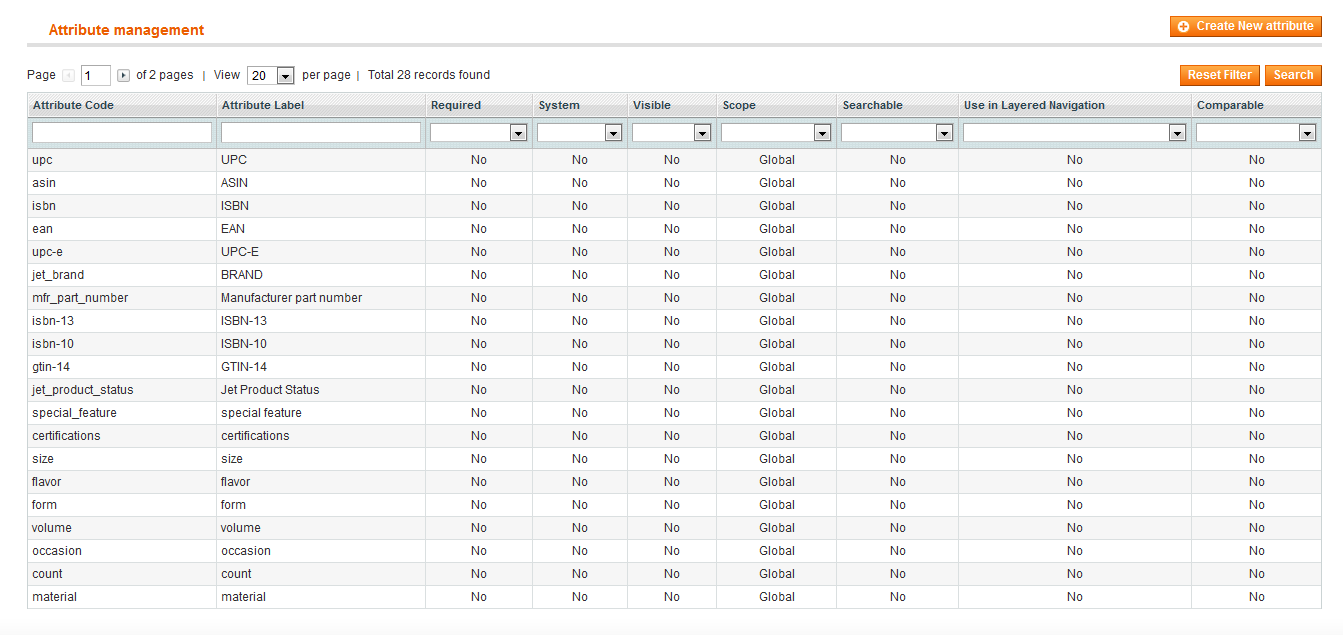
Since jet categories have some pre defined attributes, so the merchant needs to create the attributes after creating categories. For this he should go to Magento admin panel and select Jet->Manage Jet Attributes and click on the Create New Attribute button. It will create an attribute related to jet category. All the created category attributes will be listed in jet Manage Attribute panel. It will create three types of attribute – Text, Text with unit and Dropdown/List. For Dropdown type of attribute, the merchant needs to add options on his own. Currently we have added a ‘test’ option to dropdown type of attributes. For Text type attribute with unit we have added a hint below text type field by which merchant can acknowledge which type of unit he needs to enter for a particular attribute.
Note: – After updating all the categories and attributes go to Catalog > Manage Products and select all the products. From the mass Action dropdown select Update Attributes and click Submit button so as to update newly created categories and attributes in the Product Edit/Create form.

This tab will manage the product upload system. It consists of two sub menus:-
a. UPLOAD FILES – Following operations can be performed here:-
1. Upload product
Upload simple product
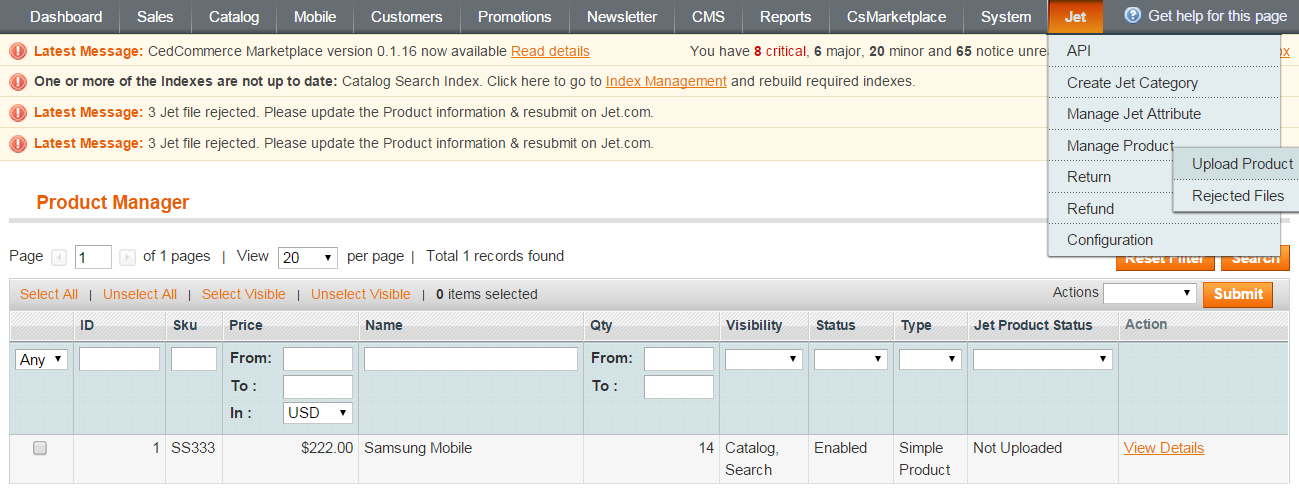
This panel will list all the products assigned in jet categories. For uploading the product on jet.com from here, the merchant needs to select the product using Mass Select by clicking the respective checkboxes and after that Upload Action should be selected from mass Action dropdown and submit button should be clicked. It will upload the products on jet.com and a message will appear in product upload panel reading “Your product has been successfully uploaded”.
Necessary information during product uploads:
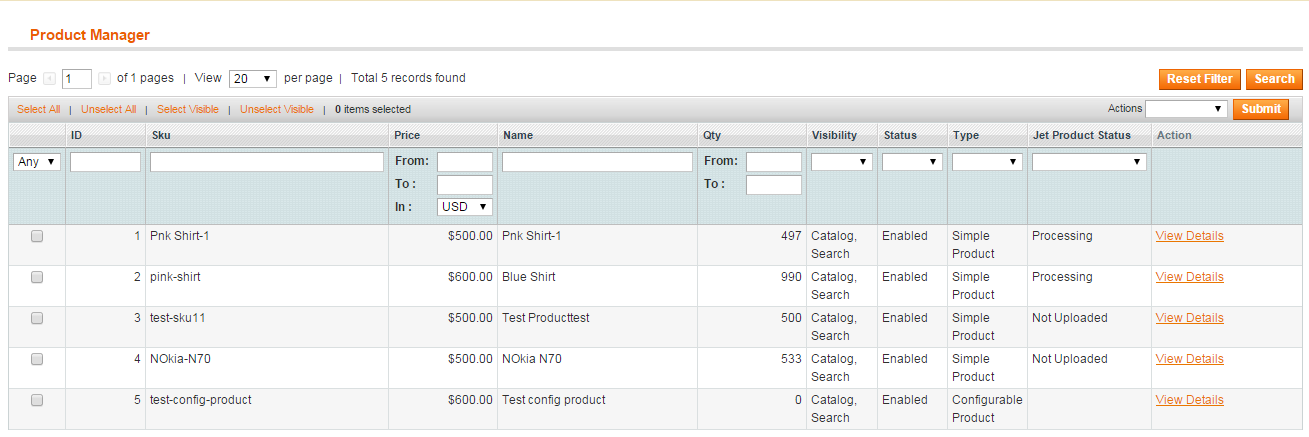
Initially when the product will be uploaded, its default status will be ‘Not Uploaded’. When the product will be successfully uploaded its status will change to ‘Processing’.
Information to be filled during product creation
During the product creation the merchant can fill attribute information from jet.com tab created under General Information tab of product. From here the merchant can fill the attribute information. During product creation it must have one of the following informations (UPC, UPC-E, GTIN-14 , ISBN-13,ISBN-10,EAN, ASIN ).
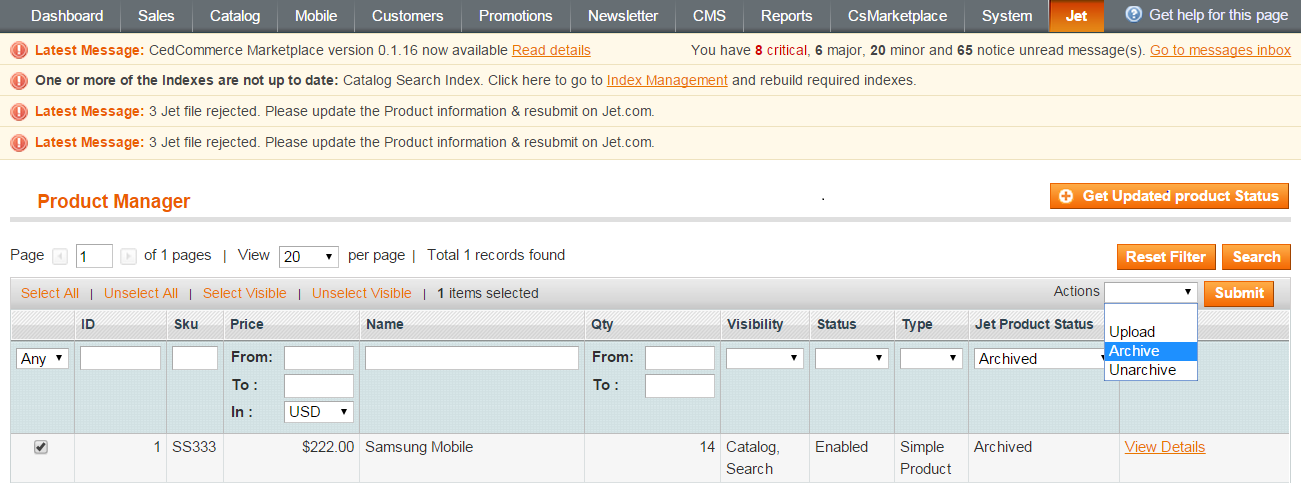
2. Close product
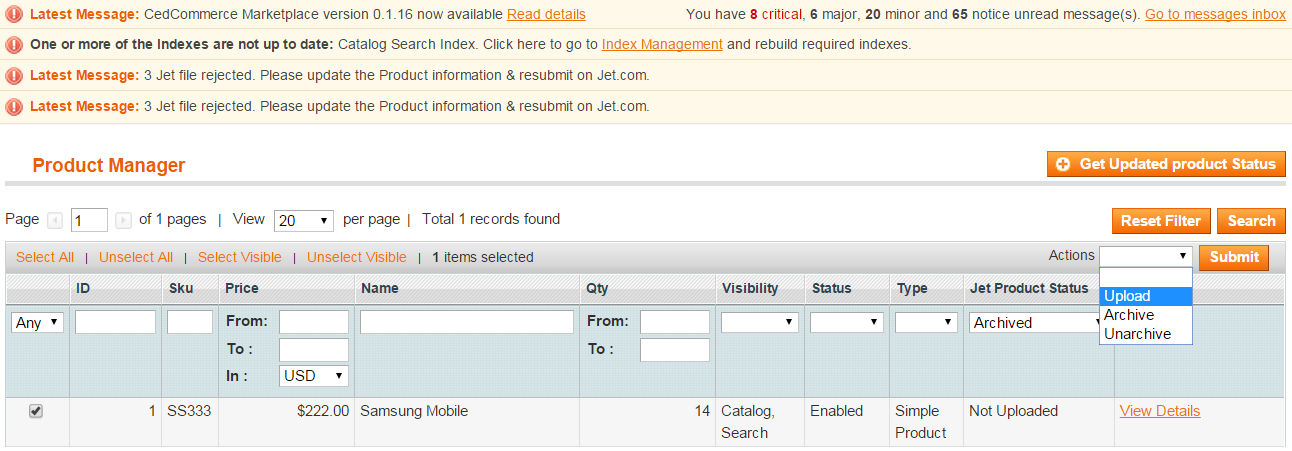
Jet .com provides the ability to close the uploaded product. If a merchant wants to close his uploaded product at any time after successful upload then it can be easily done. For this, the merchant needs to select the product from the product panel by selecting the checkbox. After that he needs to select the archive action and click on the Submit button. That product will be archived successfully and its status will change to Archived. This product will be closed on jet.com and it will not appear on jet.com for purchase.
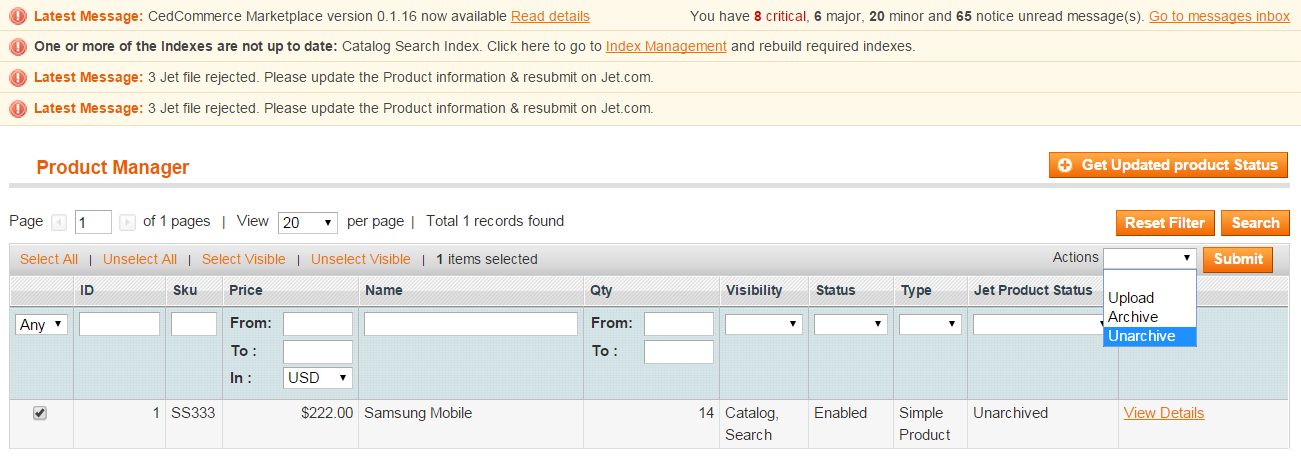
3. Reopen product
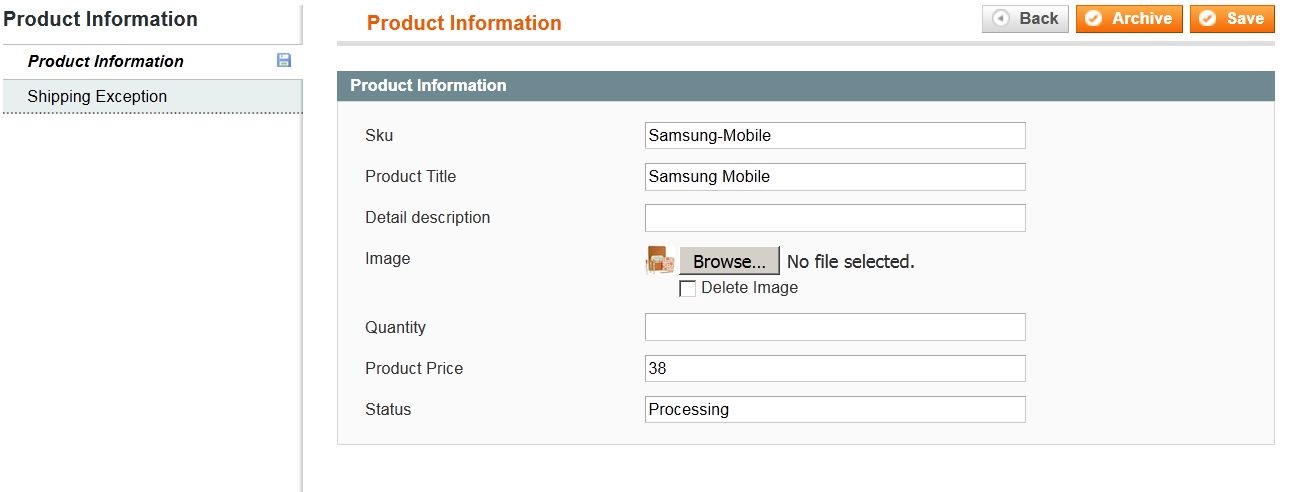
Jet.com provides the ability to reopen closed products. For this, the merchant needs to select the archived product and then select Un-archive option from the Action dropdown and click on the Submit button. The selected product will be available again for purchase on jet.com. Merchant can archive or Un-archive multiple products by selecting multiple products using checkbox. If the merchant wants he can archive or un-archive a single product also. To do this, the merchant needs to go to the View Detail action of the product from the product panel. If the product is open an Archive button will be shown. If the product is closed, the un-archive button will be shown. From here the merchant can choose a specified action as he wants.
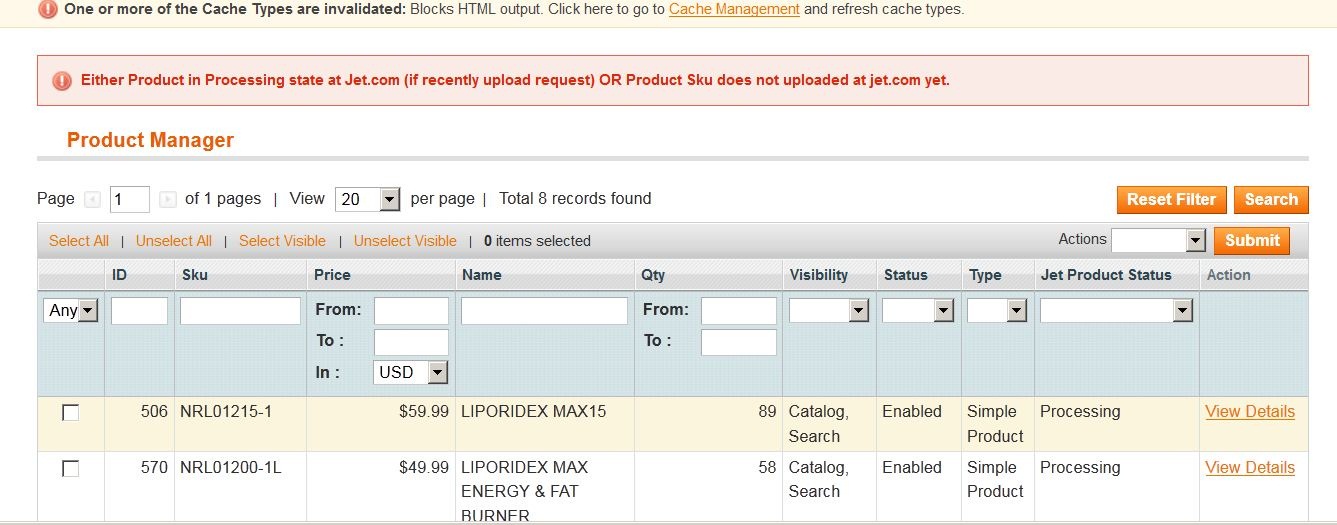
View Product Status
To view the product status click on the “View” link of any particular product. Following page will appear which will show the latest information of the product as received from Jet.com:-
If the above page doesn’t opens and the admin is redirected back to the Product Manager Grid with the notification error message “Either Product Not Uploaded on Jet.com OR Product Sku does not uploaded” then it means that either the admin has made some changes in the already uploaded product and has not re-uploaded it, or, if it is the new product then the product has not at all been uploaded not even once to Jet.com i.e. the product is under review and its status could not be get immediately and the admin has to wait for some time to get the latest status.
 b. REJECTED FILES
We upload jet.com product using their file upload process. Due to any reason if an error occurs during the product upload then that product will be listed in the Rejected File panel. From here the merchant needs to go to View Error & Resubmit action.
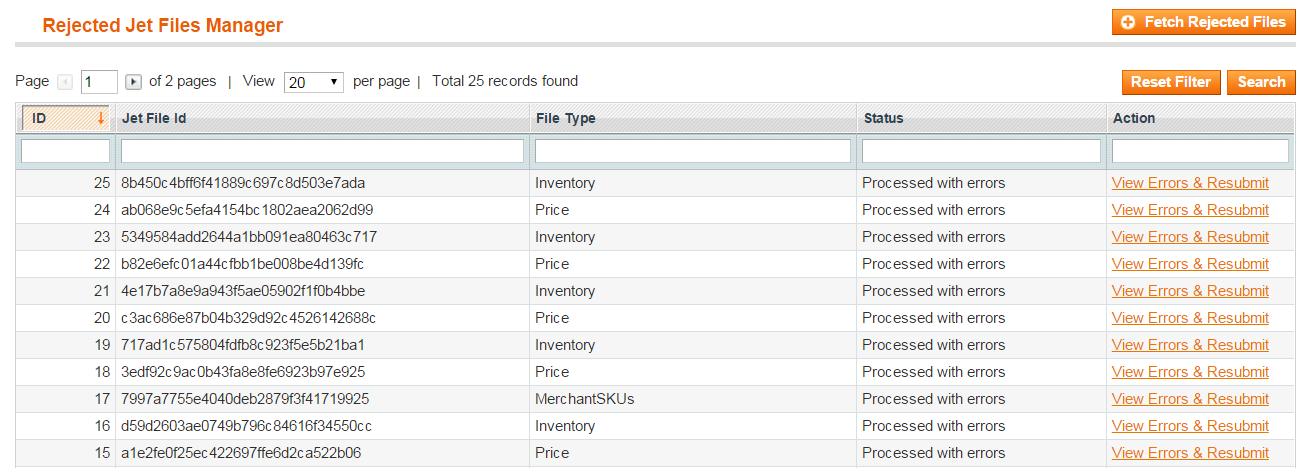
Here the Errors present in the corresponding file appear with Resubmit button. When the merchant clicks on this button his product will be resubmitted to jet.com. If the product gets submitted successfully then the status of the file will change to N/A.
Note: The errors corresponding to the related files will be listed under the Error Description section on the Error Files Page (as shown above in the “Create Jet Attribute” section). It is the responsibility of the admin/merchant to locate those errors in the respective files and resolve them.
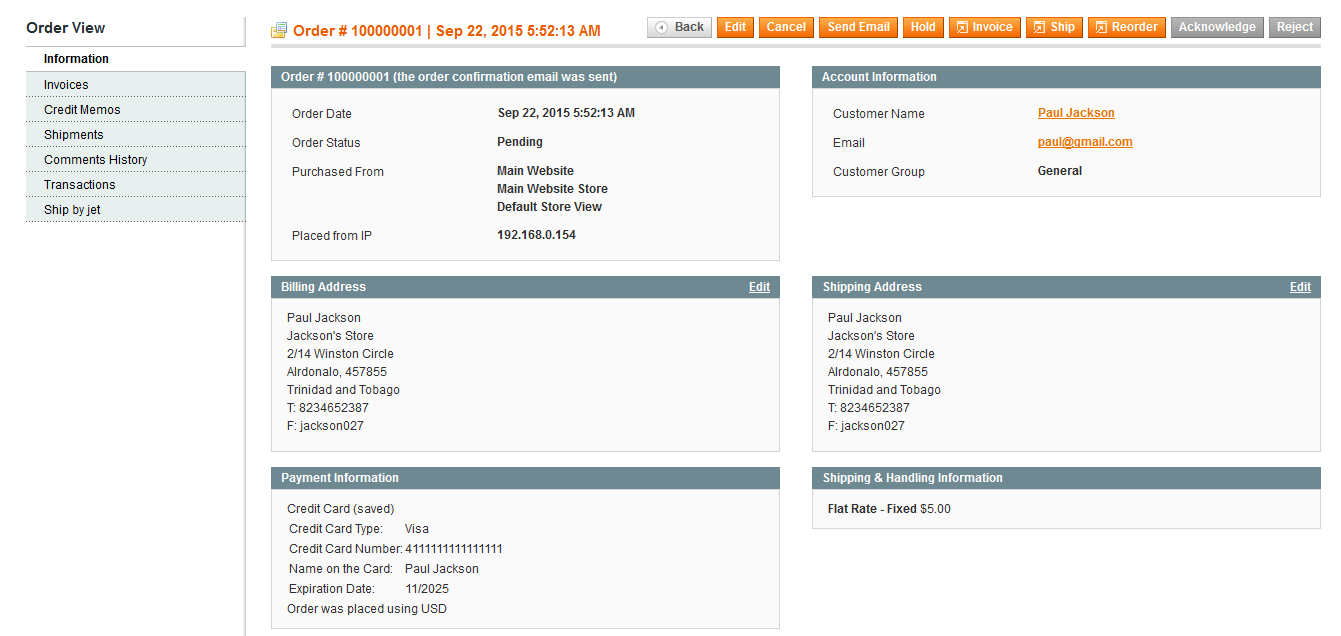
We have set up a Cron for the orders that will fetch all the orders generated on jet.com. The merchant gets notified by the notifications in admin panel. Firstly, the merchant should notify jet.com that whether he is able to fulfill the orders or not. For this we have added two buttons Acknowledge and Reject. As soon as the order is placed these two buttons (Acknowledge & Reject) remain enabled. If any of the buttons is clicked then both of them become disabled. If Acknowledge button is clicked then the admin cannot reject it. Likewise, if Reject button is clicked then it cannot be acknowledged. If a merchant is able to fulfill the orders then he needs to send an acknowledgement. Otherwise, he needs to send a reject request. As the merchant clicks on the Acknowledge button, jet.com gets notified that the merchant is able to fulfill the order. We have used default shipping method (flat-rate) and default payment method (check money order) for jet orders. So the merchant should enable these method in Magento.
For shipment, we have added a tab ‘Ship by Jet ‘from which the merchant can create shipment for orders.
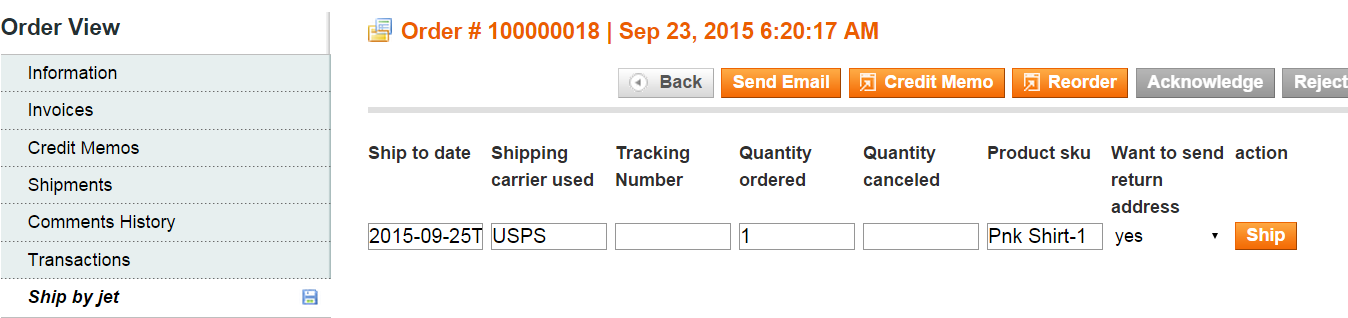
Here the merchant needs to enter the tracking number; quantity ordered will be auto-filled. In the quantity cancelled field, the merchant needs to enter the quantity he is not able to supply at the time of orders. Product sku will reflect the sku of the ordered quantity. If the merchant wants to send a Return location address then it can be done by selecting ‘yes’ from the dropdown. It means if after order completion the customer generates a return request for this order then this product will be returned to the address set in the return location configuration. When the merchant clicks on the Ship button, the order will be shipped and its invoice and shipment will be created automatically in Magento. The status of order will change to Completed.
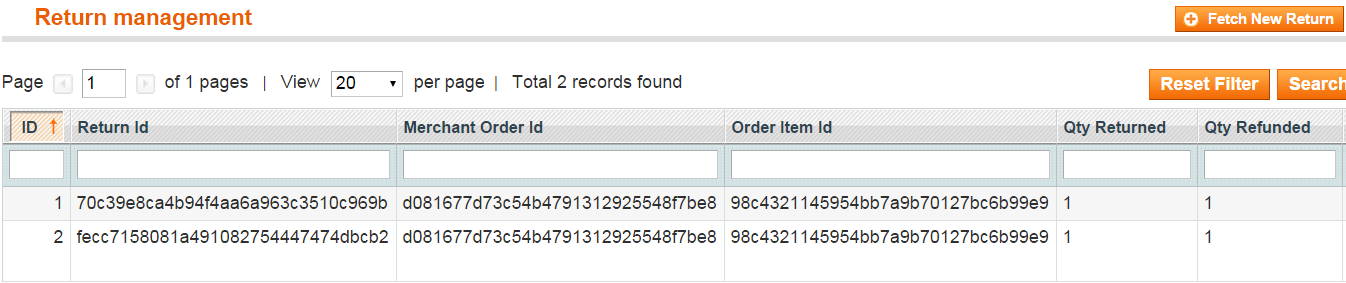
This panel lets the merchant know about the returns generated for the completed orders on jet.com. Whenever a return will be generated for a completed order then it will be listed in the return panel with status Created and the merchant (admin) will be notified about it by notification in the admin panel.
For completing the return the admin/merchant needs to enter some information like quantity refunded, return feedback, and agree to return or not. Hence the merchant needs to click on the Edit link
It will open a form that contains all the required fields which the merchant has to fill for completing the return.
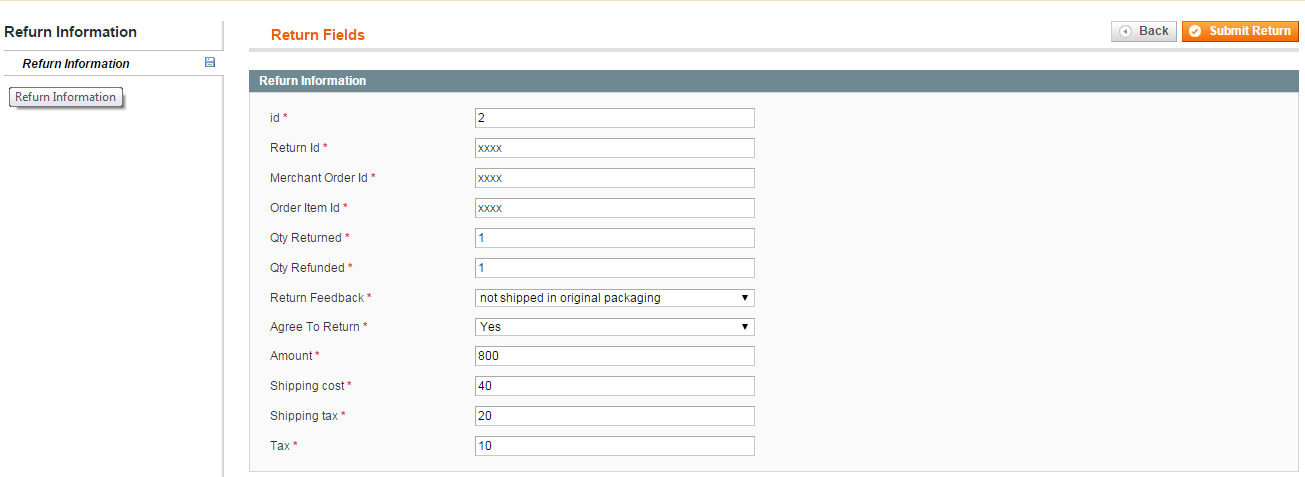
Except this all the fields will be initially filled like order id, merchant id, return id, amount, shipping cost, shipping tax (if no shipping tax has been charged it will appear blank), tax (if no tax has been applied it will appear blank).
Once the merchant fills all the fields and clicks on the Submit Return button, his return will be completed on jet.com. A message will appear in the pop up showing that his return has been completed and in the return panel its status will be changed to Completed.
If the merchant ships any order generated on jet.com and after that if a customer returns that product/order directly to the merchant without the involvement of jet.com, then the merchant needs to send a request on jet.com for completing this type of return.
To manage this type of return there is a panel ‘Jet Refund’.
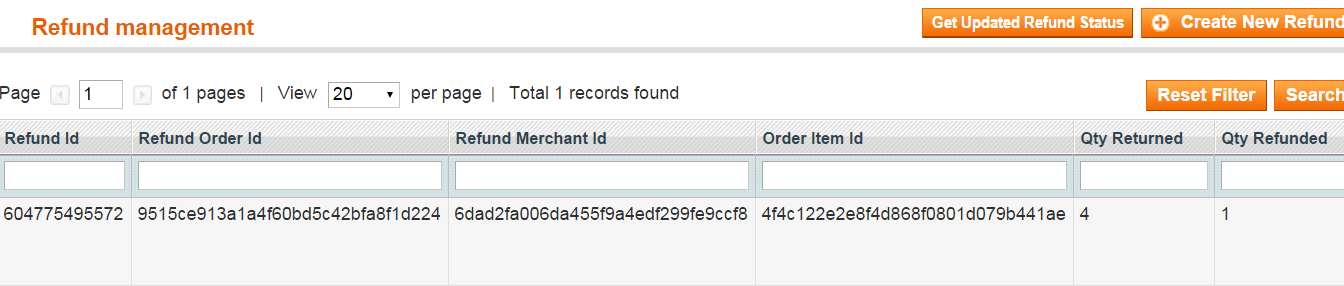
If any jet.com product will be returned directly to the merchant then to complete this return the merchant needs to click on ‘Create New Refund’ button. This will open a form for entering the information.
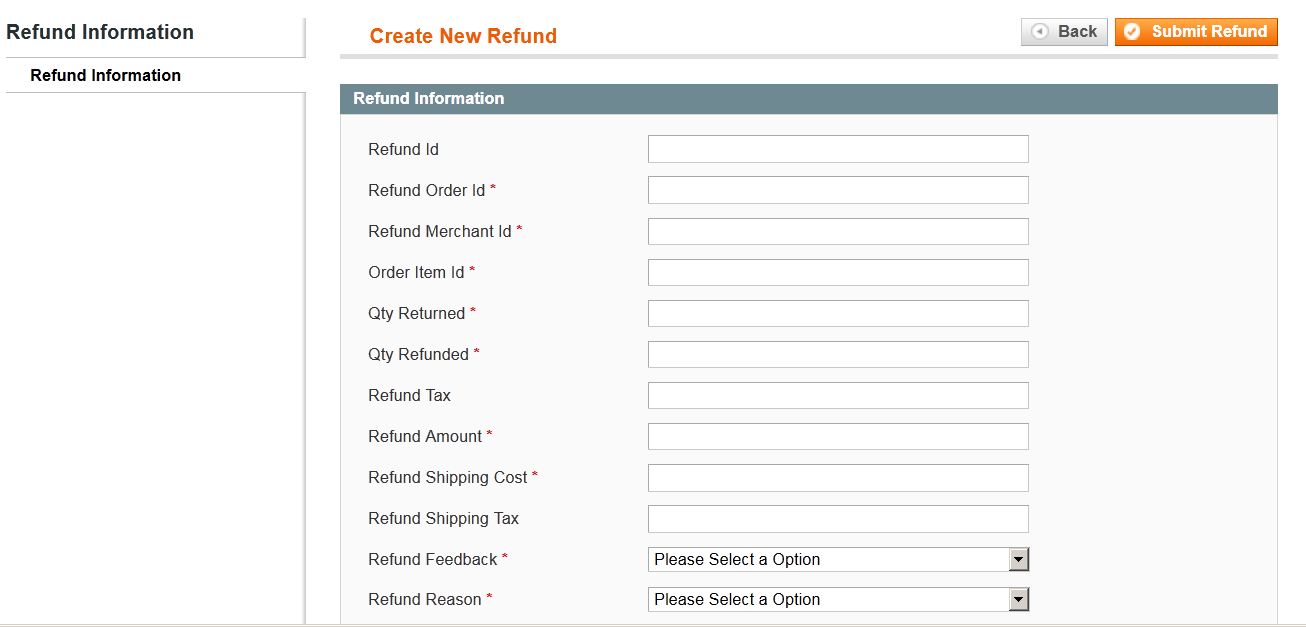 1. Refund id
This is the refund id that merchant will get from jet.com after the refund request has been created. Merchant doesn’t needs to enter this at the time of refund creation.
2. Merchant Order Id
This is the order id for which return request has been generated.
3. Order item id
This is the item id that has been ordered.
4. Qty Returned
This is the total quantity that has been returned. It should not be more than shipped qty.
5. Qty Refunded
This is the quantity that the merchant wants to refund. It should not be more than the returned quantity.
6. Refund tax
This is the tax applied on the products returned.
7. Refund Amount
This is the amount that jet has to return to the customer.
8. Shipping Cost
This is the shipping cost applied on the returned product.
9. Shipping tax
This is the shipping tax applied on the returned product.
10. Refund Feedback
This is the feedback that the merchant wants to send about the returned product.
11. Refund Reason
This is the reason why customer has returned the product.
When some order (s) is placed using Jet.com for a particular product and for the same product Magento order has also been placed then a case may arise where that product can become Out of Stock, Required Quantity is Not Available or has been Disabled then those orders are not placed on Jet.com and the list of those orders can be viewed by selecting Jet > Failed Import Orders from the menu section.
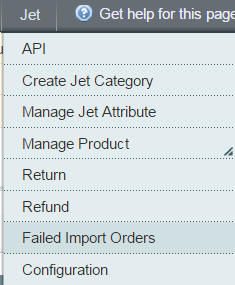 This section displays the failed orders with their order id and the reason for their failure.
 To manually fetch the latest orders (if required immediately) the merchant can click on the “Fetch Latest Orders” button.
The updated status will be reflected (visible) as follows:-
|
Activity |
Time Required for Updating (min) |
| Order Creation | 10 |
| Error in Rejected Files | 10 |
| Return Status | 30 |
| Refund Status | 30 |
| Product Status | 20 |
I have tried to clearly explain all the points related to Jet Integration which is developed by CedCommerce Team. Jet Magento Integration has really come up as a solution to all the problem faced by the merchant when it comes to integration of Jet and Magento and has provided us a means to speed up our tasks. This article discussed about the Integration of Jet store into Magento store. Likewise, CedCommerce also provides Jet Integration with WooCommerce, Prestashop , Opencart and More .
To buy our product Jet Magento Integration please visit this URL : http://cedcommerce.com/magento-extensions/jet-magento-integration.
CedCommerce always keeps room for improvement and always comes up with regular upgrades of all its products. The stuff from CedCommerce developed in Magento-2 includes Refer a Friend Module, Advance Rate Shipping, Blog Extension, Magento2 Developer-Debug Tool and many more. Not only in Magento-2 but plenty of products are developed in Magento-1 as well which will transform your E-commerce store into a multi-vendor store. You can also find CedCommerce extensions and addons on Magento Connect.
Have a look at our product gallery http://cedcommerce.com/magento-extensions.
For more details please visit www.cedcommerce.com.
How do you like the POST? Feel free to express your ideas with us in the comment section. Any suggestions or opinions would be greatly appreciated 
If you like this post, share it with your friends!!

Reading Time: 2 minutes Key Highlights AI-driven traffic to U.S. retail sites will increase by…

Reading Time: 2 minutes Critical security alert for Adobe Commerce & Magento merchants. Adobe has…

Reading Time: 4 minutes Magento is a powerful platform for eCommerce websites. However, with two…

Reading Time: 13 minutes By 2025, retail eCommerce sales are projected to account for over…
Reading Time: 16 minutes E-commerce is constantly expanding, with an accelerating pace of development in…

Reading Time: 3 minutes We at CedCommerce are happy to share some exciting news for…

Reading Time: 3 minutes Portland, Oregon [October 12, 2022]: CedCommerce is a leading eCommerce solution…

Reading Time: 3 minutes Prepare yourself with a list of the Magneto Integrations you’ve always…

Reading Time: 3 minutes Portland Oregon [September 5, 2022]: CedCommerce, a Magento marketplace solution provider,…
Reading Time: 4 minutes Have you heard that Shopee OpenAPI 2.0 has replaced the 1.0…