
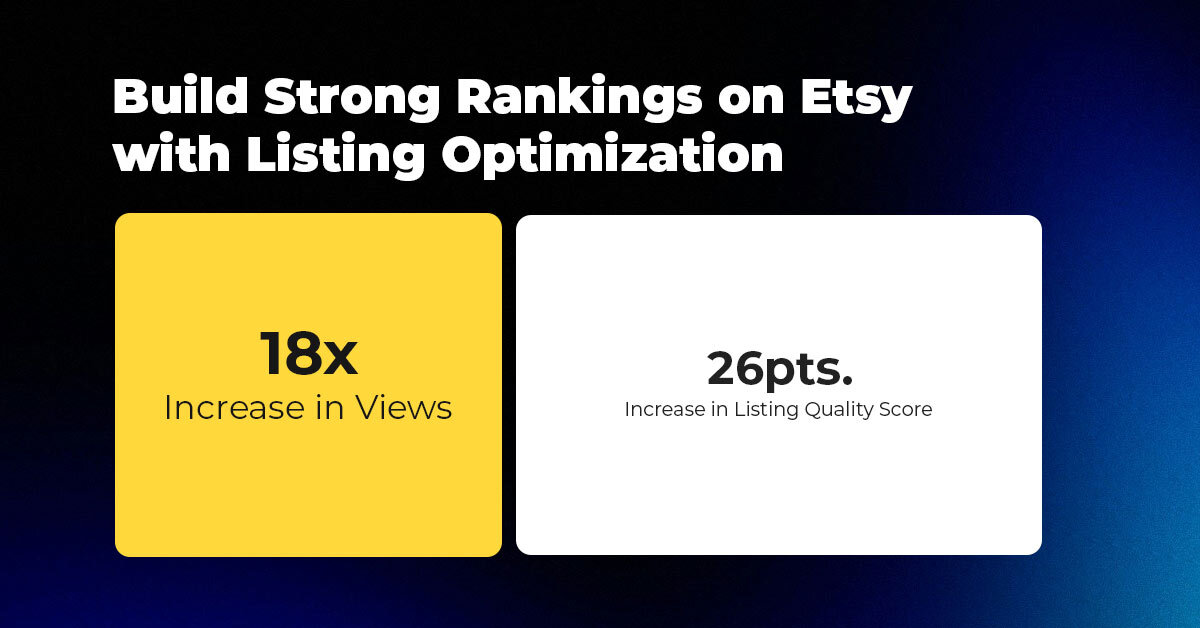
Outrank Competitors: Rank Higher with Listing Optimization on Etsy
About the Client Shop Name: CrystalHealStore Marketplace: Etsy Focus: Bohemian & Ayurvedic-Inspired Fashion Location: Global

Running short of time? Get PDF of the blog in your mail.
This blog explains the creation of a simple HelloWorld Module in Magento 2.0 for the developers to clearly understand the module creation strategy in Magento 2. In this article, we will go through building you a Hello_World module for Magento 2. If you have been through the previous versions of Magento, creation of module in Magento 2.0 version is very much different with its older versions. Here the Module Configuration to Content Render is quite different from the previous versions.
Lets Start with the Simple module creation in Magento 2.0 along with the Differences in module creation of Magento 2.0 with the Magento 1.X series :-
| Magento 1.X | Magento 2.x |
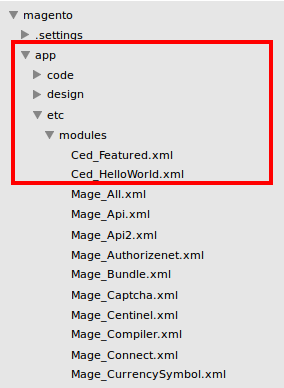
In 1.X series, we start to create the module by configuring it in the Magento inside the app/etc/modules
|
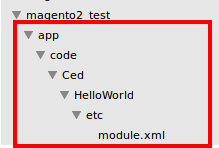
In Magento 2.0 version, we configure the module through module.xml file in the module’s directory.(app/code/ced/helloworld/etc/) The benefit of this is that the modules are now more self-contained.
|
NOTE: Here we don’t have any code pools (core/local/community), No app/etc/modules folders, So no need to register in the app/etc/modules folder. We can also register our module under the base scope also i.e. inside the app/etc/ folder directly.
The code of module.xml is:
<config>
  <module name="Ced_HelloWorld" schema_version="2.0.0" setup_version="0.0.1">
  </module>
</config>
Terms to keep in mind :
setup_version : Defines the version of the module that is important to give in the code.
schema_version : Is an Optional Field.
name : In this we define the name of the module Namespace of the Module_Modulename.
As you create this file and then run the command under the directory of your Magento :-
Linux terminal: bin/magento setup:upgrade
Windows cmd: php bin/magento setup:upgrade
It will automatically register your module in advanced settings in the admin panel.
Also the setup-version is set into the database in the setup_module table. So its necessary to give set-up version in the module.
Optional requirements:
As the requirement increases, you can increase the configuration of the module,
like if you want your module to execute after some module, You can use the <sequence> tag for it,
<module name="Ced_HelloWorld" schema_version="2.0.0">
         <sequence>
            <module name="Magento_Core"/>
            <module name="Magento_Store"/>
         </sequence>
 </module>
| Magento 1.x | Magento 2.x |
| 1) Router for the controller is declare inside config.xml file. | 1) In Magento 2 we need to declare it in a new file which is routes.xml inside the etc (configuration folder) folder. |
| 2) In Magento 1.x series all controller are located inside controllers folder. | 2) Here there is no controllers folder. All controller files will come under “Controller” folder. |
| 3) Here we use class names. Also we have Controller classes with multiple methods. | 3) But here we use namespaces. We have separate class or controller file for a separate action which runs the execute method to run that action. |
| 4) Here there is a single file of controller and different methods are defined for each action in single file. | 4) Here, we have different files for different actions and so, we can load different layout for different actions. |
Code for the routing of controller through routes.xml:
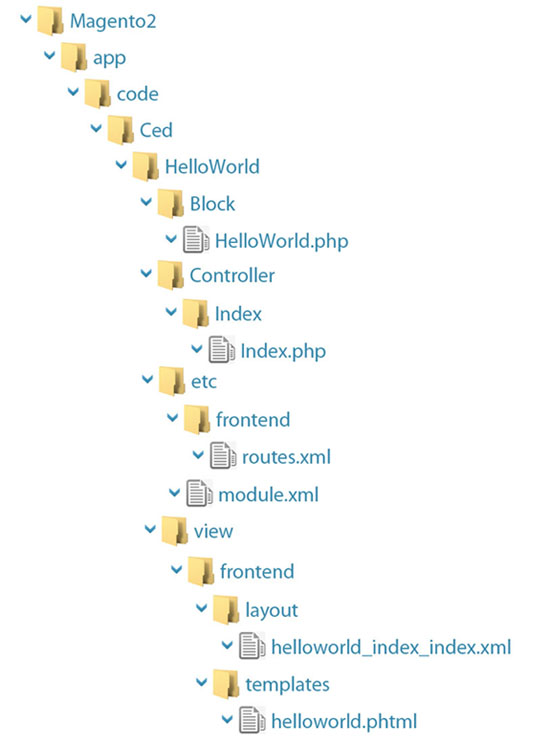
Let us create routes.xml for our controller inside our module i.e. app/code/Ced/HelloWorld/etc/frontend/routes.xml
<config xmlns:xsi="http://www.w3.org/2001/XMLSchema-instance" xsi: ="../../../../../ ../lib/internal/
Magento/Framework/App/etc/routes.xsd">
    <router id="standard">
        <route id="helloworld" frontName="helloworld">
            <module name="Ced_HelloWorld" />
        </route>
    </router>
</config>
Terms to keep in mind:
Router id : Entry Point of the module. “standard” for frontend router and “admin” for the admin router.
Route id : This id must be unique.
frontName : Sets the router name. That we use on the browser to call our module, like here “helloworld”. It must be the unique name for the module.
Create controller and action:
Let’s create “Controller” directory of our module. Then create a directory “Index” inside it that will act as Controller. Now create a action file “Index.php” inside “Index” directory.
app/code/Ced/HelloWorld/Controller/Index/Index.php
<?php
namespace Ced\HelloWorld\Controller\Index;
class Index extends \Magento\Framework\App\Action\Action
{
 public function execute()
    {
      echo "Reached to Controller";die;
    }
}
?>
Terms to keep in mind:
namespace :Magento 2.0 uses namespace concept of php. It is the location where that file is located seperated by “\”. Usually in the previous versions we define it along with the class name.
execute : In Magento 2.0 as we have a different file for each action. And we can define our functionality in the execute function of that action file.
In Magento 2.0 now we have a different action file for each action, which uses the execute method to implement that functionality. Here “Index” is a controller and “Index.php” is action.
Note: Flush the cache of the admin panel.
| Error’s that may cause |
| 1) Attribute ‘setup_version‘ is missing for module ‘Ced_HelloWorld‘ It means you haven’t set-up the “set-up” version correctly in the config.xml |
| 2) Set-up version is not defined in your module:- This error might also occur due to your custom module permissions. Please check the module permission. |
| 3) Please upgrade your database: Run “bin/magento setup:upgrade” from the Magento root directory. “The following modules are outdated”:- Now that means you have to upgrade your database to register the set_up version for your module. Solution: Linux: run bin/magento setup:upgrade under your Magento directory Windows: run php bin/magento setup:upgrade under your Magento directory. |
| 4) Errors that might occur in linux system: When you run the command bin/magento setup:upgrade you can get below errors-a) [Zend_Db_Adapter_Exception] pdo_mysql extension is not installed. -It means pdo_mysql extension is either not installed or not at proper location. Solution: run apt-get install php5-mysql in terminalb) [Zend_Db_Adapter_Exception] SQLSTATE[HY000] [2002] Can’t connect to local MySQL server through socket-‘That means your system is not redirecting the socket file to correct location. Solution: First, you have to locate where your mysql.sock file is located. In our case it was in /opt/lampp/var/mysql/mysql.sock. you can locate file by terminal just run command “sudo find / -type s” with the super user privileges. Type su on terminal. Then give the password for user privilege. Navigate to where your mysql.sock file is located Right click on the file and select Make Link. Rename the link File to mysqld.sock then Right click on the file and Cut it Go to /var/run and create a folder called mysqld and Paste the Link File you will now have a mysqld.sock file at /var/run/mysqld/mysqld.sock and your work is done now 🙂 |
Reaching to Controller is half the work done.
| Magento 1.x | Magento 2.x |
| 1.) Here we have different folder for layout and templates, as well for css and js. | 1.) In magento 2.0, every module has its own VIEW directory where all module-specific template, layout, js, and css/less files are stored. |
| 2.) In Magento 1.x series generally, there is single layout file we create for a single module and create different handles for different actions. | 2.) In Magento 2.0, for each layout handle there is a separate file. |
| 3.) Here we have to define the layout configuration in config.xml so that Magento locate it. | 3.) But Here we don’t have to configure anywhere. Here we name layout as router name_controller name_action name and Magento locates it automatically. |
If you want to load the layout file for your module then follow some steps:
<?php
namespace Ced\HelloWorld\Controller\Index;
class Index extends \Magento\Framework\App\Action\Action
{
 public function execute()
    {
	 $this->_view->loadLayout();
         $this->_view->renderLayout();
    }
}
?>
<page xmlns:xsi="http://www.w3.org/2001/XMLSchema-instance" xsi:noNamespaceSchemaLocation="../../../../../../../lib/internal/Magento/Framework/View/Layout/etc/page_configuration.xsd">
    <body>
	<referenceContainer name="content">
	<block class="Ced\HelloWorld\Block\HelloWorld" name="helloworld" template="helloworld.phtml"/>
	</referenceContainer>
   </body>
</page>
Points to focus:
class : Here we define block file where module related functions resides.
name : A unique name given to the block which is used for the cross references.
template : Here we define the path to template file inside the templates directory.
Note: <referenceContainer> and <referenceBlock> are the most common layout instructions which locate a container or block in the tree by ‘name’, then manipulate that element. Here content indicates that your content would be rendered on the content section.
| Magento 1.x | Magento 2.x |
| core/text_list block type used in Magento 1.x serves as a structural block. |
Here we use container wrapper for this purpose. |
<?php
namespace Ced\HelloWorld\Block;
class HelloWorld extends \Magento\Framework\View\Element\Template
{
}
?>
"HelloWorld Html is now get Rendered on frontend"
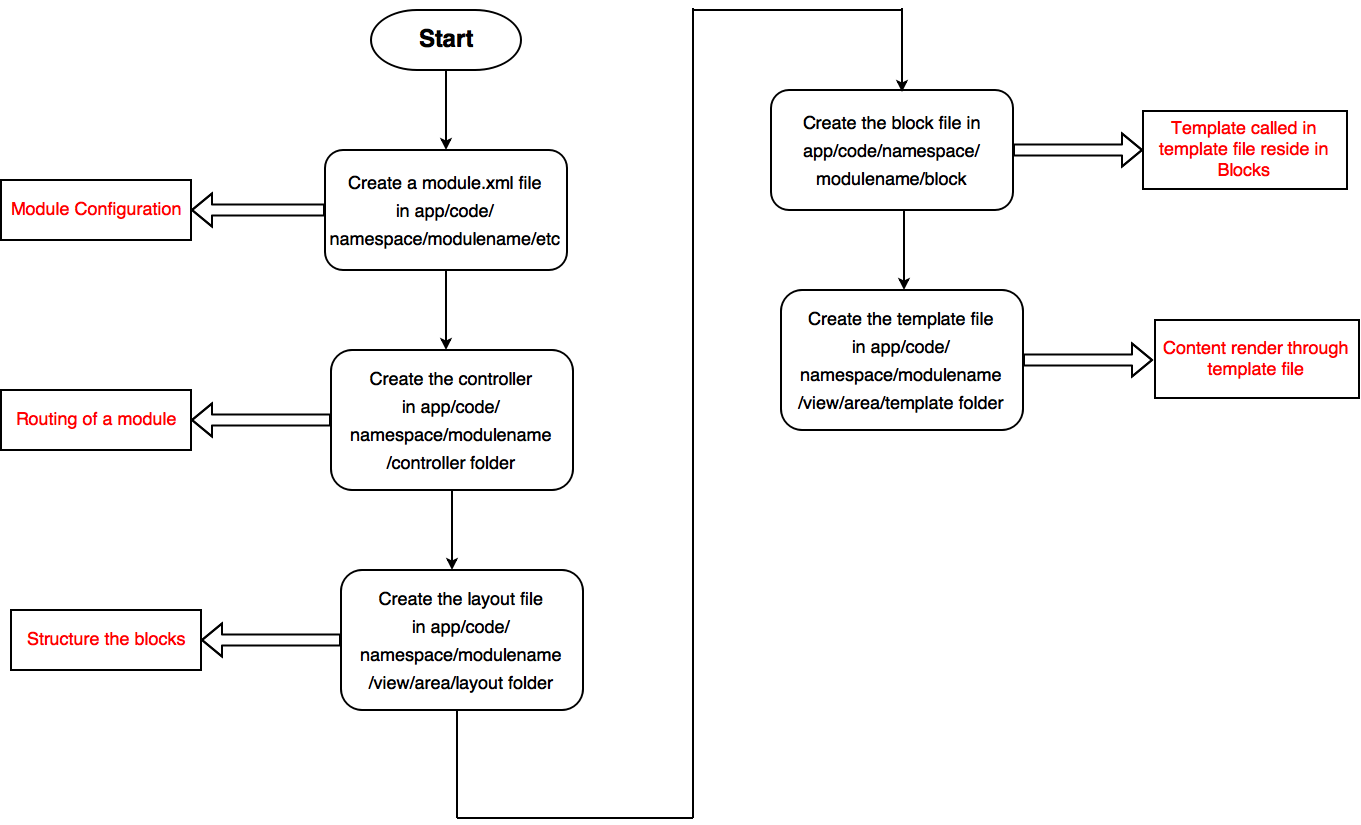
Summary of Module Development Steps
HelloWorld Module:- Ced_Helloworld
Should you’ve any doubts, you’re mos welcome to ask.
Thanks for your interest!
Team CedCommerce
About the Client Shop Name: CrystalHealStore Marketplace: Etsy Focus: Bohemian & Ayurvedic-Inspired Fashion Location: Global
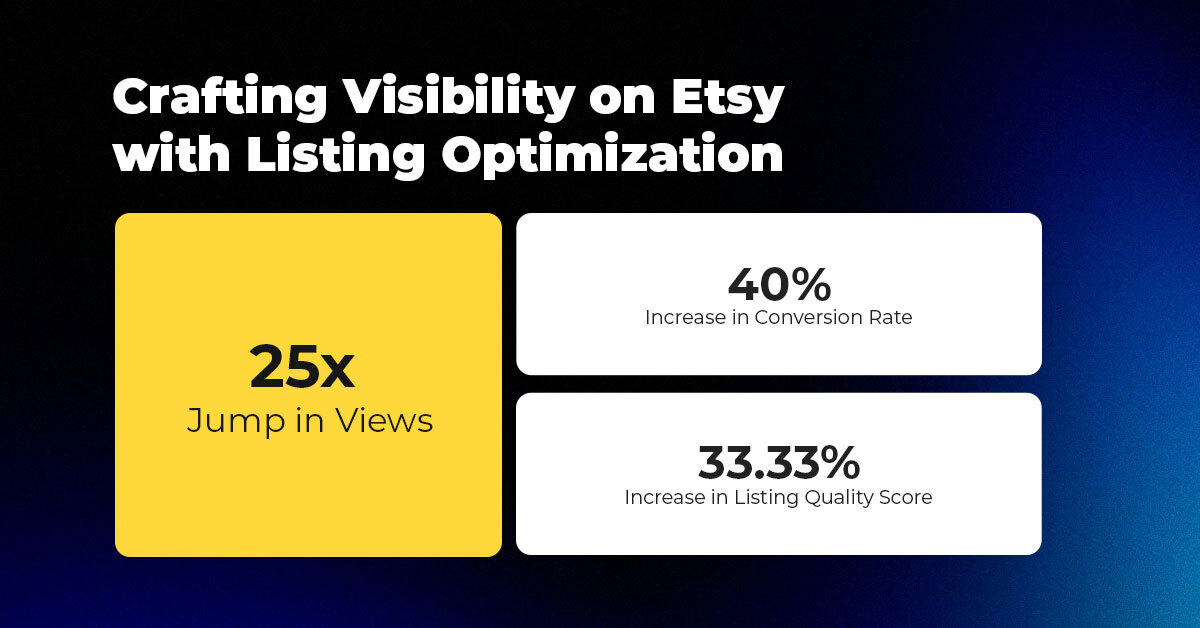
About the Client Shop Name: PinwheelCraftsStore Marketplace: Etsy Focus: DIY Craft Kits for Kids Location:
It just took one Black Friday crash for Gymshark to realize their growth had outpaced
It takes on average 5 to 10 minutes to list a single product on the

With millions of sellers on Amazon, protecting your brand has never been more important. Counterfeit

TikTok isn’t just setting trends anymore — it’s rewriting the playbook for performance marketing, creative

In a significant development for online retailers, Walmart has officially updated its policies to permit
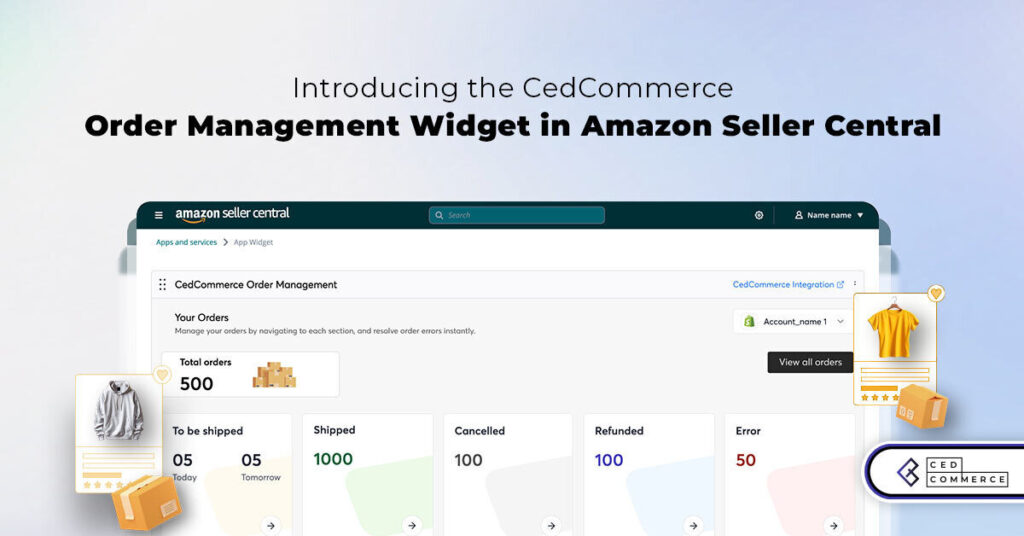
Are you encountering issues with Amazon order management across various sales channels? If so, everyday

A Deep Dive into Selling Smart on TikTok Shop UK, TikTok Shop US, and TikTok

In a world where cross-border commerce fuels eCommerce growth, tariffs are no longer just policy

In the world of eCommerce, visibility is everything—and Walmart Marketplace is no exception. With thousands

In what comes as a major relief for TikTok and its millions of users in

In a move aimed at enhancing product quality and boosting buyer confidence, TikTok Shop has

Selling on Amazon offers immense opportunities, but one of the most crucial decisions sellers face

Amazon is doubling down on AI-driven selling tools, introducing a new AI-generated product enrichment pilot

With over 17.6 million sellers on eBay marketplace, cracking the code behind the top selling
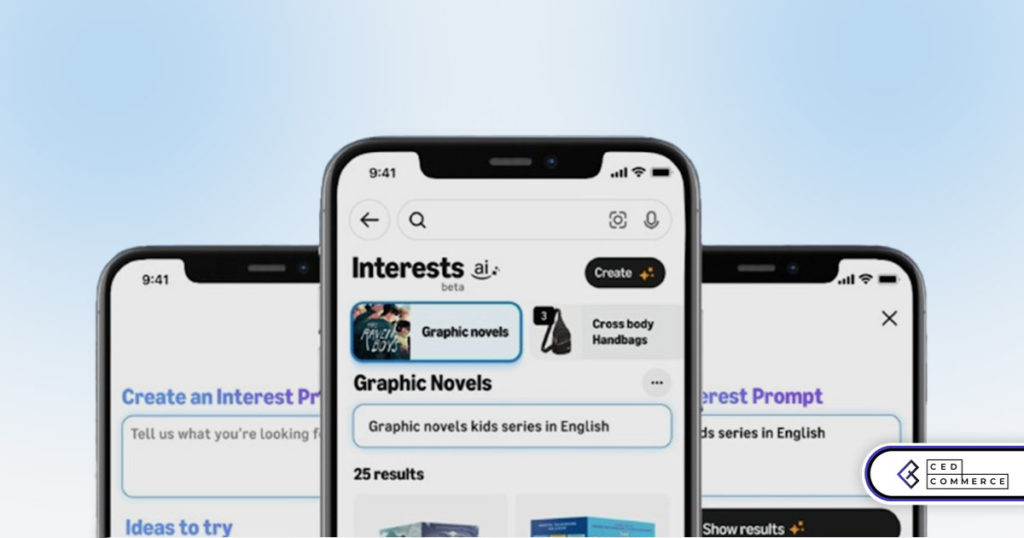
Amazon is doubling down on artificial intelligence, introducing the AI-powered ‘Interests’ feature that automatically finds
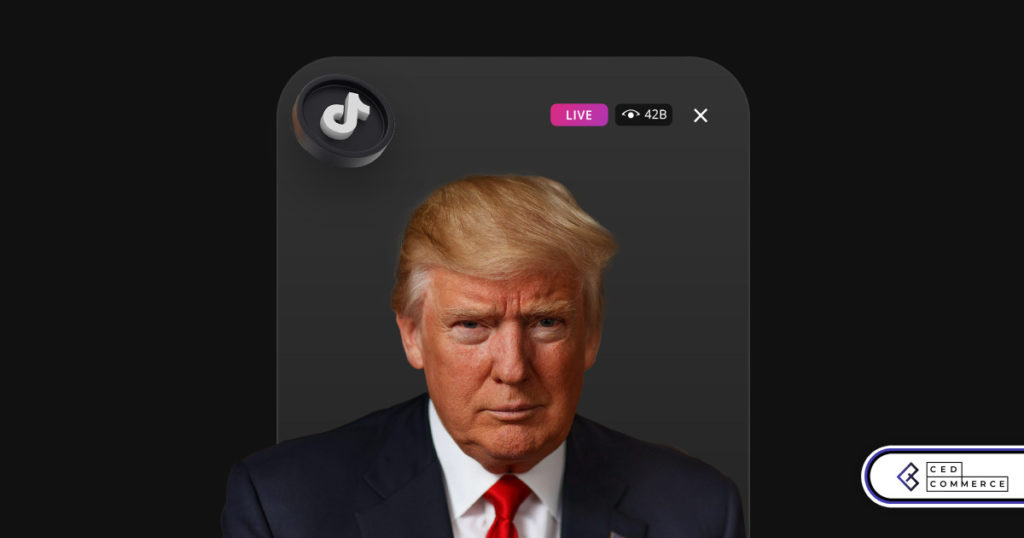
U.S. President Donald Trump has hinted that a TikTok deal is on track before the

Nearly a decade after closing post its first attempt, Best Buy is returning to the

PrestaShop has long been a leading name in European eCommerce. With its flexibility, user-friendly interface,
Yes really good description about the module creation in magento2.
Simple and very clear.
It didn’t work for me..
http://104.99.99.99/~magentoadm/helloworld
I just see:
Whoops, our bad…
The page you requested was not found, and we have a fine guess why.
If you typed the URL directly, please make sure the spelling is correct.
If you clicked on a link to get here, the link is outdated.
I got Clear Concept for Magento 2 Module structure but unfortunately this module not working for me , i also download module from download & Windows cmd: php bin/magento setup:upgrade link after that not working.
Leave a Reply