
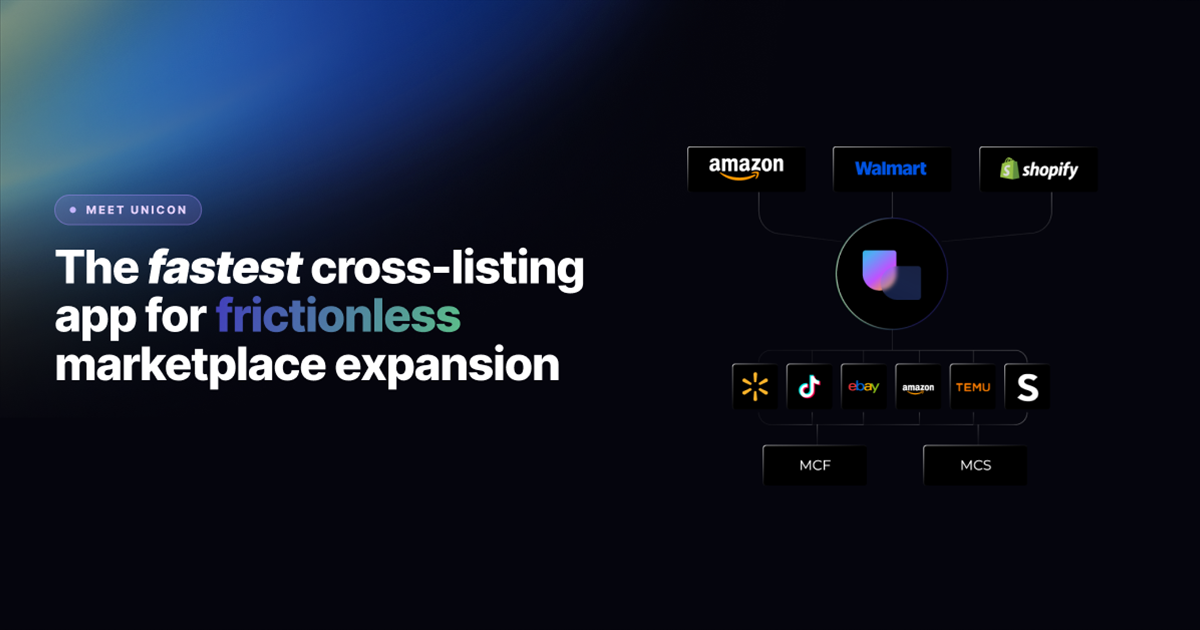
CedCommerce Apps Are Now Available in Shopify Sidekick
Reading Time: 6 minutes Your marketplace stack may be connected, but your attention is still…

Running short of time? Get PDF of the blog in your mail.
Customer’s experience matters the most, from the time he visits your store to the time he receives the package, a lot can go wrong. However, as a store owner, you do have control over all the processes which you can mold for the betterment of their experience. But when it comes to shipping, it may feel like you’re handling your brand reputation over to a stranger.
However, if you’re with proper knowledge on how to set up shipping on Shopify, you won’t feel that way. As after knowing about it completely and how to do it, you can carve out the perfect strategy which may meet customer’s satisfaction and expectations.
Therefore, this Shopify shipping guide will walk you through all the necessary information related to shipping on Shopify and how to do it.
These are the services or companies which are responsible for delivering your customer’s orders. Shipping carriers can either pick the ordered products from the warehouse, your own location or let sellers drop packages to them and deliver them to the customer.
The Shipping carriers are available according to the location of your business. The carriers available in Shopify by default are-

The carrier-calculated Shipping also called “real-time rates” are used for automatic calculation of the Shipping charges by using package weight, dimensions, and addresses.
Shipping rates are the additional rates that are charged to ship the item to the buyer. The cost of shipping is displayed to your customers during the checkout. It depends on the product weight, dimensions, distance, and other factors.
Well, it’s up to you whether you want to charge your customer for the Shipping rate or offer them free shipping. Free shipping draws the attention of the customers and they tend to quickly buy.
You can calculate the shipping rates by using this calculator by Shopify- SHOPIFY SHIPPING CALCULATOR
The wide spectrum of Shipping rates is majorly divided into 3 types-
It is a standard shipping rate you put as an option on the checkout irrespective of any other factors. You can simply put the flat rate for each time a customer places an order. This will leverage sellers precisely on what a customer should be charged at the checkout.
You can offer price-based shipping rates, through which you’ll be able to set minimum and maximum cart values for your flat shipping rate. For example, if you want to offer different prices for orders above and below $30, you could set the flat price of $5 for orders below that price and $10 flat rate for orders above the same.
The same you can do with weight-based shipping rates, you can set different flat rates for minimum and maximum total cart weight.
It is the best way to get your products sold, as most of the customers never prefer to pay extra for Shipping. Any flat shipping rate can be made into free shipping by setting the Shipping cost to $0.
Stitch Labs’ findings indicate a potential 10 percent increase in revenue when companies provide free shipping to customers.
You can also set the minimum amount limit to get free shipping for customers. For example, if you want to offer free shipping for orders over 100$, you just have to set a price-based flat rate to 0$ for orders over 100$.
Also, there are certain apps available on the Shopify app store like the Shipping bar which shows the amount remaining for customers to get free shipping. For example, if your customer has purchased a product of cart value of $85 and minimum free shipping limit is $100, then during the checkout, he will be notified that $15 cart value is left to get free shipping.
Another way to offer free shipping is just simply adding the shipping price to the price of the product. Adding shipping rates into the product prices saves you from paying the charges from your pocket and cutting benefits.
These are the shipping rates that are offered, calculated, and shared by the carriers like UPS, USPS, FedEx, DHL, Canada Post, etc. to the customers during the checkout.
The details of the product in the cart are shared with the carriers, and they share the shipping charges. In this way, your customers will get the exact shipping charges per order.
Shipping labels are the identification labels that specify the owner of the package. That label contains a set of information which helps carriers ship order to the right person. Generally, shipping label contains the following piece of information-
The barcode helps carriers track the shipment’s progress. They are scanned at each phase of the delivery until the package reaches the destination.

Shipping labels can also show some extra information like-
Moreover, the price of the Shipping label varies on the basis of the delivery speed you want to offer. The one promising 2 days delivery will be more expensive as compared to the one which takes 7-10 days.
Shipping profiles help sellers create product-based shipping rules so that they can offer accurate shipping prices. In simple words, you can use shipping profiles to set shipping rates of specific products and charge a different amount for them based on the distance.
For example, your store deals in two categories, let’s say “A” and “B”. Category “A” is fragile and will take more shipping charges than the category “B”. So, to offer a fair Shipping price, you can create a shipping profile for the category “A” and assign a suitable shipping price.
https://www.youtube.com/watch?v=S3qb1Vmpy4Q&feature=youtu.be
Each Shopify store comes with a default shipping profile, known as a general shipping profile. This general shipping profile comes with general shipping rates. For the businesses having simple shipping with limited location, this general profile and rates are often sufficient. But sellers generally create more profiles in order to offer accurate shipping prices.
The general shipping profile can be used for setting default shipping settings for your shipping. Products newly added or the products which are not in any custom profile will automatically fall in the general shipping profile.
After you understand the things on the grass-root level, the next step is to learn how to set up Shipping on your Shopify store. Let’s roll-down step-by-step to achieve an upskilled shipping process to satisfy the needs of your business and consumers.
Do you want a winning Shipping setup for your store in no time? Hire Shopify expert for the same.
Request a quote now.
It is the location from where the orders will be shipped. By default, the original address that is entered as a location while creating a store is taken as your shipping location.
If you register any different location to ship or you have any fulfillment services to work on your behalf, then make sure to add them in locations.
If you’re a dropshipper and wondering how to set up shipping on Shopify for dropshipping, then you need not go the extra mile. You just have to select the app in the shipping from section. If you’re using Oberlo for dropshipping, then you just have to select Oberlo in Shipping from this section.

In the same way, if you sell POD products and, let’s say, you use Printful for the same, then you just have to select it in the same way.
You can also have multiple locations for Shipping based on your plan-
Steps to add locations-


Moreover, if you want you can prioritize, change the Shipping origin, prevent a location from fulfilling, or reactivate/deactivate a location. Learn how.
As the Shipping profile is explained above, we are clear with what it is and its importance. By default, each Shopify store is built with one Shipping profile that contains the general rates. For businesses with a simple shipping setup, creating general shipping rates is often sufficient. But for the stores that are enveloping a large audience from different locations, creating a shipping profile is mandatory as it widely helps in managing shipment and its cost.
To create a Shipping profile, follow the steps:


By following the steps mentioned above, you’ll be able to create your custom Shipping profile.
In simple words, a shipping zone is a group of countries or regions that are subject to the same shipping rate. Let’s say if you have your warehouse in the U.S., then you can create a Shipping zone comprising all the states. All the customers lying in that particular zone will be charged the same shipping rate.
You have to create shipping for the countries in which you want to sell. Customers lying within these zones will be able to receive the order.
Steps to create a Shipping zone-


Moreover, you can also edit or delete your Shipping zones. Learn how.
We have already discussed different shipping rates you can offer to your customers. Therefore, now the question that arises is “How to set up shipping rates on Shopify?”
Your Shipping profiles and zones should be ready before creating any shipping rates. So that you can set different shipping rates for different shipping profiles separately.
To set 3 different types of Shipping rates, that is, flat shipping rates, calculated shipping rates, and free Shipping rates follow the steps-
A- Steps to create flat shipping rates:


B- Steps to create Calculated Shipping rate-

C- Steps to create Free Shipping rate-

Moreover, you can edit and delete a rate. Learn how.
Shipping can be one of the most time-consuming and frustrating parts of running a business. As the business grows, it may get even more complicated. The rise in the cost of shipping and logistics results in a cut of profits can be really daunting at times.
Fortunately, Shopify shipping is simpler. Sellers regardless of the size of its business and expertise can have a simplified shipping process by managing everything in one place. With Shopify shipping as your Shipping platform, sellers can save a ton of time which can be used for the other aspects of your business.
Note: Shopify Shipping is available for orders shipped from fulfillment locations based in the United States and Canada.
https://www.youtube.com/watch?v=NeCcWPxcVEk
On the basis of your plan, you’ll be catered to, with different shipping features-
All three plans have almost the same features except for the advanced plan. It goes a little further and displays the calculated shipping rates to the Shoppers during the checkout.
Have a look at the maximum discount available or different carriers on the basis of plans-
Also, you need not sign up for any additional shipping carrier accounts to use Shopify Shipping. It is accessible from the admin panel of your Shopify store. Let’s look at how to set up Shopify shipping from your store.
To set Shopify shipping on your store, follow the steps below. But if you’re not done with store setup, then follow this free guide for successful Shopify store setup from scratch- How to sell on Shopify? | A detailed guide
Step-1: Select the shipping origin
Set up location from where you want your products to be shipped as explained above.
Go under settings -> shipping. Click on manage rates, here, all your shipping origins will be displayed.
Click on create shipping zone to set the locations or countries in which you want to ship orders.

Step-2: Adding shipping rates
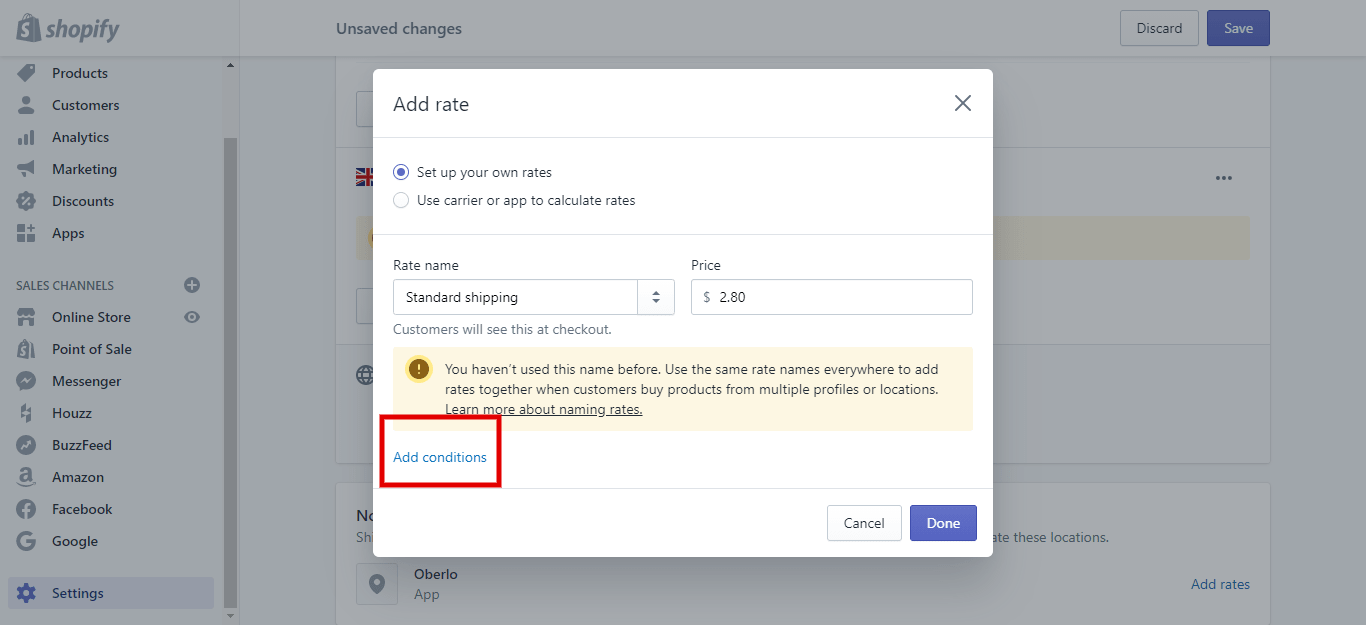
Go to the rates at the Checkout section, and click Edit next to each section. Click on the Add rate to enter the rates. This is where you set free shipping, flat rates, or exact-rate shipping.

Step-3: Add product weight
Add accurate product weight and set dimensions of packaging to charge your customers the exact price. Have a look at common product weights outlined by Shopify.
Step-4: Print Shipping labels
Print the shipping label via desktop printer or label printers supported by Shopify. Shopify supports the following 3 printers:
To start the process, go on the label printer’s corresponding website and download the application driver to your computer. Connect the printer with the computer via USB and print the shipping label.
Refer to Shopify Shipping labels to learn about buying and printing shipping labels in depth.
Learn about payment methods and how to add them to your Shopify store.
How to add payment methods to Shopify? | Process payments easily
You are not alone dealing with shipping hassles. You also aren’t alone looking for clear solutions for the same. This Shopify shipping guide must have cleared different aspects of shipping and how to set up shipping on Shopify so that you can now work on creating a successful shipping strategy for your Shopify business.
Still having doubts? Comment them below, our experts will be there for your help 24*7.
Reading Time: 6 minutes Your marketplace stack may be connected, but your attention is still…
Reading Time: 10 minutes SHEIN Marketplace sellers work with two underlying fulfillment models: seller-managed fulfillment,…
Reading Time: 3 minutes Section 1: About the Client Milky Mama is a leading maternal…

Reading Time: 1 minuteIntro Summary Shopify Scripts stopped executing entirely on June 30, 2026. Merchants…
Reading Time: 9 minutes Your buyers are not shopping in one place anymore. They search…
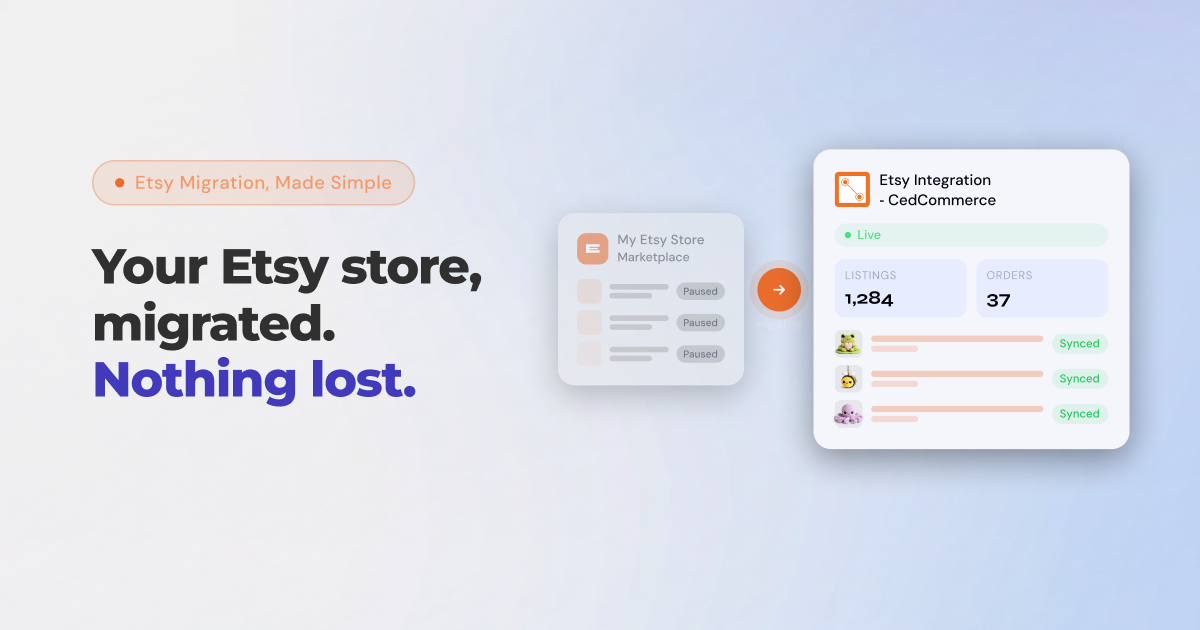
Reading Time: 8 minutes If you’ve been running your Etsy store through Shopify Marketplace Connect,…
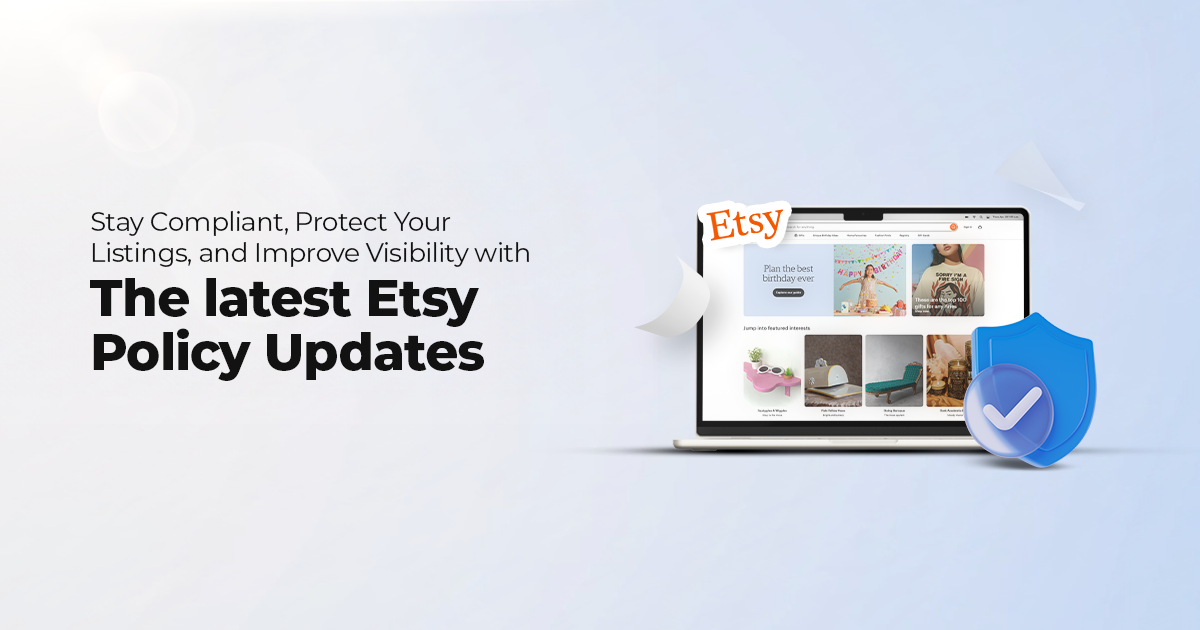
Reading Time: 12 minutes From Etsy policy changes, such as fees and payments, to creativity…
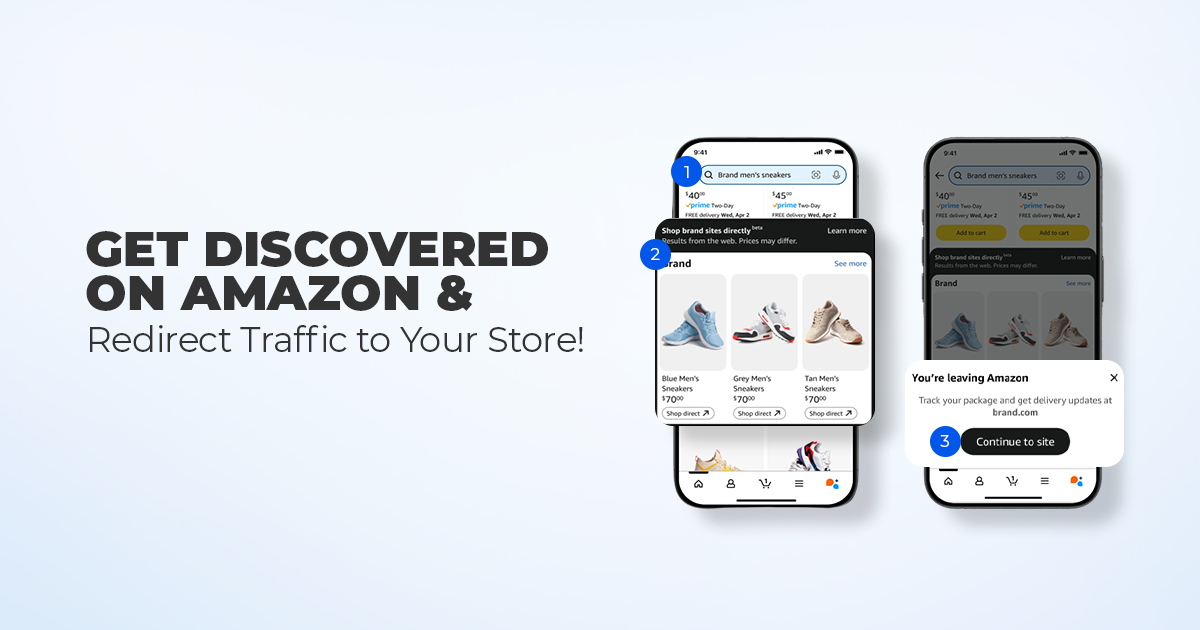
Reading Time: 11 minutes What if reaching hundreds of millions of Amazon customers didn’t mean…

Reading Time: 2 minutes Amazon is rolling out a significant update that will directly impact…

Reading Time: 2 minutes When OpenAI confirmed a 4% transaction fee for Shopify merchants selling…