
Shopify Payments Setup – Adding a Payment Method to Your Shopify Store

Running short of time? Get PDF of the blog in your mail.
Understanding how you’re going to receive money from your customers should be one of the key concerns while you’re setting up your online store. So make sure that you define a robust payment process for your Shopify store. By far, Shopify Payments is the most flexible mode of accepting online payments. Adding a payment method in your Shopify store is not a step-by-step process. It should rather be a wise decision which will decide if the overseas shoppers can shop from your store or not. This blog is all about how to add Shopify Payments as a payment method in your Shopify store.
BNPL, cryptocurrencies, and cardless payment methods are some of the emerging digital payment trends. Keeping in mind the broader term payments – we have directed the blog in 3 parts. For merchants who don’t see Shopify Payments as a payment method can sign-up with various third-party payment gateways – Click here to know more.
Third-part of the series highlights various online payment trends that emerged recently and how Shopify merchants can instill the payment trends in their store. The links are hidden somewhere in this blog. Let’s see if you can find it.
Which is the Best Payment Provider for Shopify?
When a customer orders from your store, their payments much be processed before they reach you. A payment provider checks all the payments. Due to this, there is a delay before the amount gets credited to your bank. So it would help if you were choosy when adding a payment method in your Shopify store.
Third-party payment providers will have their ways of collecting funds from your customers. You can make a list of payment providers that suits you best and check with their website for more details.
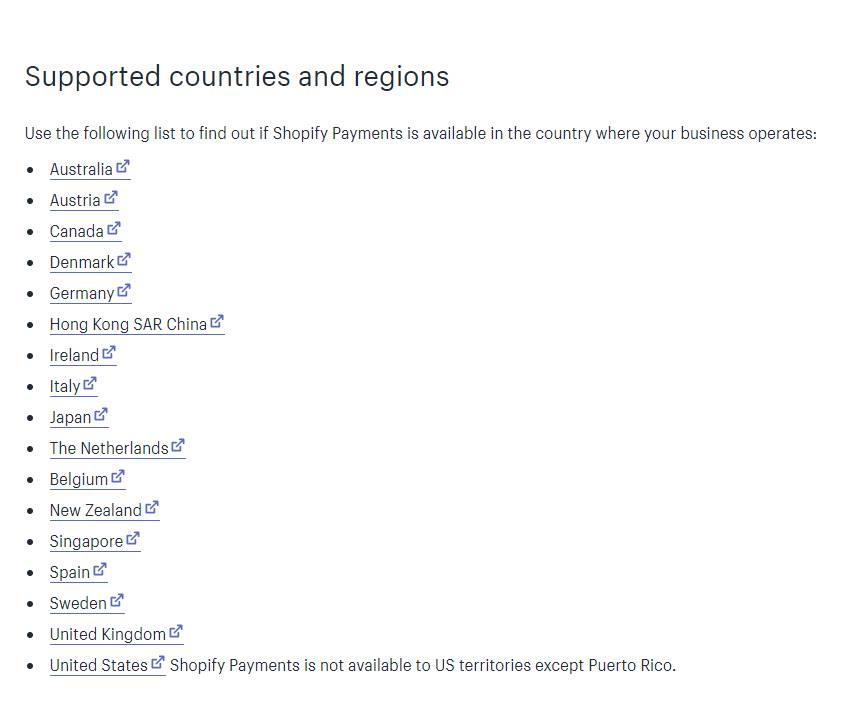
All other payment providers except charge a fee for all the processed transactions. But Shopify Payments only charge for transactions through credit cards. If you operate your Shopify store from any of these countries, then you can add it as a payment method –
Don’t worry if your store is elsewhere. Shopify’s ecosystem is loaded with third-party payment providers like PayPal, RazorPay, Paytm. Click here to see prominent payment gateways region-wise.
How to Configure Shopify Payments Step-by-Step –
Make sure that you decide on your store currency. It is the currency that you price your product in, which is used in your reports. Here’s what you need to do –
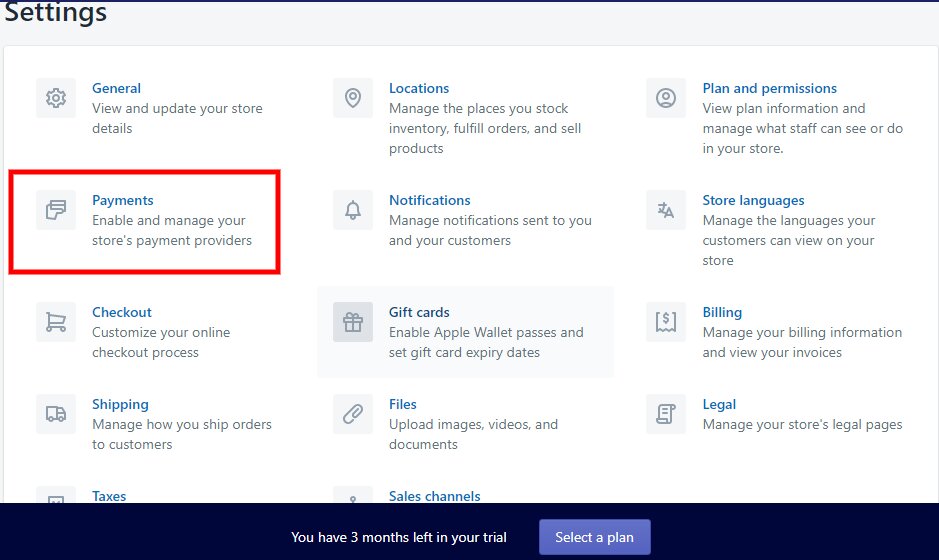
- From your Shopify admin, go to settings > payments.
- You can activate it in either of the ways –
– If you are yet to set up a credit card payment provider, then click on complete account setup in Shopify Payments.
– If you have a different credit card payment provider enabled, click on Activate Shopify Payments – this will remove any other payment provider linked with your Shopify account. - Fill in your business and personal information and click on Save.
Keep the Following Docs Ready Before Configuration –
You are required to disclose personal and business details. The purpose of collecting details is to comply with regulatory requirements for smooth transactions. Make sure your bank account is –
- A complete checking account or a current account in the UK or Ireland.
- Use the payout currency of your region.
- Accepting electronic bank transfers.
In the Business Details section, select the type of your business. Then, add your business number, EIN, or TIN, depending on your business’s country. If you set up as LLC or incorporation, then you need the name and date of birth of someone in the business listed under Personal Details.
Shopify Payments – the Apex of Payment Providers!
Essentials of an online store are confined within Shopify’s platform, and you have to assemble each one of them as per requirements. Shopify Payments is an in-house payment solution that accepts all kinds of payments. Below are some highlighting features –
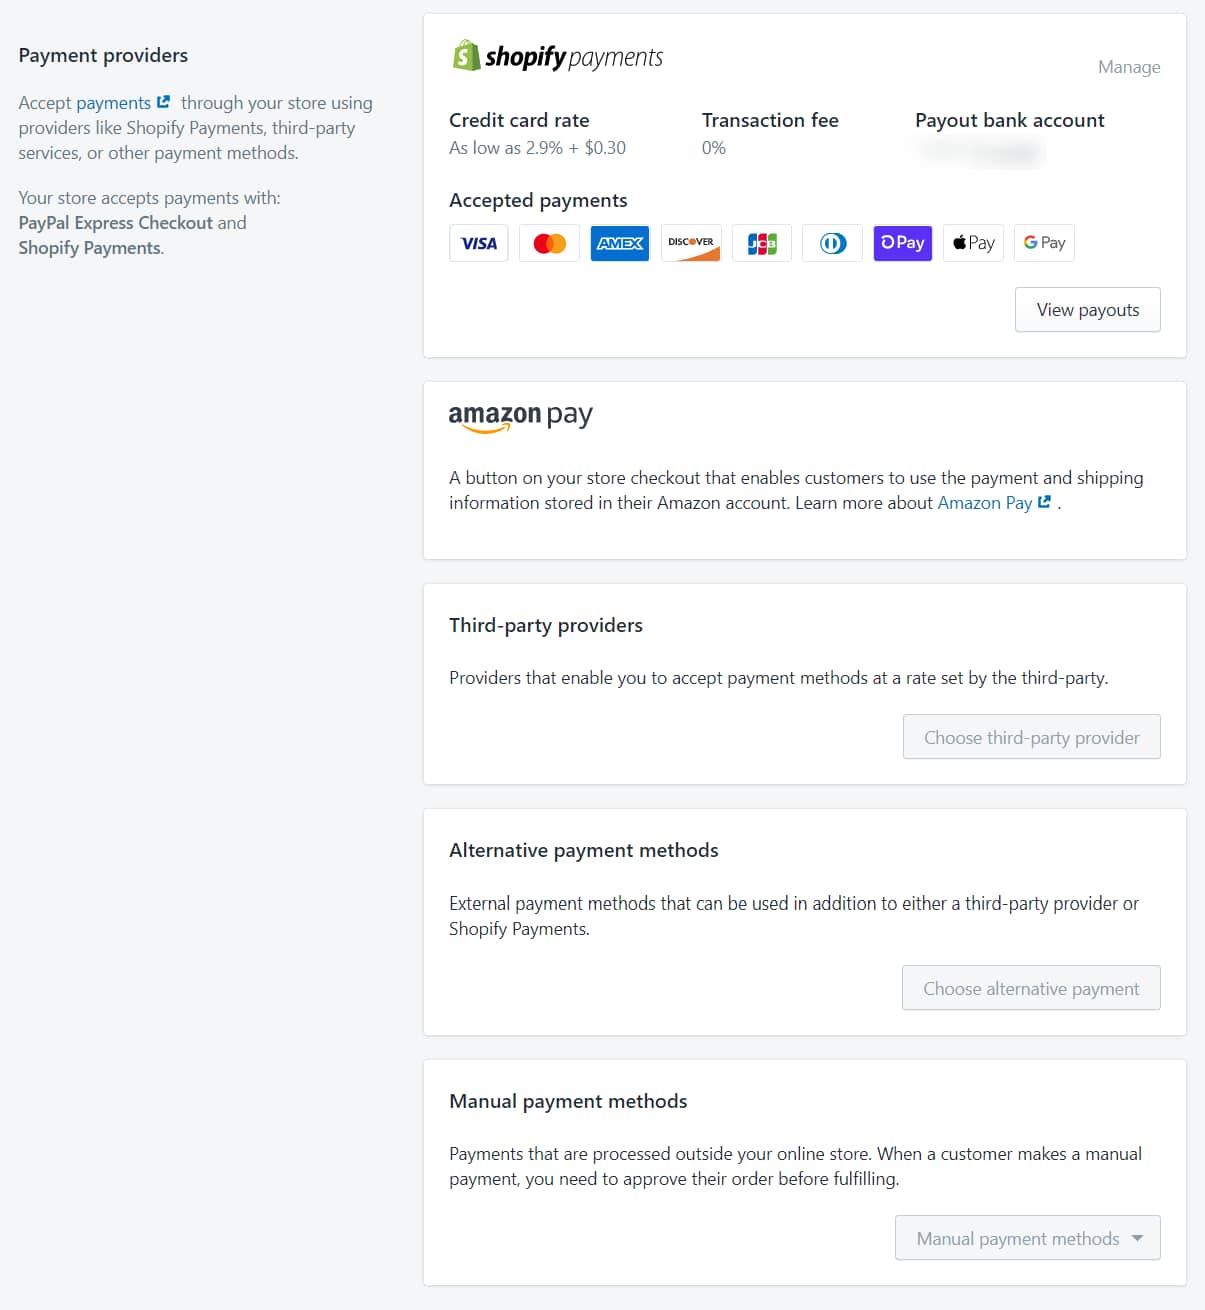
- You don’t have to sign up with any other payment provider. All major payment methods come in handy with Shopify platforms like – bank transfer, credit card transaction, accelerated checkouts, BNPL, and much more.
- Other payment providers charge a fee on every online transaction. But Shopify Payments only charge only for credit card transactions.
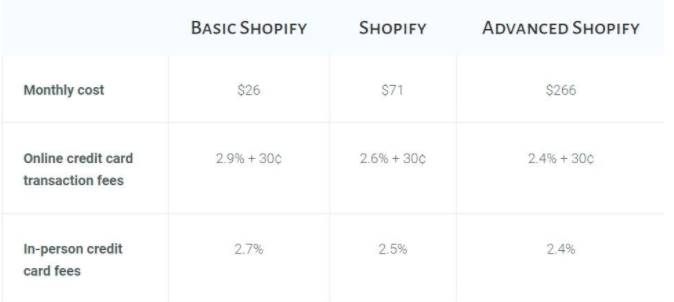
- Transaction fees and costs are based on your payment plans. You can lower the credit card processing fees by upgrading your subscription with Shopify!
- Cross-border trade is easy with Shopify Payments. However, sometimes the currency that your customers prefer can be different from the currency of your payouts from Shopify Payments.
With Shopify, you can connect with shoppers from more than 130 countries! This can be a big deal for multi-channel merchants. In addition, you can add a country selector to your theme so that customers can select their country or region to pay in their local currency.
Consult Shopify Experts Now! - Enhanced Fraud Analytics comes in handy. For example, you’ll be notified if an order is a scam. You also get access to payment-specific analytics and reports – and everything is right inside one dashboard – your Shopify Admin.
- Other payment providers have their own rules for credit-card order payout. You can check with the provider. On average, you receive the amount within 5-7 working days.
But with Shopify Payments, you usually receive the amount in 2-4 working days, depending on your store’s location.

- Shopify Payments are integrated with PayPal. To figure out the best payment provider, you can do a SWOT analysis, check with the company’s service. You can also consult Shopify experts to plan out a suitable payment process for your store.
Shopify Payments Support These Local Payment Providers –
The pandemic gave us quite a few learnings. One of the lessons was not to underestimate the power of local shopping. A lot of shoppers are now looking forward to shopping with local online stores. As an online merchant, you can add either of the following local payment methods in your Shopify store –
- Klarna Payments – This is available for Shopify stores hailing from Australia, Germany, and Sweden. With Klarna Pay Later, Pay Now, and Slice It – customers can pay for their orders with flexible payment options. Klarna works differently with Shopify Payments.
If a customer pays using Klarna Pay Later, then they will be redirected to Klarna’s checkout page from where they can place orders. Customers from Australia, Finland, Germany, and the Netherlands can pay using Klarna payments. Here is how you can activate Klarna payments in your Shopify store –
– From your Shopify admin, go to Setting > Payments.
– In the Shopify Payments section, click on Manage. when, while in the Payments options, toggle the payment options that you want to change.
– Click on save. - Sofort Payments – If it is a direct and secure bank transfer payment method for Shopify Payments. When a customer selects Sofort as a payment method, they need to log in to their account and use two-factor authentication to verify the payment.
Sofort payment solutions are only available for German merchants selling in Euros. However, as a merchant, you can accept payments from Austria, Belgium, Germany, Italy, Netherlands, and Spain. - iDEAL Payments – It is an ideal local payment solution for European Shopify stores. When customers select this payment method, they need to log in to their iDEAL account to verify the payment.
To activate this payment method, you must sell in Euros and reside in Austria, Denmark, Germany, Italy, the Netherlands, Belgium, Spain, or Sweden. - EPS Payments – Electronic Payment Standard is a secure bank transfer payment method for Shopify stores in Austria and Germany. EPS Payments lets customers pay for their orders using their bank accounts.
- Bancontact – Shopify stores from Austria, Denmark, Germany, Italy, Netherlands, Belgium, Spain, and Sweden can activate Bancontact as a local payment method. Since these funds are debited immediately, customers can’t cancel the payment.
Enable Accelerated Checkouts with Shopify Payments –
Time is precious, and Shopify doesn’t want shoppers to waste their time entering the same billing and address information every time they shop online. Using accelerated checkout buttons, shoppers can skip the cart and go directly to the checkout from the product page. Below are the options in case you want to set accelerated checkouts. Please note – to activate accelerated checkouts; you need to start Shopify Payments in your store –
- ShopPay lets customers save their email address, credit card, shipping, and billing information to bypass filling these things the next time they shop. They have to click authorize the purchase and get verified by a 6-digit code, after which orders get processed. To activate ShopPay, follow these steps –
– From your Shopify admin, go to Settings>Payments.
– Click on Manage in the payments settings.
– In the accelerated checkouts, click on ShopPay.
– Click on save. - ApplePay – Especially crafted for apple users using a safari browser on iPhone, iPad, or a Mac. Customers need to tap on Apple Pay, scan their fingerprints, and Apple Pay will provide that information to the payment provider.
To activate ApplePay as your accelerated option, make sure you use either of their following credit-card payment providers –
– Shopify Payments.
– Stripe.
– First Data Payeezy.
– Authorize.net.
– CyberSource.
– Braintree.
Make sure that SSL is activated on your store’s domain. Apple devices are sensitive to vision. So, if you are opting for ApplePay, you need to make sure that your store looks great across all Apple devices. - GooglePay – By activating GoolgePay as an accelerated payment process, customers will pay for their orders using the GooglePay app.
- AmazonPay –Amazon Pay is a fast, easy, and trusted way to make purchases on your Shopify store using payment and shipping details stored in their Amazon accounts. You keep complete control of customer relationships, and Amazon never captures product-level data. To activate AmazonPay, follow these steps –
– From your Shopify admin, go to settings > payment.
– In the AmazonPay sections, click Activate AmazonPay.
– Follow the instructions and create your account.
– If you use a custom domain for your Shopify store, then add the homepage URL of your store to your AmazonPay integration sections. Here is how you can do this –
– In the Amazon Seller Central, go to integration > Integration Central.
– In the Manage Client ID/ store ID(s), click view Client ID/Store ID(s).
– From the app or store name, select your Shopify store and click on edit.
– Add the complete homepage URL to Allowed JavaScript origins.
– Click on save changes.
Before You Click on Save, Watchout for These Payment Trends –
The pandemic has changed many things – one of them is how online shoppers are paying and what payment options are available to them. Basically, eCommerce is slowly moving from card to cloud – when it comes to paying online.
Don’t forget to catch up with the emerging payment trends!
Summing Up –
Setting up a payment method in your Shopify store is not a step-by-step tutorial. It should rather be a time taking, decision-making process. Shopify allows you to be flexible, but you need to decide the adjustable rate depending on your niche.
You can always trust Shopify Experts for business advice.
