| Play Now |
Facebook Ads are a great way to build your brand recognition, increase sales, and attract new customers. You will also be able to segregate your audience based on their interests, demographics, and behaviors to reach out to the people who would find your business most valuable.
Are you also planning to advertise your products on Facebook and wondering how to set up a Facebook Ad Account?
Read further to learn how to create a Facebook Ad Account, set your spending limit, and more.
Table of Content
- Why do you need a Facebook Ad Account?
- How to create a new ad account through Facebook Business Manager?
- Get your Ad Account ready to launch your first Ad Campaign
- An easy alternative to set up your Ad Account with CedCommerce’s Facebook & Instagram Shopping App
- Why is it beneficial to use Facebook & Instagram Shopping App for setting up your Facebook Ad Account?
- Limitations of a Facebook Ad Account
- Wrapping it up
Why do you need a Facebook Ad Account?
A Facebook Ad Account lets you keep track of all the details related to a particular campaign or ad set and the nitty-gritty of business management like your billing information.
Your budget-related metrics, such as your reach, frequency, and engagement, can also be seen here. Your Facebook marketing plan won’t fetch you the desired outcomes without an ad account. So, it is essential to have a Facebook ad account.
To create a Facebook Ad account, you’ll need the following things:
- You must have an existing Business Page on Facebook. If you do not have a Business page yet, create it now.
- You must have admin access to your Facebook Page.
- You must have your personal Facebook account.
- A payment method you would require to use for advertising.
How to create a new ad account through Facebook Business Manager?
You can create your Facebook ad account through Facebook Business Manager. Facebook Business Manager is a one-stop destination that assists you in managing all of your Facebook assets, such as ad accounts, business pages, Instagram accounts, and Facebook Pixel.
To start running ad campaigns on Facebook, you need to connect your Facebook page to the Business Manager.
Connect your Facebook page to the Business Manager
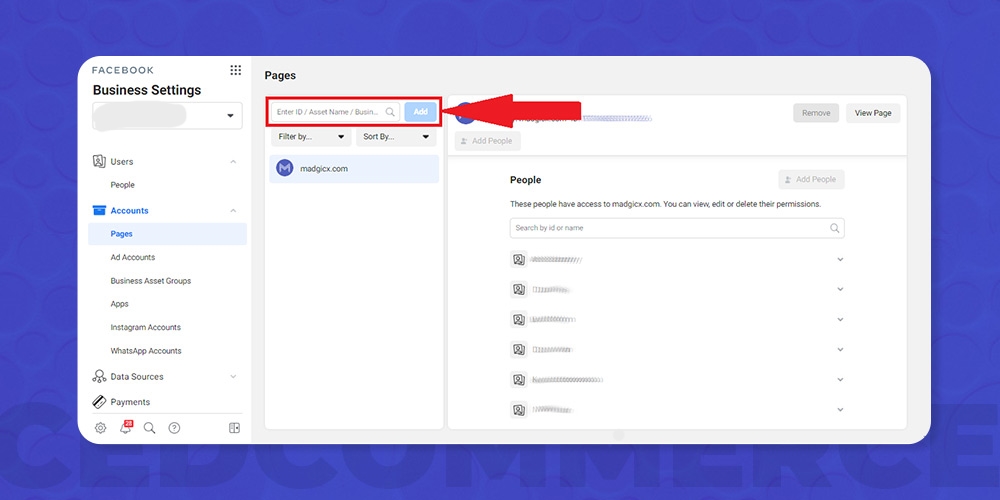
To connect your Facebook Page with the Business Manager. You have to follow these steps:
- Go to the Facebook Business Manager.
- Navigate to the menu on the left and click on the Business Settings.
- Now enter the URL of your Facebook Page.
- Finally, click on “Add” to connect the Page to your Business Manager.
Now that you have linked your Facebook Page to the Business Manager, it’s time to create a Facebook Ad Account.
Create a new Facebook Ad Account with the Facebook Business Manager
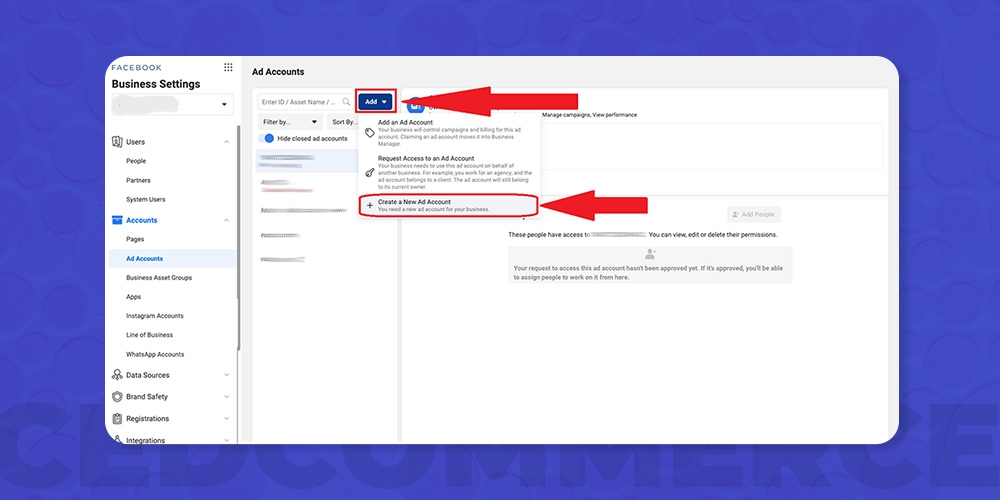
To create a new Facebook ad account with the Business Manager, you need to:
- Navigate to the left-hand side panel of the Business Manager and choose “Business Settings.”
- Click on Accounts. Then select “Ad Accounts” from the drop-down menu.
- Click on the blue-colored “Add” button to open the drop-down menu.
- Select “create a new ad account” from the drop-down menu.
-
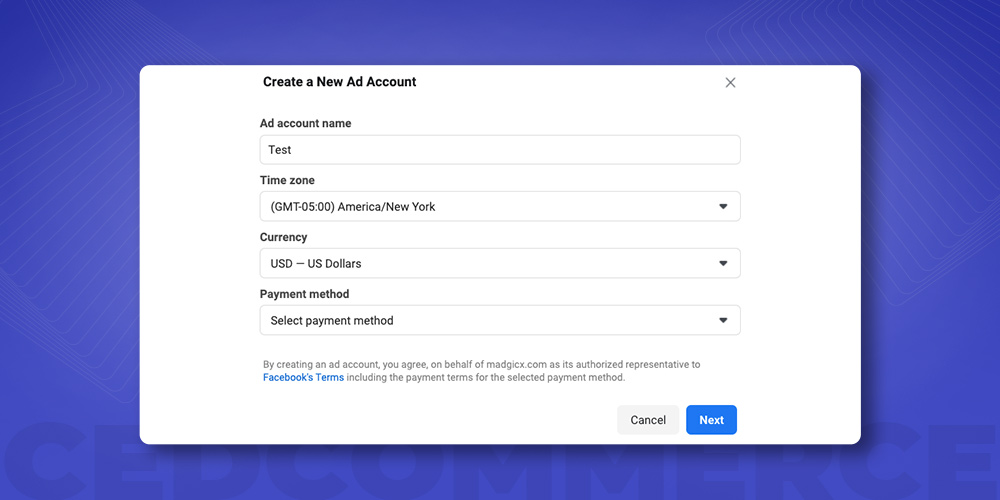
After that, choose your time zone, currency, and payment method for your new ad account. You won’t be able to modify your billing currency or time zone once you have created your ad account, so pay extra attention while choosing.
- Choose whether you’d want to use this ad account for your own business or a client. Then press “Create.”
You have created your new Facebook Ad account.
Get your Ad Account ready to launch your first Ad Campaign
You just have created your new ad account. However, you need to do a few more things before launching your first campaign. These include adding a payment method, setting permissions, and adding people for various roles.
Let’s look at how to accomplish all these and what more you can do to make your ad account work for you efficiently.
How can you add a new payment method to your Facebook ad account?
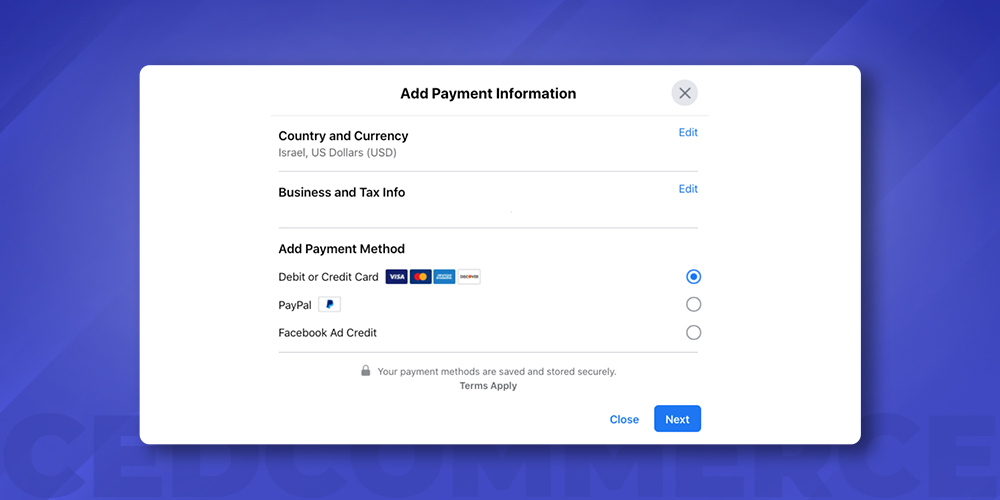
- Select “Payment Settings” from the Facebook Ad Account Settings menu. You will be able to add a new payment method, change current ones, specify a spending limit, and see your upcoming bill in this section.
- Click on “Add Payment Method” from the Payment Settings.
- Choose a payment method to add: credit or debit card, PayPal, bank account (in supported countries), Facebook Ad Credit (if applicable), or manual payment options in your area (in supported countries and currencies).
- Fill in the required fields.
- Click on Next.
It is advisable to add a secondary payment method. If in case, your primary method fails, Facebook could start billing from your secondary payment method and does not halt your ad campaigns.
Once you’ve added your payment methods, you can select which one will be your primary method. Please note that you cannot delete your primary method until and unless you make another payment option primary.
What is the billing threshold?
Facebook will charge your account whenever you reach your monthly billing threshold and any remaining charges at the end of your monthly billing term.
Your billing threshold will be set to a small amount when you initially start advertising on Facebook. Whenever you make successful payments, money will be deducted from your balance. The billing threshold may increase until your account reaches a final threshold amount. Your billing threshold may be thought of as a strategy to establish a good payment history with Facebook.
In most cases, your billing threshold is set at $25 at first. As you continue to spend and your payments are successful, it will automatically increase your billing threshold to $50, $250, $500, and so on.
You can also manage your billing threshold from Facebook Ad Manager.
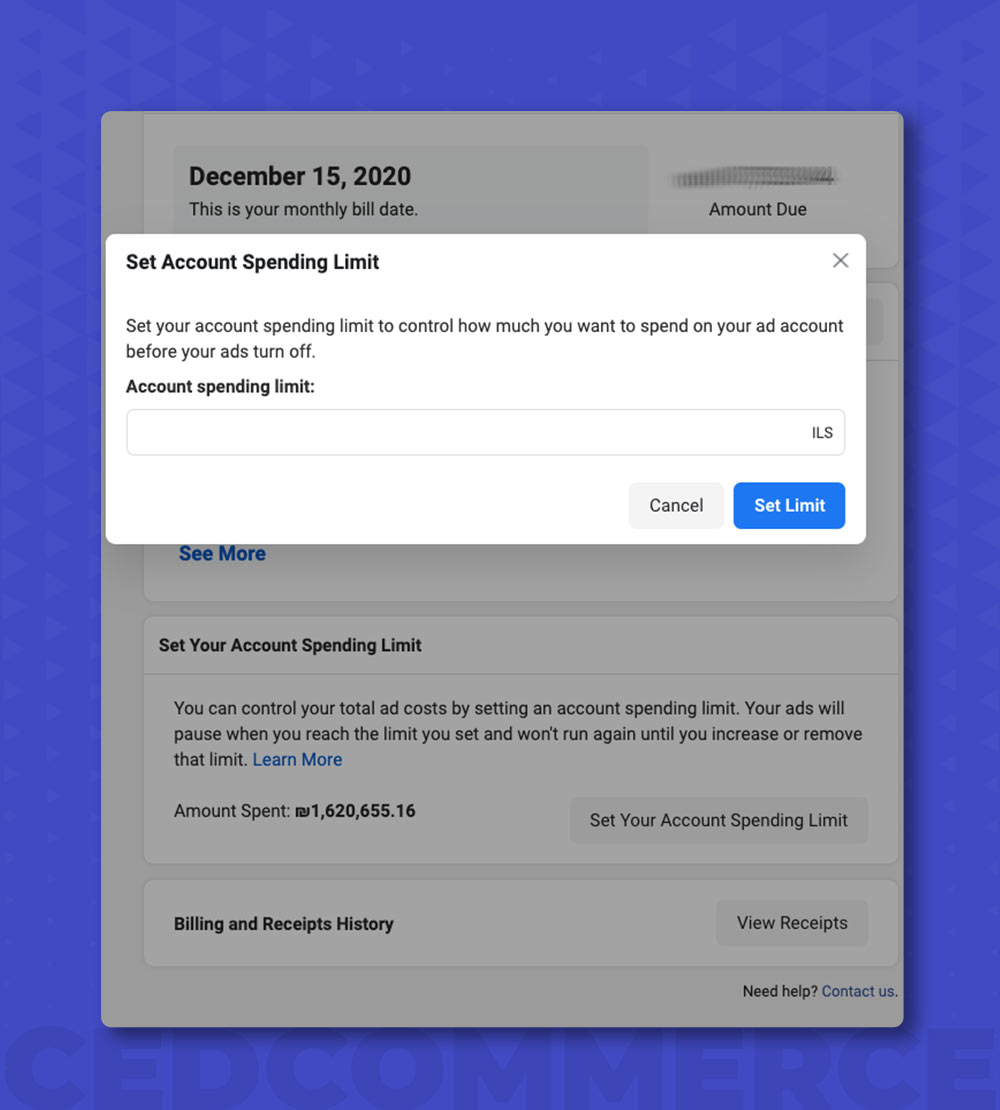
How to set Facebook Ads spending limit?
To minimize overpaying, you can set a spending limit for your account. Once you reach this amount, all ads will be put on hold, and you won’t be charged again unless the limit is raised or decreased.
This is extremely helpful if you have an agency or a media buyer managing your account on your behalf and you have a limited budget. However, if you set this limit too low, you’ll have to update it more often.
In addition, your advertising will be suspended for at least 15 minutes each time you reach the limit. So, if you are into promoting a big sale or a time-sensitive offer, this can be disadvantageous.
To set your account spending limit, go to “Payment Settings” and select “Set Your Account Spending Limit” (below “Payment Methods”) to set your spending limit. Then, enter the amount you want to limit and click “Set Limit.”
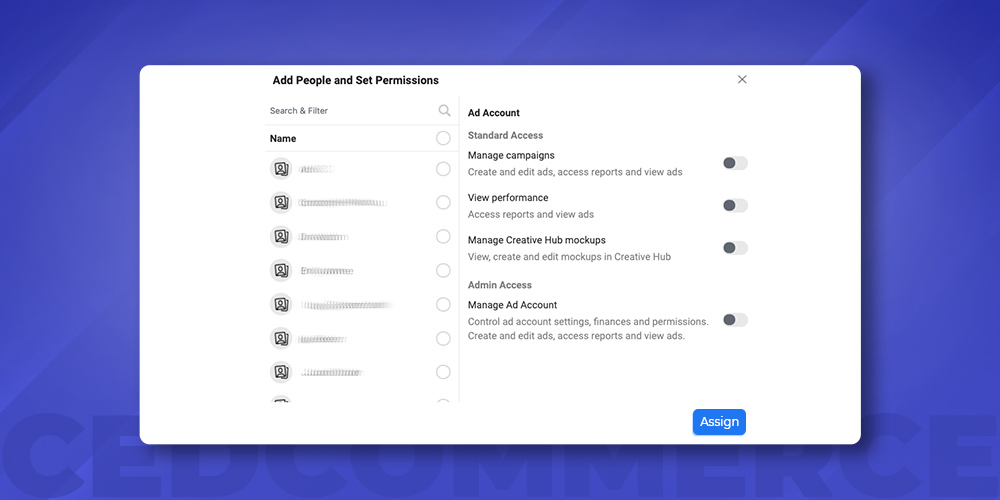
How to assign roles and grant permissions to manage your Ad Account?
One last step before launching your first ad campaign is to add people to your account for various roles and grant them permissions accordingly. This helps a lot when you have a team working on a Facebook Ad account.
Facebook formerly specified 3 Ad account roles: Admins, Advertisers, and Analysts. Analysts only had access to Ad Account reports. Advertisers could only create and edit their ads and have insights from the ad account reports. Admins could manage payment methods, Facebook Ad account settings, spending limits, add people to the ad account and assign roles.
However, you can now specify permissions for each person added to your ad account.
Follow the steps below to set permissions in your Facebook Ad Account:
- Navigate to the Business Settings from Business Manager and select “Ad Accounts.”
- A new screen will appear. Here you can add new users to your ad account and edit the permissions of existing ones. Select “Add People” to add new users.
- You can grant the following permissions to the selected user: Manage Campaigns, View Performance, Manage Creative Hub Mockups and Manage Ad Account ( Admin Access).
-
Click on “Assign” to assign the permissions to the added user.
Now you are ready to launch your first ad campaign on Facebook.
An easy alternative to set up your Ad Account with CedCommerce: Facebook & Insta App
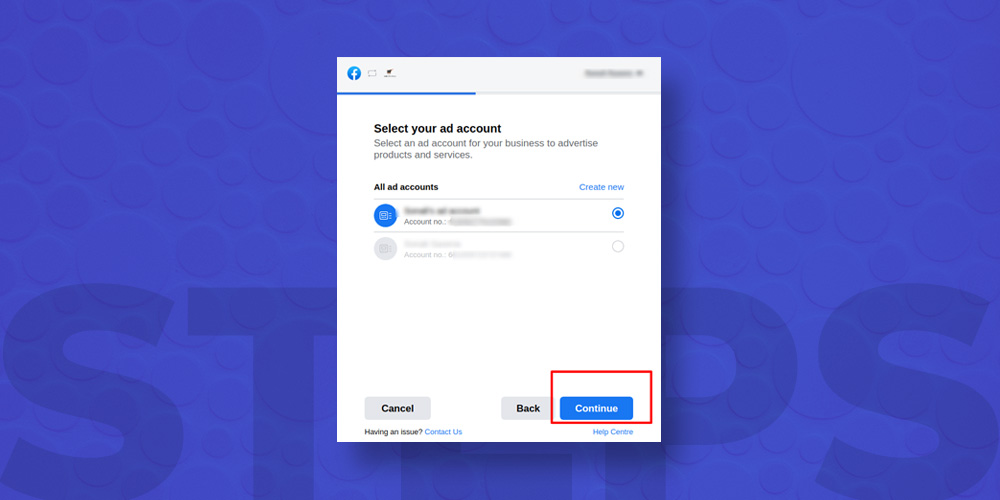
You might find creating and setting up your Ad Account a tedious process. However, you can set up your Facebook Ads account in just a few minutes with CedCommerce: Facebook & Insta app.
Yes! You heard it right. The Facebook & Instagram Shopping app lets you set up your ad account during the onboarding process. All the prerequisites of creating an Ad account have been taken care of beforehand.
All you have to do is click on “Create New” while selecting your Ad Account.
That’s it! You have created your new Facebook Ad account.
Complete the Onboarding process and start running your Ad Campaigns from the Ads section on the dashboard.
Why is it beneficial to use Facebook & Instagram Shopping App for setting up your Facebook Ad Account?
CedCommerce: Facebook & Insta app simplifies your overall process of selling and promoting your products across Meta commerce platforms. The app lets you connect all of your Meta Assets, such as your Facebook Page, Product Catalog beforehand. This removes your extra work and makes your Ad account setting process smooth.
Also, the app provides you with interfaces where you can create a new Facebook Page, product catalog, and Facebook Pixel so that you can set up all of these instantly.
Thus, setting up your Ad Account has never been easier as CedCommerce: Facebook & Insta helps you create it in just ONE CLICK.
Limitations of a Facebook Ad Account
It is crucial to know Facebook’s limitations tied to your ad account, even if you initially won’t hit any of them.
Ad Account Limits
There are limits to how many ad accounts a person can have and how many people can use each one.
- A person can have up to 25 Facebook Ad Accounts.
- Each Ad Account can have up to 25 associated admins, analysts, or advertisers. When this limit is reached, you must either delete yourself or let an admin delete you from any ad accounts you are no longer using.
Campaigns, Ad Sets, and Ad limits per Account
In addition to Ad account limits, there are limitations on the number of campaigns, ad sets, and ads that you can create and run per ad account. You’ll receive a notice or an error message saying you can’t create any more after hitting those limitations. These limitations apply to all of your advertising, ad sets, and campaigns, whether they’re active (on) or not (turned off).
You can only create and manage a certain number of ads, ad sets, and campaigns per ad account if you have a regular Ads Manager account.
- You can have up to 5,000 ad sets in your account.
- Each ad set can have up to 50 ads.
- You can run up to 5,000 campaigns from your account.
- You can run 5,000 ads from your account. Out of these, only 1,000 ads can use dynamic creatives.
Wrapping it up
Setting up your ad account with CedCommerce: Facebook & Insta is a breeze. Isn’t it??
However, now you have learned the two ways of setting up your Facebook Ad account. Select your preferred method of creating your ad account and start running your ad campaigns on Facebook.
Furthermore, we are always there for your help, irrespective of your chosen method of setting your ad accounts. You can reach out to us any time. Our social media mavericks are available round the clock for your assistance.
So, What are you waiting for? Start creating your Facebook Ad Account NOW!