Multi-Vendor Marketplace Work Flow By CedCommerce
Cookie Settings
Cookies used on the site are categorized and below you can read about each category and allow or deny some or all of them. When categories than have been previously allowed are disabled, all cookies assigned to that category will be removed from your browser. Additionally you can see a list of cookies assigned to each category and detailed information in the cookie declaration. Learn more
Allow all Cookies Deny AllNecessary Cookies
Some cookies are required to provide core functionality. The website won't function properly without these cookies and they are enabled by default and cannot be disabled.
Preferences
Preference cookies enables the web site to remember information to customize how the web site looks or behaves for each user. This may include storing selected currency, region, language or color theme.
Analytical Cookies
Analytical cookies help us improve our website by collecting and reporting information on its usage.
Marketing Cookies
Marketing cookies are used to track visitors across websites to allow publishers to display relevant and engaging advertisements.
- Getting Started
- Introduction
- Purpose
- Scope
- License
- General Description
- Product Perspective
- Product Functions
- User Characteristics
- Vendor Registration Process
- New Vendor
- Become a Vendor
- Public Name
- Shop Url
- Approval/Disapproval
- Vendor Shop Enable/Disable
- Vendor Website Sharing
- Account Management
- Dashboard
- Profile
- Transaction Settings
- Shipping Settings
- Shipping Methods
- Vendor Profile View on Shop Page
- Catalog Management
- Product's Types
- Product's Attribute Sets
- Product's Attributes
- Product's Pricing
- Product's Inventory
- Product's Catgeories
- Product's Websites
- Product's UpSells
- Product's CrossSells
- Related Products
- Product's Custom Options
- Admin Moderation
- Vendor Product Collection on Shop Page
- Order Lifecycle
- Order Lifecycle
- Place an Order
- Commission Distribution
- Create Invoice
- Create Shipment
- Create Credit Memo
- Commission Calculation
- Transaction Lifecycle
- Transaction Overview
- Transfer List:
- Transaction List (Vendor View)
- RMA Lifecycle
- Request RMA
- Transfer to Vendor:
- RMA Chat
- Approve RMA
- Admin Specific RMA Name
- RMA Mails
Getting Started
Introduction
In this document we are discussing about vendors and theirs products. Purpose of CedCommerce Multi-Vendor Marketplace is to fulfill the requirement of supply chain management without breaking the cash-flow.
CedCommerce Multi-Vendor Marketplace have two perspective:
- From merchant (formally admin) shop: CedCommerce Multi-Vendor Marketplace adds to the inventory of products on the merchant’s site by adding vendor’s products. As more and more vendors will add their products, the inventory of the site will also increase.
- From vendor: Using CedCommerce Multi-Vendor Marketplace vendor can sell and promote their products online from the merchant’s (admin) shop.
Purpose
A Marketplace is a regular gathering of people for the purchase and sale of provisions, livestock, and other goods. In other words, it is simply a place where buying and selling occurs.
Scope
- CedCommerce Multi-Vendor Marketplace is a marketplace with vendor management system developed by CedCommerce
- It is aMulti-Vendor platform where the products from multiple independent vendors appear in the common product catalog on the merchant’s (formally admin) website and the visitors can shop for them at a single web store with the products supplied by hundreds of different vendors from all over the world.
License
This license agreement (hereinafter referred to as “Agreement”) is duly executed between you (user of our software/documentation) and CedCommerce (hereinafter referred to as “we/us/our”). The agreement applies to all products/software/scripts/services you purchase from us.
For more info click here
General Description
Product Perspective
CedCommerce Multi-Vendor Marketplace has two perspectives from the products view point:
- From merchant (formally admin) shop: CedCommerce Multi-Vendor Marketplace increases the inventory of the products on the merchant’s site allowing the vendors to add their products.
- From vendor: Using CedCommerce Multi-Vendor Marketplace the vendor can sell their products from the merchant’s shop.
Product Functions
CedCommerce Multi-Vendor Marketplace has a unique vendor panel from where the vendor can manage their products and sales. Merchant (formally admin) has full control on every action performed by the vendor and therefore, for managing vendors and their products, sales, commission, etc. there are some panels in the merchant (formally admin) section.
User Characteristics
1. Vendor: Vendor is a person (or a company) who can sell his/her products at merchant's site. Vendor has to sign up first at merchant’s shop for selling his/her products.
After the merchant’s (formally admin) approval, Vendors:
- can have profile section,
- can have add/edit/list/delete product's attributes section,
- can have add/edit/list/delete product section,
- can have order view/cancel/invoice/shipment section for their products (because an order may contain multiple vendor's products),
- can have sales reporting section for their orders,
- can have commission section from where they can add their bank detail etc and also view the commission and statistics of sales,
- can have mass import/export section for products and categories,
- can have rating/review section for their products,
- can have a landing page for their products with their logos, about vendor information etc.
2. Merchant(formally admin): Merchant (formally admin) is the owner of the shop who can manage all the activities of every vendor. Every action performed from the vendor panel by the vendor is a must to be approved by the merchant (formally admin), only after that it will be available online at the shop. Merchant (formally admin) has the authority to disable any function of the vendor at any time.
Merchant (formally admin) has the following possible menus :
- Manage Vendors,
- Manage Vendor's Products
- Manage Vendor's Sales,
- Manage Vendor's Commission,
- Vendor Configurations.
Vendor Registration Process
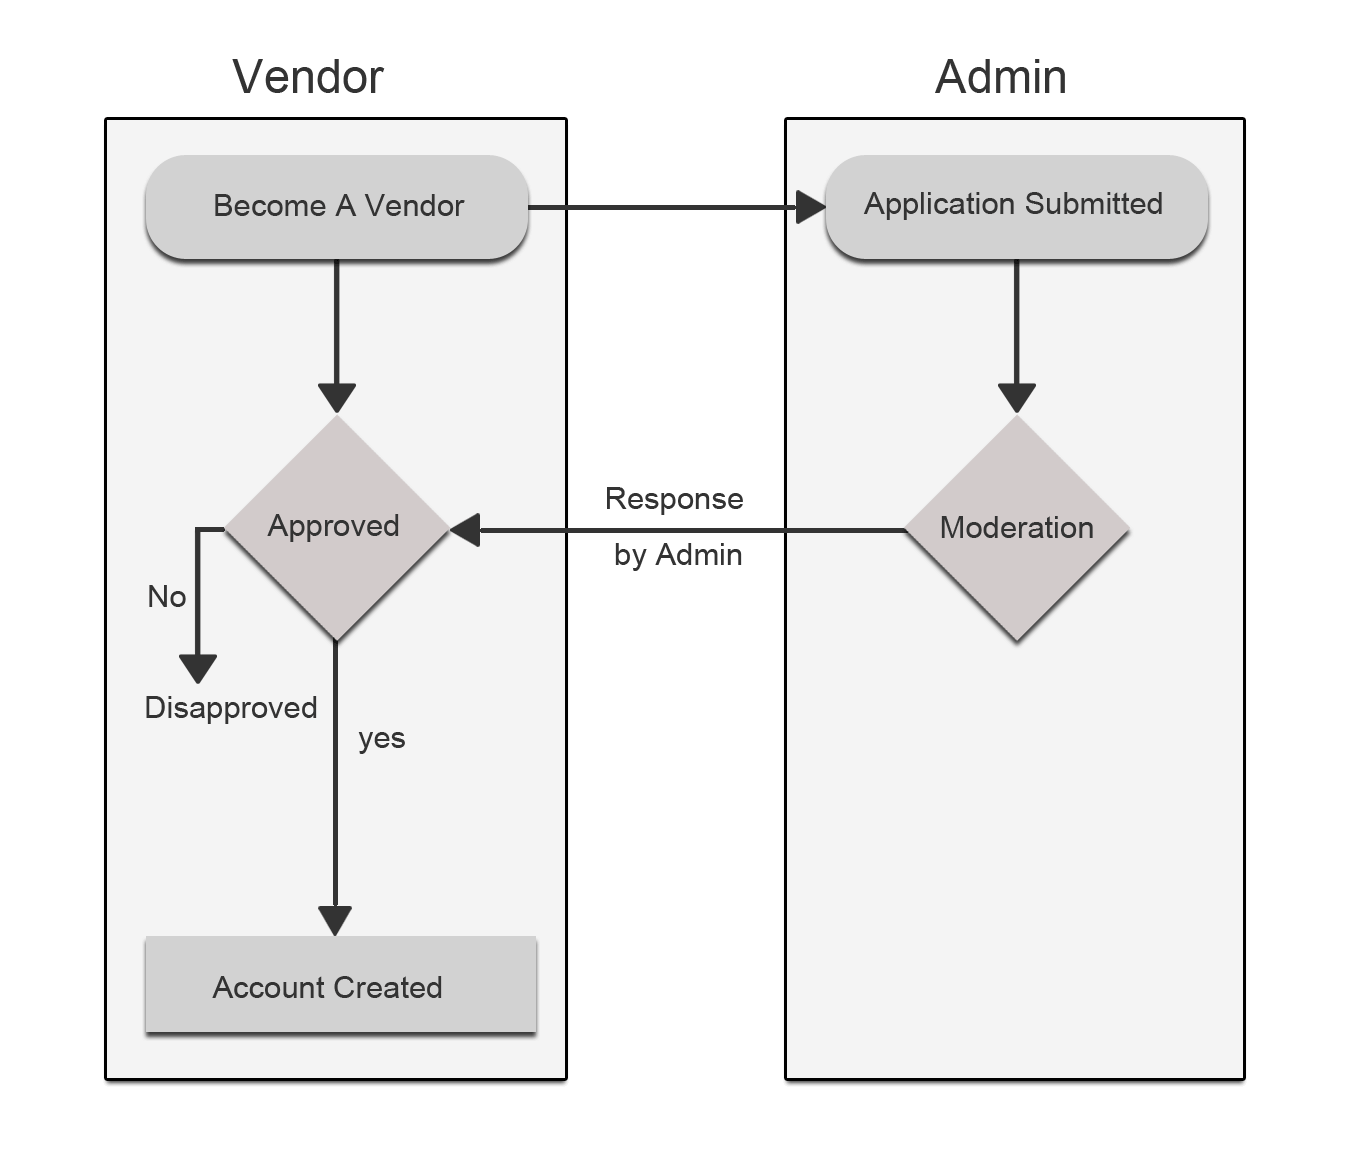
New Vendor
Anyone can be registered as a vendor from "Create New Account" link.
Become a Vendor
An existing customer can also become a vendor through the Approval Page.
Public Name
Public Name is the Display Name/Brand Name of the vendor. Public Name will be used "At Marketplace Page", "At Shop Page", "At Order View", "At Transaction View", "At Invoice View", "At Print View" etc.
Shop Url
Shop Url is a unique URL key throughout the vendor system. Shop Url key will be used for creating a unique URL for vendor shop.
Approval/Disapproval
Admin has the authority to approve/disapprove every new vendor. The admin can also enable the Auto approval option for the vendor in which case every new vendor will get approved automatically.
But admin has the authority to disapprove a vendor at any time from the admin panel.
Vendor Shop Enable/Disable
Admin has the authority to enable/disable the shop page of the approved vendor at any time.
Vendor Website Sharing
In default Magento, the customer can share all the websites/specific websites as per the admin settings.
Vendor class is the extended form of customer class which means a vendor can share the websites of Magento site according to their parent customer website sharing options.
If the parent customer is eligible for sharing all the websites in that case the vendor can create products for all the available websites of the Magento site otherwise the vendor can create products for only assigned website.
Account Management
Every Approved Vendor has an Account Panel (say Vendor Panel) to manage their profile, products, sales, reports, settings and many more according to their group settings and membership plans.
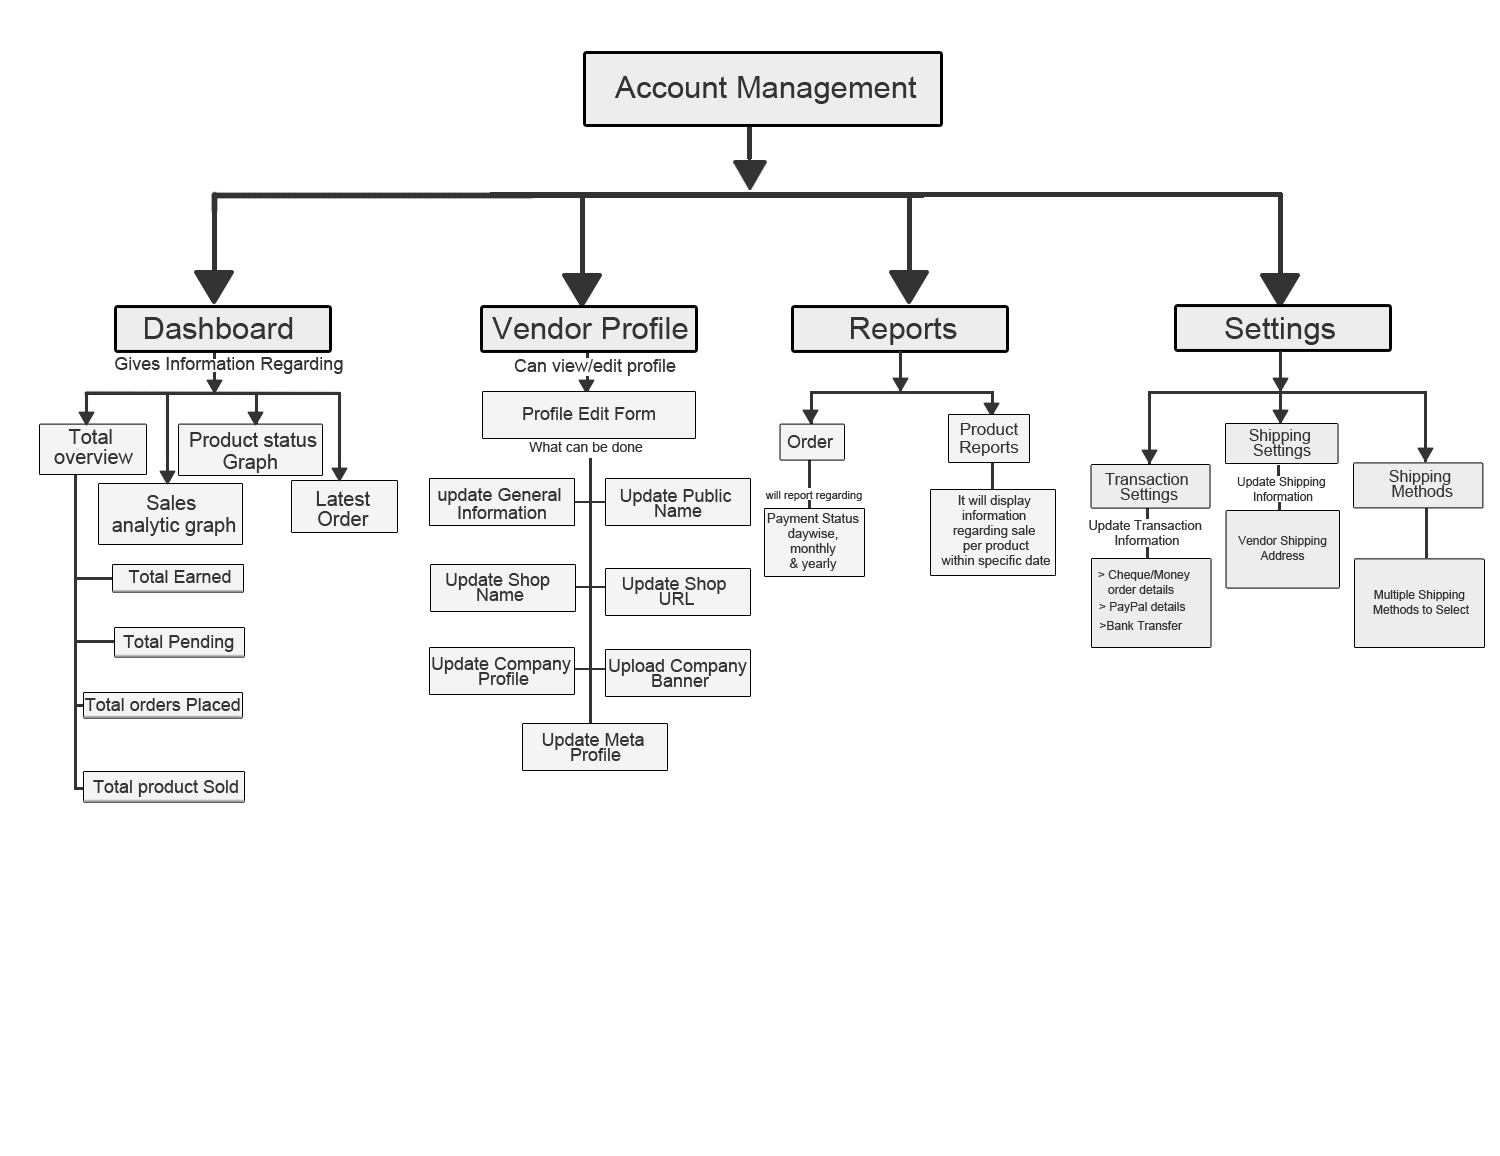
Dashboard
Dashboard is a resource panel of vendor from where the vendor has the ability to view a snapshot of their Total Pending Amount, Total Earned Amount, Total Orders Placed, Total Products Sold, Sales Analytics (Today, Week, Month and Year), Products Status, Latest Orders, Country Wise Orders and Chat* .
Total Pending Amount: An amount which the admin has to pay to the vendor for the purchased products.
Total Earned Amount: Total amount earned by the vendor from their sold products.
Total Orders Placed: Number of orders placed by the buyers for vendor's products.
Total Products Sold: Total Products Quantity sold.
Sales Analytics (Today, Week, Month and Year): It depicts a sales graph having “Recent Time Range” versus “Number of Placed Orders” where the “Recent Time Range” can be current 24 hours in the case of Today, can be current 7 days in the case of a Week, can be current 30 days in the case of a Month, can be current 12 months in the case of an Year.
Products Status: A count chart which will represent the count of Pending, Approved and Disapproved Products created by the vendor.
Latest Orders: Listing of last 5 Order placed for vendor's products.
Country Wise Orders: Country wise sales graph. On hovering at a particular region/country the vendor can view the total order count and total sale amount for these orders.
Chat*: A Chat window to communicate with admin for vendor related queries.
Profile
Profile is a resource panel of the vendor from where the vendor has the ability to manage his/her account information.
Account Information is generally divided into four attribute groups** called "GENERAL INFORMATION", "COMPANY INFORMATION", "SUPPORT INFORMATION" and "SEO INFORMATION".
GENERAL INFORMATION: Generally following inputs comes under this attribute's group:
- Profile Picture(Editable attribute): This is personal picture of vendor or vendor representative.
- Created At(Non-Editable attribute)
- Shop Url(Non-Editable attribute)
- Status
- Vendor Group
- Public Name
- Name
- Gender
- Contact Number
Transaction Settings
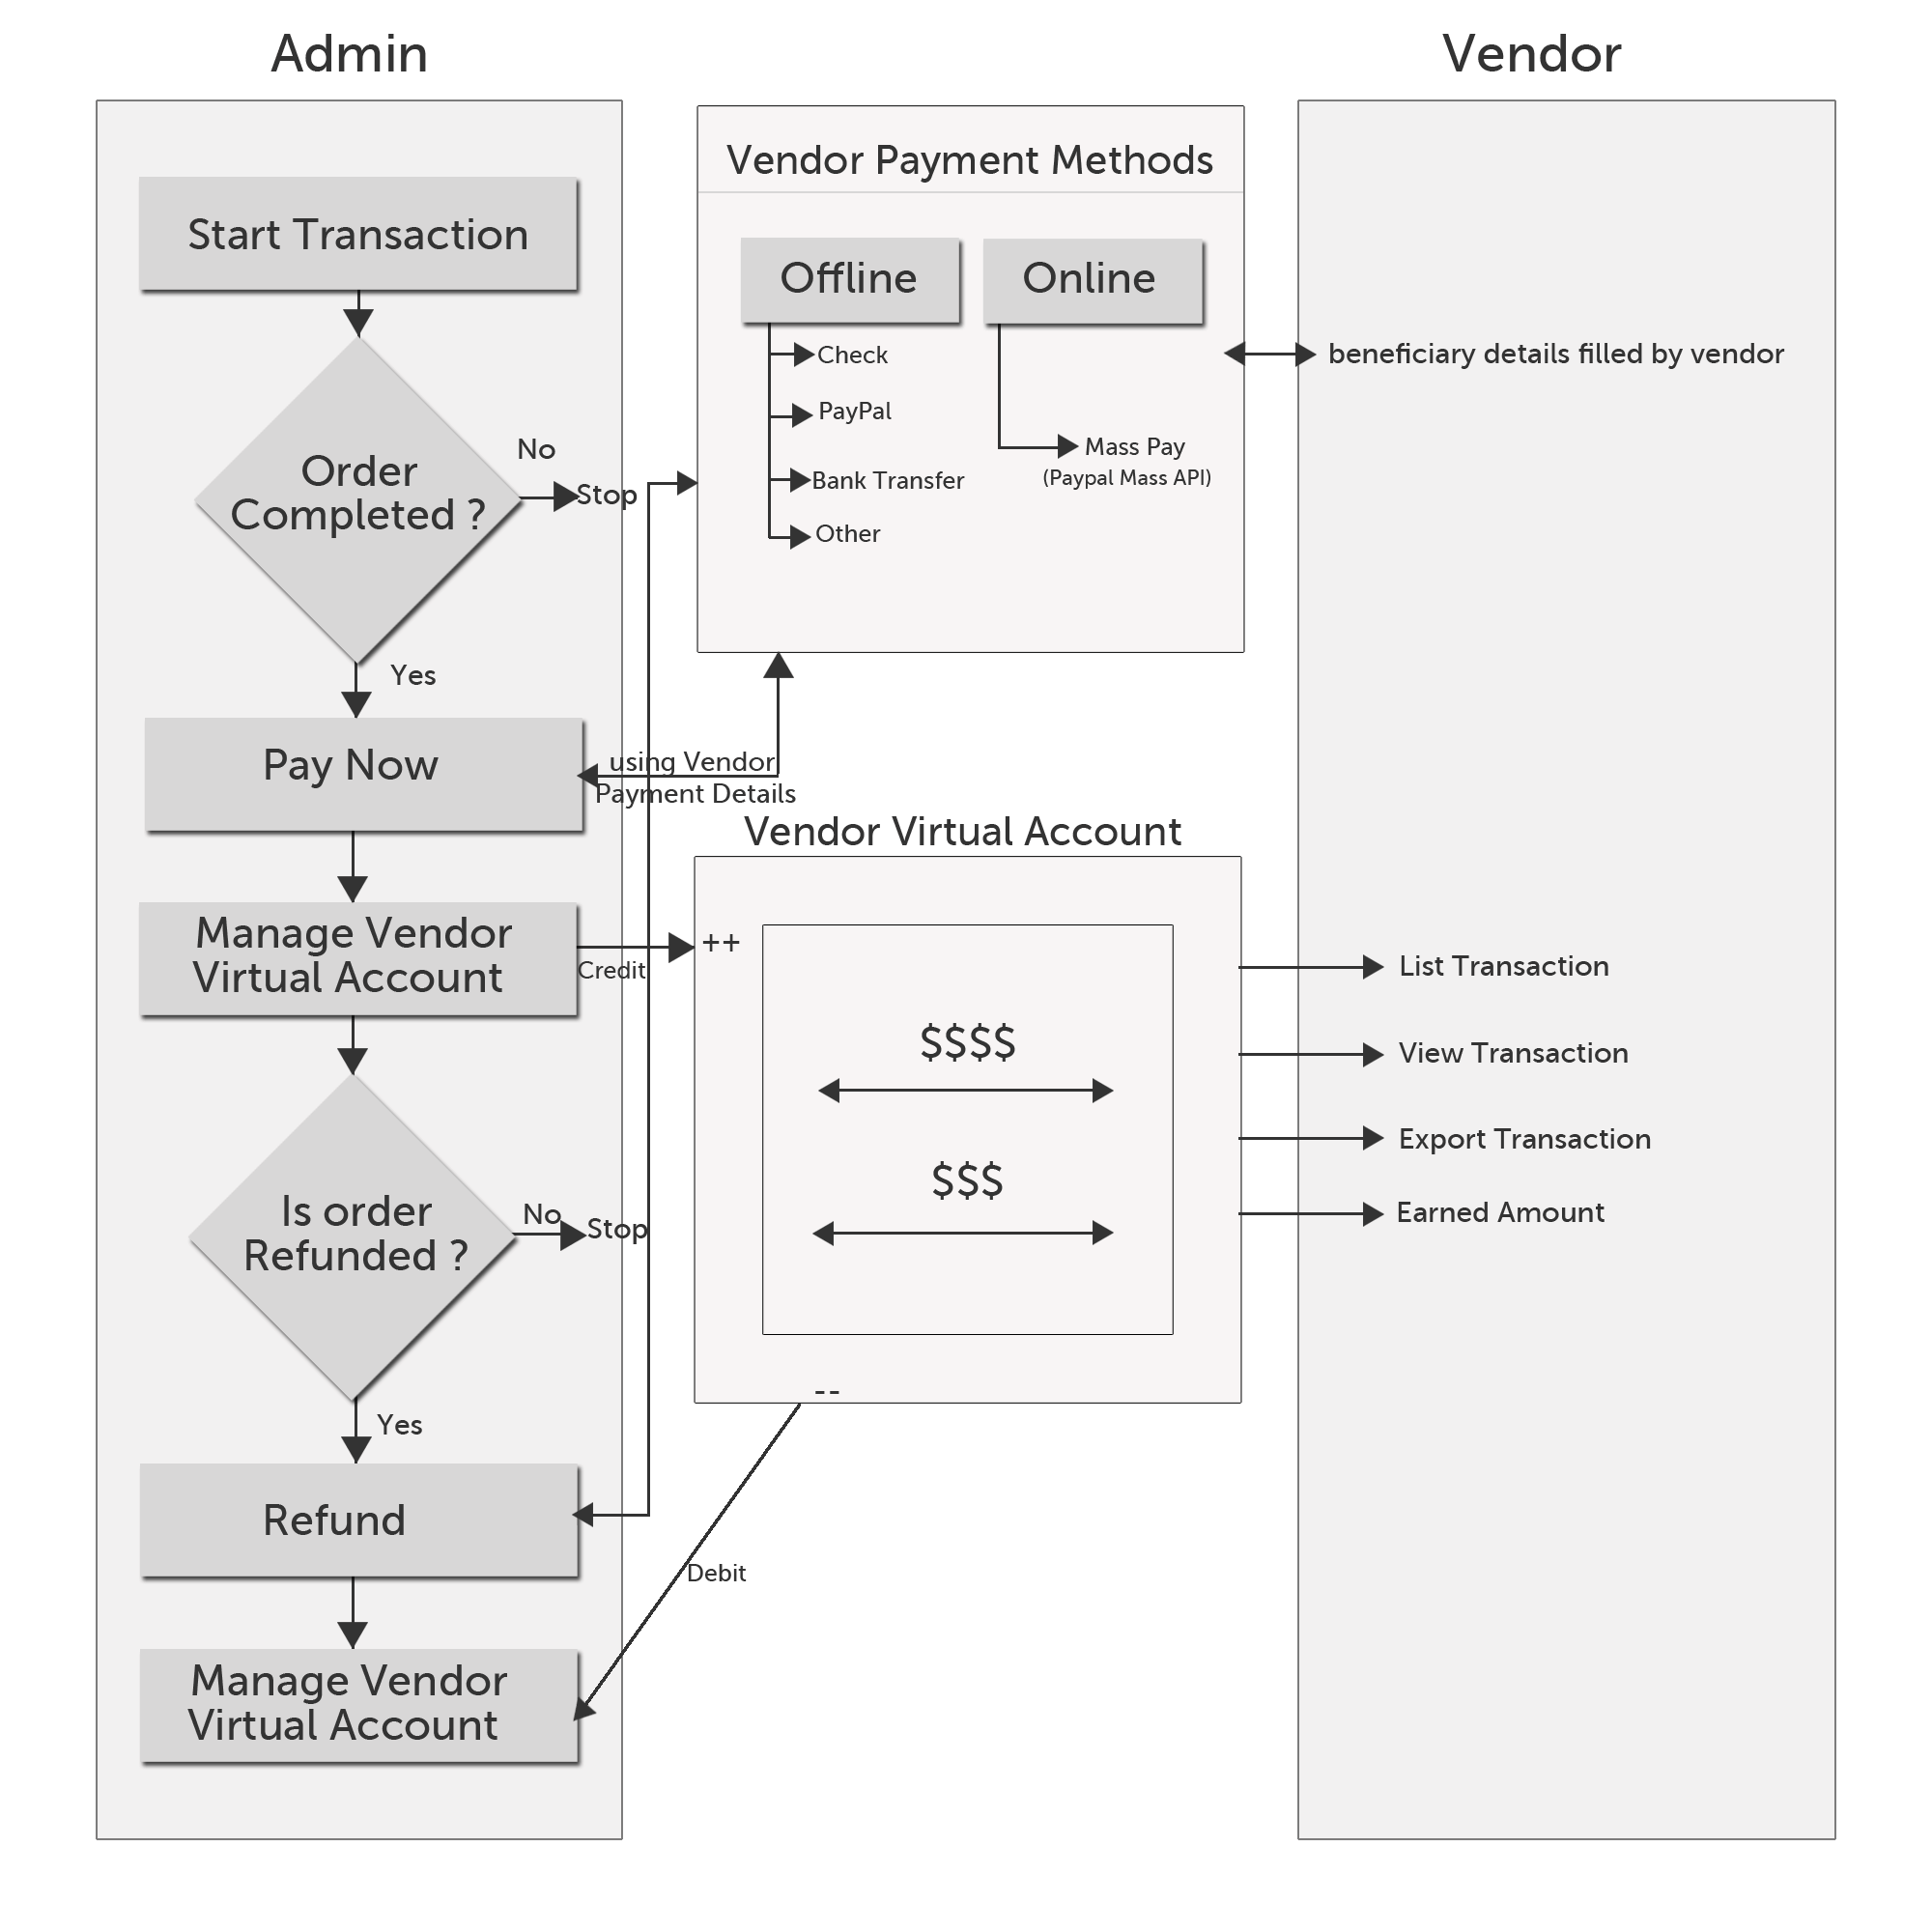
Transaction Settings are used for Admin to Vendor transaction purposes. Whenever the admin has to pay to the vendor then he/she can go to the Transaction Panel and click the Credit Amount or Debit Amount button as per the requirement
Transactions can be made Vendor-wise or Order-wise. In vendor-wise transactions, the Admin can pay to each vendor at a time i.e. one vendor at a time whereas in order-wise transactions the admin can select all the orders of a particular vendor and for pay for them at once. Admin can deduct his commission and pay the remaining amount to the vendor
Refund can also be done by the Admin in case a Refund Request has been generated by the customer. In such a case the Admin has to first generate the Credit Memo of the respective order and then he can Debit the required amount from the vendor’s account
All the transactions carried out are offline transactions for online transaction Vendor PayPal Adaptive Addon can be used
Shipping Settings
This section is for the vendor. Here the vendor has to specify his/her Origin Address i.e the Company Address from where the products will be shipped. This functionality can be achieved by Vendor MultiShipping Addon which acts as a container for all types of shipping methods. Therefore, for using any shipping addon Vendor MultiShipping Addon has to be pre-installed.
Shipping Methods
Vendor can use the available Shipping Methods from the Settings > Shipping Methods settings section in his/her vendor panel.
It displays shipping method-wise settings from where the vendor can set the item-wise or order-wise shipping rates, allowed countries or export the details from csv depending upon the shipping method
Vendor Profile View on Shop Page
The marketplace page displays the shop of every vendor clicking on which the dedicated shop page of the respective vendor gets displayed.
This page shows the relevant profile information of the vendor and his/her contact details as well so that the customers can have an idea about the background of the vendor like his Company details, company logo, banner, company address, telephone number, email-id, social media url (if any), etc
Catalog Management
Product's Types
From vendor panel, the vendor has the ability to create all the types of products, i.e. the types of products that the merchant (store admin) can create from the admin panel, all those types of products can be created from the vendor panel at frontend.
*Configurable, Bundle and Grouped products can only be created after installing Vendor Product Addon.Product's Attribute Sets
Every vendor gets an attribute set. When the vendor will create an attribute from the vendor panel for his products, then that attribute will be assigned to this particular attribute set. This way each vendor has his own set of attributes for his product.
* This feature will be available only after installing Vendor Product Attribute Add-onProduct's Attributes
Vendor can create an attribute for his products from the vendor panel. While creating the attribute, the vendor can select the attributes assigned to him for being a vendor. During product creation vendor can use the attribute set to assign the newly created attributes to his products.
Product's Pricing
From the vendor panel, vendor can assign the price to the products in the same way as the admin does. It has all the necessary fields for setting the price of a product similar to the product pricing section in the admin panel.
Product's Inventory
Vendor can do the inventory settings similar to the default Magento inventory settings.
*After installing the Product Addon you will get the inventory section as in the default Magento.Product's Catgeories
Vendor can assign the products to the available categories created by the store admin. This way vendor’s products will also get listed according to the store’s categories.
Product's Websites
As mentioned in the above topic i.e. Vendor Website Sharing, Vendor class is the extended form of customer class and customer can share all the websites/specific websites as per admin settings. So as per the admin settings of sharing, the vendor can share his/her products for all the websites/specific websites.
Product's UpSells
This functionality is similar to the default Magento functionality, but in this the vendor can select from his products only i.e. the products created by him.
Product's CrossSells
Its functionality is similar to the default Magento functionality, but in this the vendor can select from his products only i.e. the products created by him.
Related Products
Its functionality is similar to the default Magento functionality, but in this the vendor can select from his products only i.e. the products created by him.
Product's Custom Options
Its functionality is similar to the default Magento functionality i.e. the vendor can create the custom options in a similar fashion as the admin does.
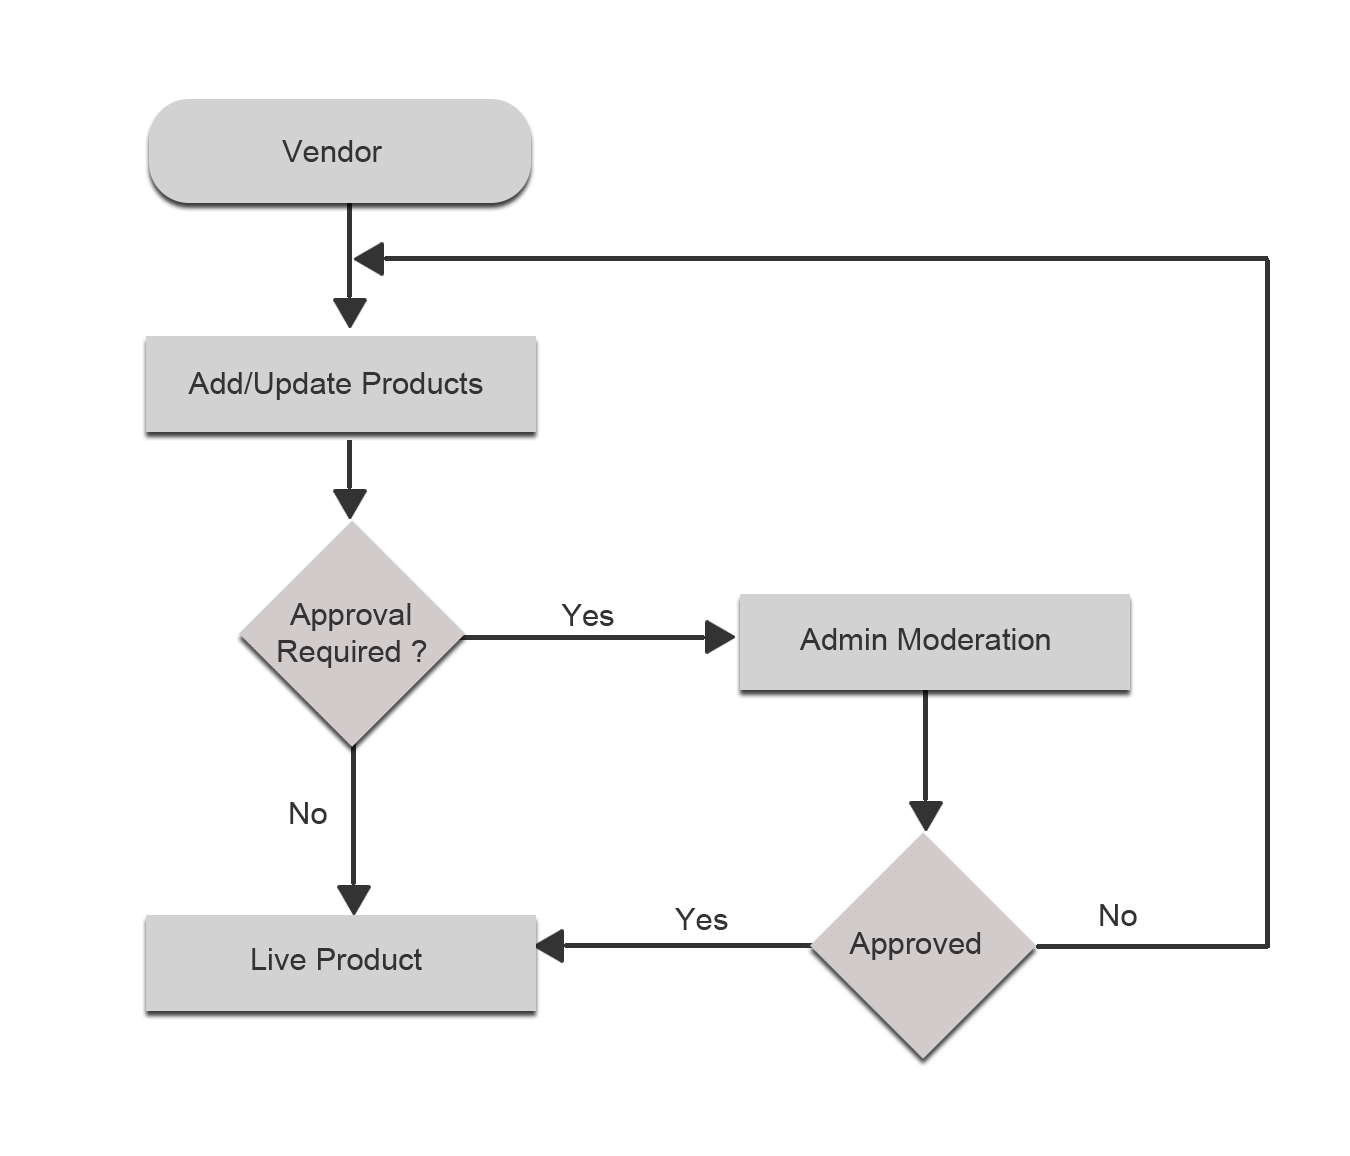
Admin Moderation
Admin has the power to control as many vendor functionalities as he wants. For instance, without admin approval the vendor products are not shown at frontend. Like this there is much other functionality which can be controlled by the admin.
Vendor Product Collection on Shop Page
When a vendor creates a product to show on his shop page, firstly it goes to the admin for approval, and after admin approval the product starts appearing on the shop page. The customer can then easily see the product on the shop page of the vendor
Order Lifecycle
Multi-Vendor Marketplace Order Lifecycle
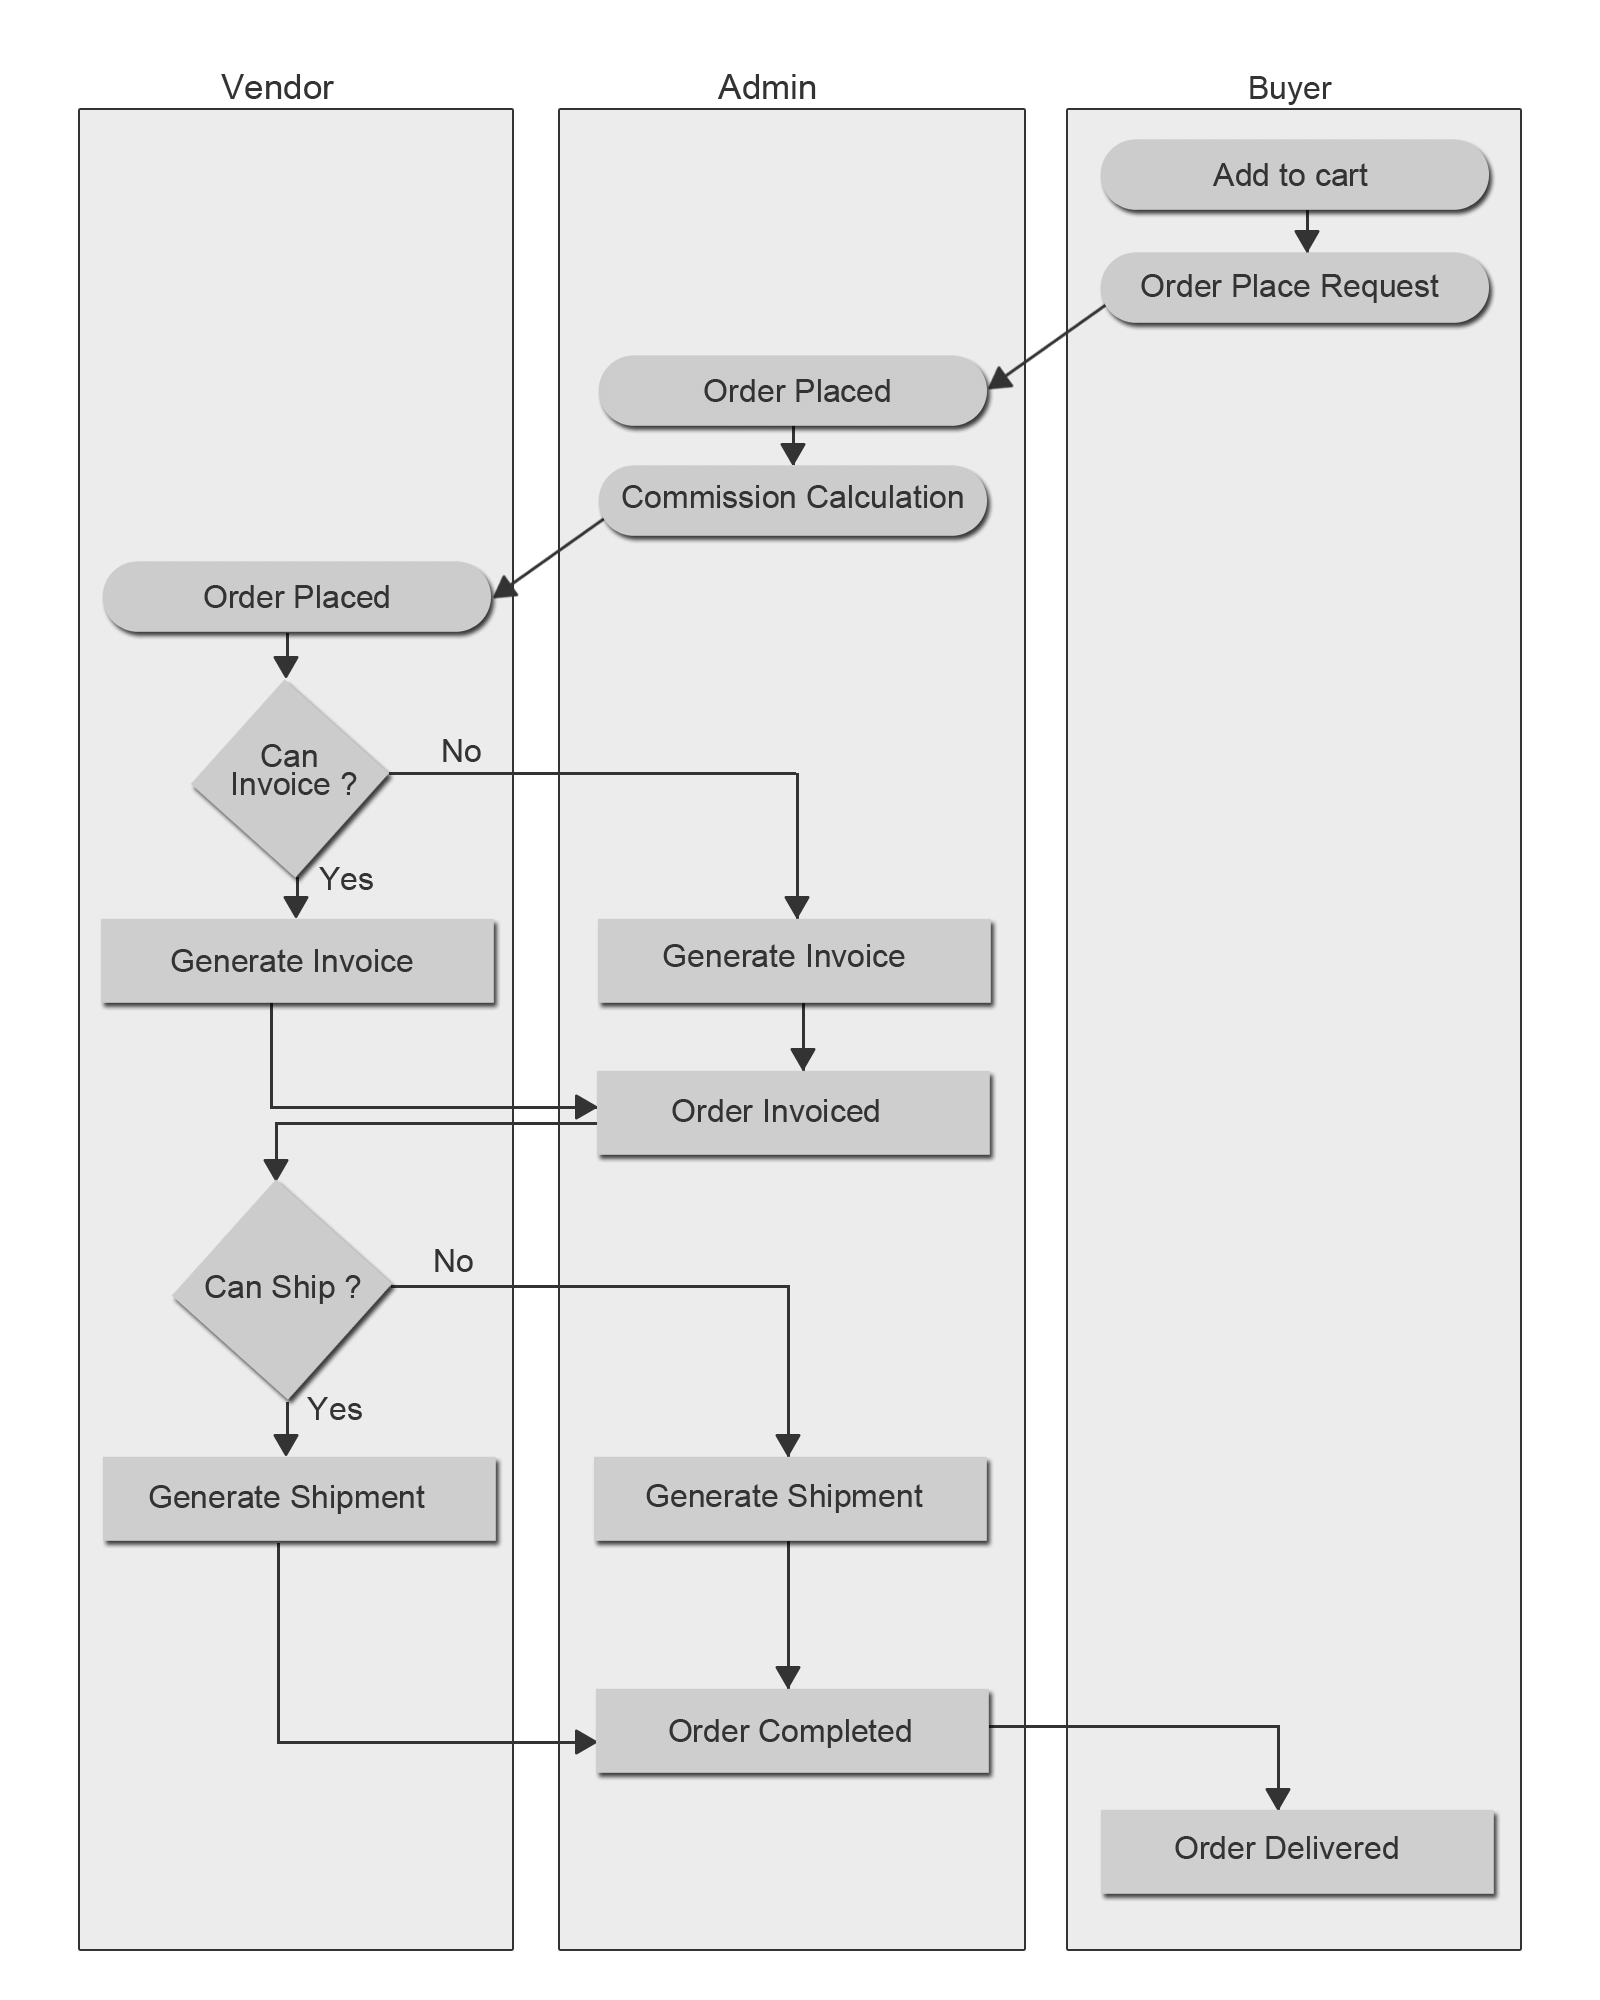
Place an Order
CedCommerce Multi-Vendor Marketplace is providing a feature where different sellers can come together and sell their products on the digital marketplace. Any customer can order different sellers products in a single order. Any cart can be associated with multiple vendor's products.
Here the orders can be placed in two ways-
1) Merge Orders-
These are the orders which contain different vendors’ products and in this case only one Magento order is placed.
Demonstrative Example-
Suppose there are Three vendors "Vendor-A", "Vendor-B" and "Vendor-C" these vendors one product from each vendor has been added to the cart by any customer. Now if the customer placed order for these Vendor's product then finaly one magento order is being placed like Magento order 1000009.
1) Split Orders-
In this case when different vendors’ products are ordered in a single order then different Magento orders are placed and this depends on the number of vendors’ products added to cart.
Demonstrative Example-
Suppose there are three vendors "Vendor-A", "Vendor-B" and "Vendor-C" one product of each vendor has been added to the cart by a customer. Now, if the customer has placed an order for these Vendors’ products then different Magento orders are placed like Magento order 1000007, 1000008, 1000009. Magento order count is propotional to the count of vendors’ product added to the cart.
Commission Distribution
Commission distribution is an important part in any marketplace. If the Admin has launched his/her marketplace then he will get the commission, and the vendors will get the payments for their sold products.
Admin of any Magento store can create the commission rates by going to the System Configuration or CsMarketplace menu CsMarketplace > Vendor Configuration > Vendor Payment (fields). The rates can be managed as fixed or percentage. This commission will be paid to the admin and the rest of the payment is made to the vendor.
Create Invoice
Any vendor can create the invoice of any product sold by him. Here the requirement is that he needs to install Vendor Order Addon. After installing this extension, the shipping charges have to be applied by the vendor to be eligible to create the invoice. If only Multi-Vendor Marketplace Basic (free) version is used then the invoice can be generated by the admin only.
Create Shipment
Any vendor can create the shipment of any product sold by him. Here the requirement is that he needs to install Vendor Order Addon. After installing this extension, the shipping charges have to be applied by the vendor to be eligible to create the shipment. If only Multi-Vendor Marketplace Basic (free) version is used then the shipping can be generated by the admin only.
Create Credit Memo
Credit Memo means refund of any order. Any vendor can create the Credit Memo of any product sold by him. Here the requirement is that he needs to install Vendor Order Addon. If only Multi-Vendor Marketplace Basic (free) version is used then the credit memo can be generated by the admin only.
Commission Calculation
The calculation of commission in Multi-Vendor Marketplace Basic extension is very easy and accurate. The commission can be applied as Fixed rate or Percentage-wise rate by the admin from Vendor Configuration settings in the admin panel.
To apply enhanced miscellaneous commission rates, Vendor Commission Addon can be used. This addon will allow the admin to impose Product Type-wise or Category-wise commission rates with the feature of min/max rule. The admin will thus, be able to earn more profit in the form of commission with the use of Commission Addon
Transaction Lifecycle
Transaction Overview
Transaction is a very important part of CedCommerce Multi-Vendor Marketplace. Marketplace is a platform where different vendors come together and sell their products on commission basis. So after deducting admin commission the remaining payment will be given to the vendor. The commission can be dependent on the marketplace commission settings. Multi-Vendor Marketplace commission settings can be extended by installing the Vendor Commission Addon. It is the responsibility of the admin to release the vendor payments when the order related to the any vendor is placed. Admin will credit the payment to the vendor’s account from the transaction panel.
Transaction List
Admin can view the vendor’s transaction list from the admin panel by going to CsMarketplace > Vendor Transactions
Transaction list can be categorized into two types-
Credit Amount
Credit Amount is the process in which the payment is made to the vendor. The vendor will get the payment after the successful invoice generation and completion of the orders. Admin can also make the payment to the vendors from Vendor Orders grid. If any one of the vendor’s products is successfully invoiced then the admin can release the payment to the vendors. Admin will get the Pay Now button on the successful invoicing of any vendor’s product.
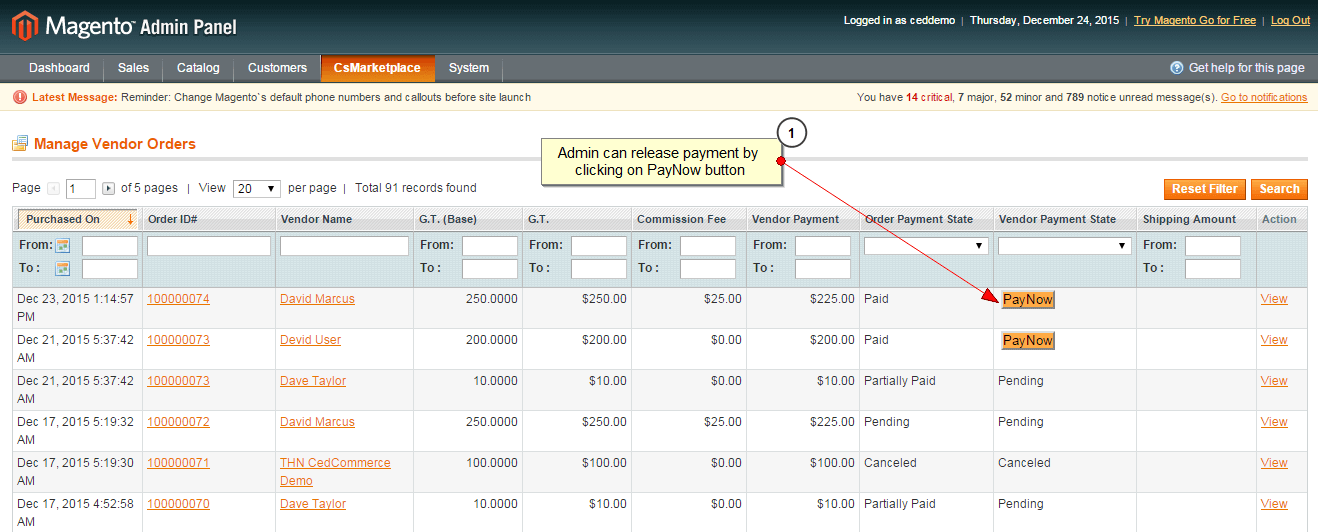
Note: To make the payment product wise - If in an Order there are multiple products and we invoiced only one product then Pay Now button will be visible to make the payment to the respective vendor and this can be achieved by Vendor Order Addon.
Debit Amount
Debit Amount is the process in which the payment is debited from the vendor’s account. This condition will arise only in certain cases where any payment has been made to the vendor for some order and after that the refund request has been generated by the customers. In this case the admin has to create the Credit Memo then only the Refund Now button will appear. Refund Now button can be seen in the Vendor Order list panel.
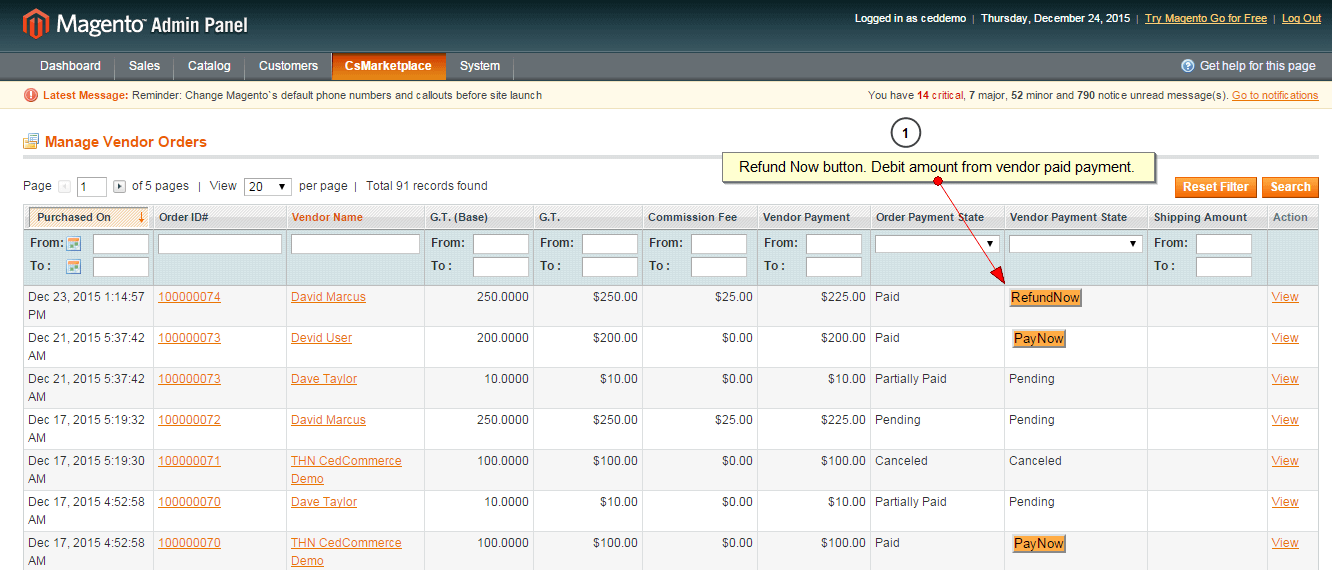
Note: To make the refund product wise - If in an Order there are multiple products and we created the credit memo only for a single product then the Refund Now button will be visible to Debit the amount from the respective vendor.
Transaction List (Vendor View)
Vendor can view the Transaction List from the vendor panel. Vendor can view the Credited as well as Debited Amount easily from their vendor panel. Vendor can go to the transactions section in his vendor panel from Vendor Panel > Transactions. It will list all the transactions of the vendor.
RMA Lifecycle
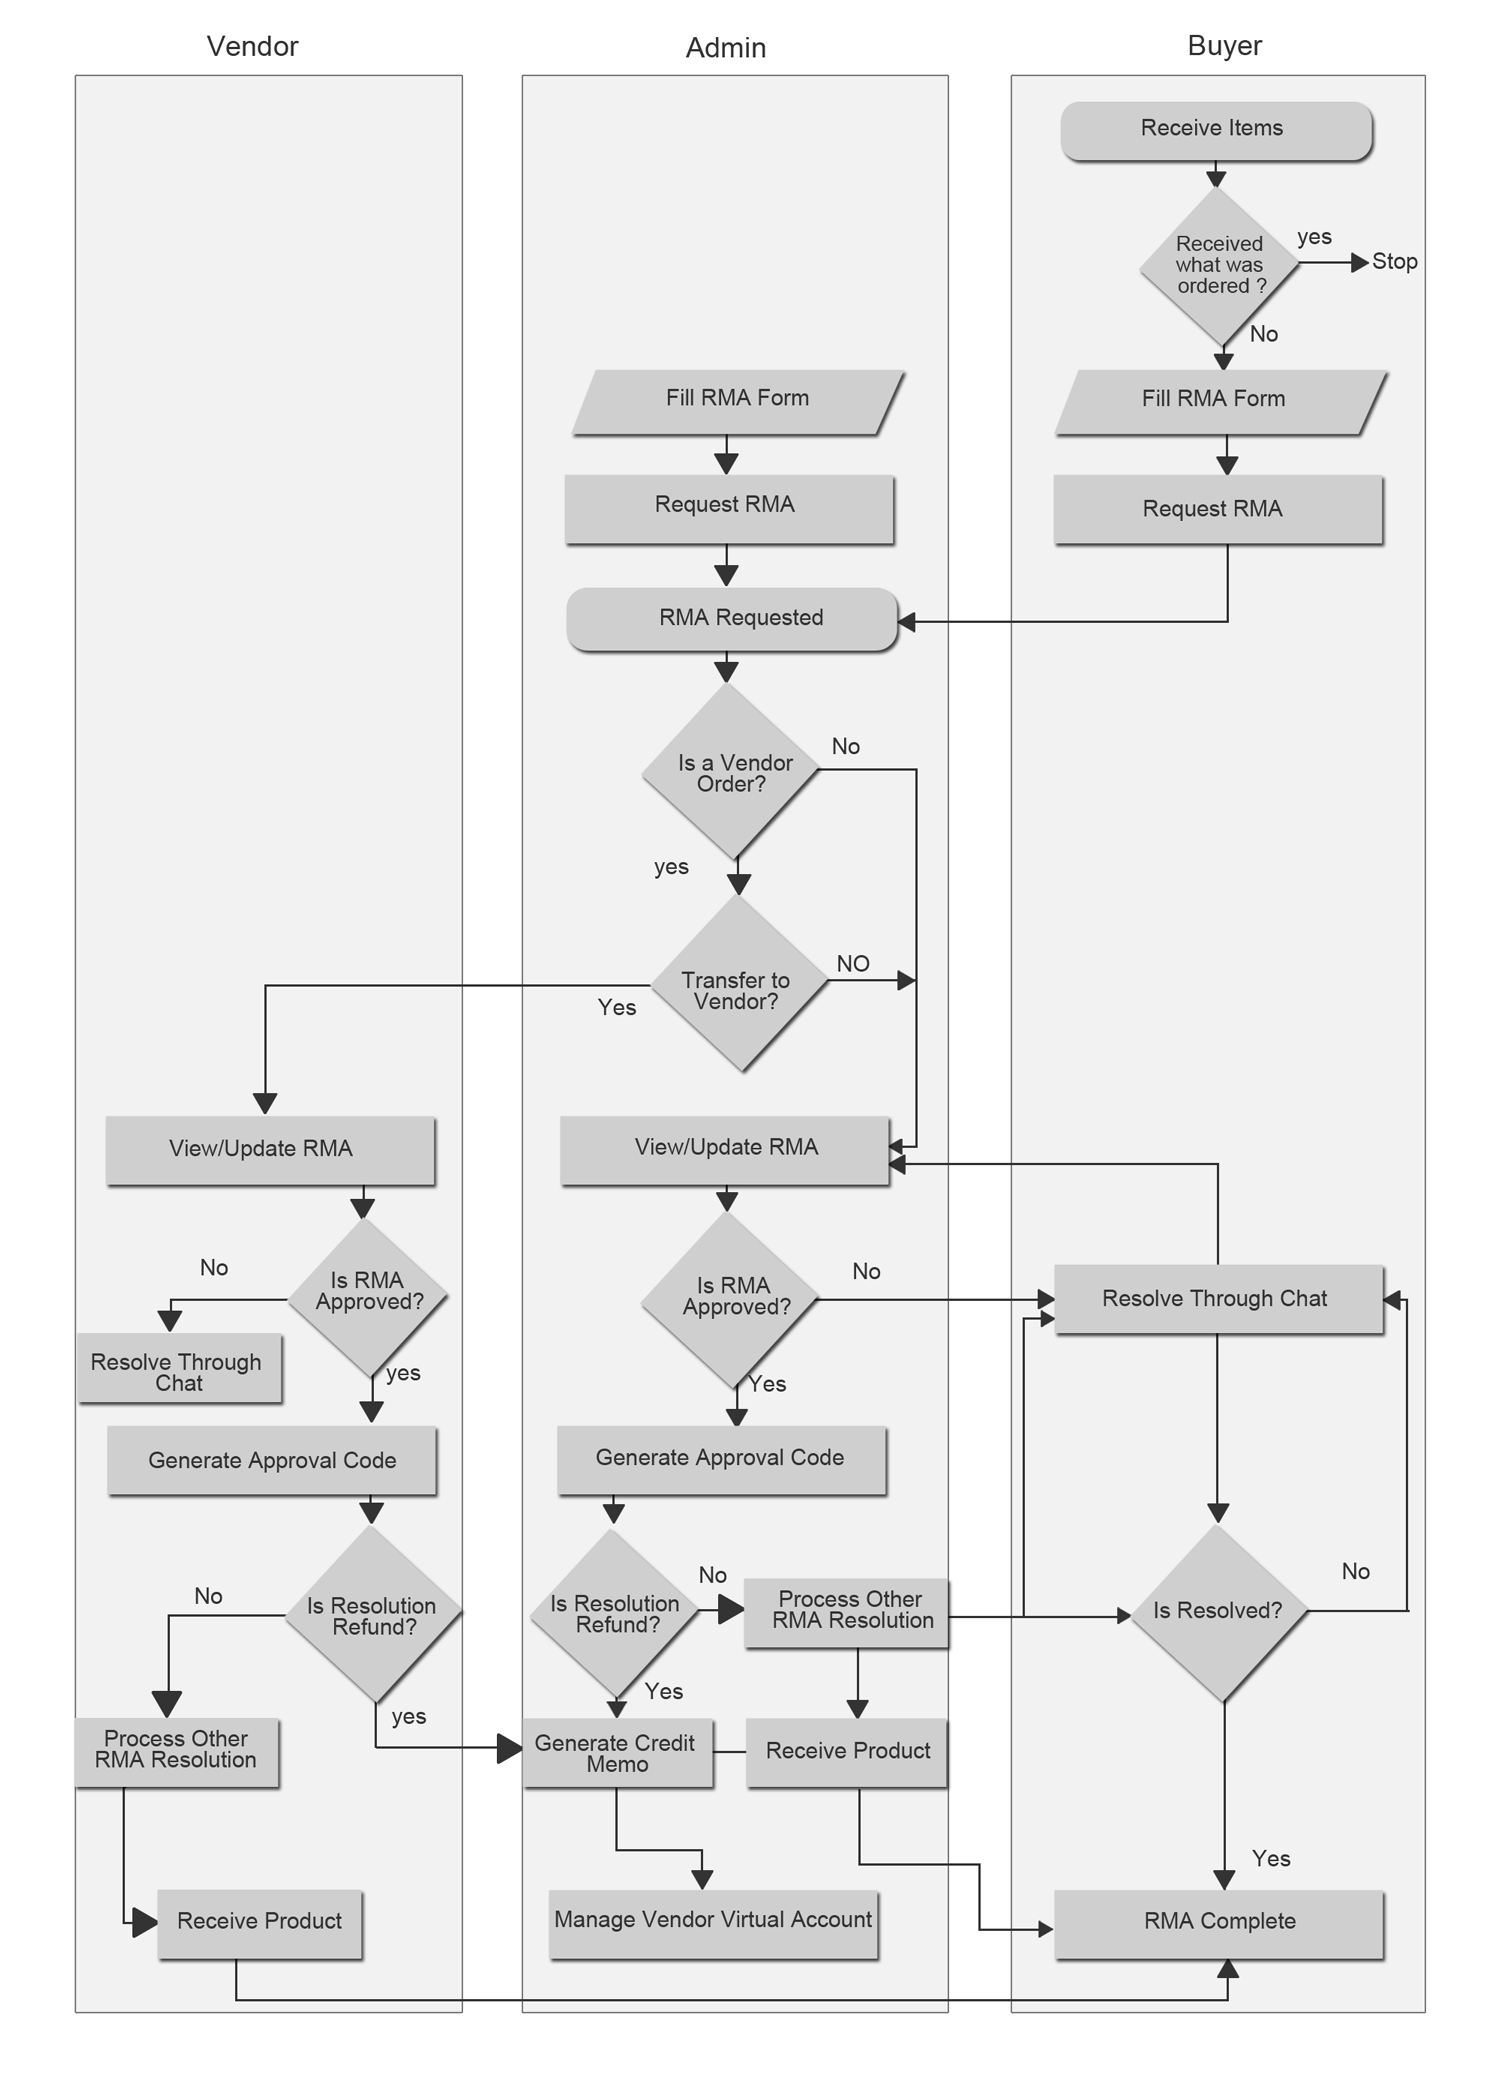
Multi-Vendor Marketplace RMA Lifecycle
Request RMA
CedCommerce Multi-Vendor Marketplace supports RMA Lifecycle for any Magento Multi-Vendor Marketplace by using Vendor RMA-Product Return Addon. Any customer can request RMA for the orders placed product wise by selecting any number or group of products in any completed order. The administrator can also generate the RMA of any product from his admin panel due to any cause such as:
after a customer complain from any other source like a customer service call, or a seller/manufacturer reports a defect in the delivered products and wishes to exchange the product, etc.
Here the RMA can have the following situations:
1) RMA has Administrator's Products-
If the selected Product(s) belongs to the administrator then only he is responsible for handling and communicating with the customer related to RMA.
2) RMA has only one Vendor-
If the selected Product(s) in RMA belong to a particular vendor only, then as soon as an RMA is created a Notification is sent to the vendor informing about the RMA request and an RMA is added in his Vendor Panel. Now the vendor can see RMA related updates in his/her Vendor Panel.
3) RMA has multiple Vendors:
If the Order placed has multiple vendors’ products, it is also possible that the customer will select the products of multiple vendors for RMA. In such a case, different RMA requests are generated in Magento. It depends on how many vendors’ products have been added to RMA.
Whenever an RMA is requested by a Customer, a notification appears in the Admin Panel informing the Administrator about the RMA request.
Transfer to Vendor:
Administrator has the rights to transfer the RMA controls to the vendor. If the admin wishes he can set 'Automatic Transfer to Vendor' as 'yes' so that the RMA is automatically transferred to the respective vendor as soon as it is created. The admin can also figure out whether to transfer to vendor or not.
The vendor can update and edit the RMA only after the Admin has transferred it to the vendor. Moreover, the vendor can view the RMA Chats and reply to the customer only if the RMA was transferred by the admin. Otherwise, the Vendor will only be able to see the RMA details in his/her Vendor Panel.
RMA Chat
Vendor RMA provides a panel to the customers, vendors and the administrator to communicate and elaborate RMA conditions and reasons over a chat messaging system. It is a section where a customer can describe his/her reasons and the vendor can put up questions as it is often the case that the issues faced are due to lack in understanding the use of the product. Thus, this gives the three of them an opportunity to know each other’s perspective.
Approve RMA
The RMA with an 'approved' status signifies that whatever may have been requested in the RMA has been approved by the vendor/admin. In the case of default different RMA Resolution Requests we can have following conditions when RMA is approved:
1) "Repair" Products-
In case of combination of Repair and Approved a unique 'Approval Code' is generated and the admin can use this code for permitting any one Customer to send the product to the vendor by whatsoever medium the vendor wishes to fetch it.
Demonstrative Example-
Suppose that the vendor/admin provides a facility of door to door pickup of products, in that case the person collecting the items and the person returning can use this approval code as an authenticity for the other.
2) "Replace" Products-
In the case where the combination says “Approved Replaced Products”, a new order needs to be placed explicitly in the admin panel with the concerned amounts discount by admin itself for the exchanged product.
3) "Refund" Products-
If the request is to Refund Products and is approved, a credit memo is created in the admin panel for the concerned amount of the product.
Demonstrative Example-
Suppose the customer has ordered two products of X and Y amount and the amount totals to Z (X+Y=Z) in the placed order, then if the RMA is created for Product 1 of amount X, the Approved Refund will generate the Credit memo of amount X only.
Admin Specific RMA Name:
In many situations an administrator may find that the name 'RMA' or 'Vendor RMA' is not explanatory enough for any customer visiting the shop. Thus, the Vendor RMA addon provides the Admin the right to name this section as he desires from the admin panel and the vendors and customers see the RMA links with this given name.
RMA Mails:
The admin can choose to allow mail notifications when we create, update or chat in RMA through its configuration controls.